Angels Landing Permits and Chain Safety
Maya Lin
Maya Lin is a travel journalist and outdoor enthusiast who believes the best trips combine rugged adventures with urban comforts. After spending six years backpacking across four continents, she founded Trail & Town Guide to help fellow travelers navigate both hidden mountain passes and bustling city neighborhoods with confidence.
Angels Landing is the hike that shows up on everyone’s Zion mood board for good reason: tight switchbacks, canyon views that feel almost unfair, and that final razorback ridge where you grip chains and try not to think too hard about gravity.
It is also a hike that now requires planning. Since 2022, you need a permit to hike beyond Scout Lookout and onto the chain section. The good news is that the system is straightforward once you understand the timing, and there are excellent Plan B hikes that still deliver big Zion energy.
Angels Landing at a glance
- Start: The Grotto (Shuttle Stop 6), then West Rim Trail to Scout Lookout
- Distance: about 5.4 miles round trip (to the summit and back)
- Elevation gain: about 1,500 feet
- Time: commonly 4 to 6 hours moving time, plus breaks and shuttle logistics
- Difficulty: strenuous, with significant exposure on the chains
- Facilities: restrooms at The Grotto, and the last restrooms are at Scout Lookout
Note: Distance and timing can vary a bit depending on conditions and crowd flow. Always confirm current conditions with the National Park Service before you go.
Do you need a permit?
Yes, if you go past Scout Lookout to the chain section. Rangers often check permits near Scout Lookout and at the start of the chains.
- No permit needed to hike up West Rim Trail to Scout Lookout and turn around there.
- Permit required to continue from Scout Lookout onto Angels Landing (the chains and summit spur).
If someone in your group does not get a permit, the simplest approach is to all hike to Scout Lookout together, then only permitted hikers continue while the rest relax and enjoy the view.
Rules can change, so verify current requirements on the official NPS Angels Landing page and Recreation.gov before your trip.
How the lotteries work
Permits are distributed through Recreation.gov using two main lotteries. Exact windows, time slots, and rules can shift year to year, so treat the outline below as your map, then confirm specifics on Recreation.gov before you apply.
Seasonal lottery
This is for people who can plan their Zion dates in advance. You apply during the posted seasonal window, select potential dates, and get results before the season begins.
- Best for: travelers booking flights and Springdale lodging early
- Strategy: choose multiple acceptable dates and time slots to increase your odds
Day-before lottery
This is for last-minute tries. You apply the day before you want to hike and (typically) get results before the next day’s hiking window.
- Best for: road trippers, shoulder-season visitors, anyone with schedule flexibility
- Strategy: apply for a range of time slots you can realistically make, and have a backup hike ready
Permit costs
Permit fees are charged through Recreation.gov. At the time of writing, it is commonly a $6 application fee plus a $3 per person fee if you win. Fees and structures can change, so confirm the current amounts right before you apply.
Time slots
Permits are typically issued for a time window to start the chain section. Think of it like timed entry for the most congested part of the route.
- Earlier is calmer: cooler temps and fewer bottlenecks on the ridge.
- Midday is hottest: summer heat on exposed rock can be brutal and risky.
- Afternoon can be windy: gusts often pick up, and that matters on a narrow spine.
Important: Carry your permit (digital or printed) and photo ID. Group sizes, name changes, and transfer rules can vary, so check the current Recreation.gov rules for what is allowed.
Timing for a day trip
Most Angels Landing stress comes from underestimating Zion logistics, not the hiking itself. Here is a practical day-visitor flow that keeps you ahead of crowds.
Step 1: Shuttle and trailhead
For much of the year, Zion Canyon Scenic Drive is shuttle-only for most visitors. Shuttle operations are seasonal and can change, so check the current shuttle schedule on the NPS site.
- Trail start: get off at Shuttle Stop 6 (The Grotto) to access the West Rim Trail and the Angels Landing route.
- Budget time for: parking, shuttle queue, shuttle ride, and walking to the trailhead.
- Target: arrive early morning to reduce heat, lines, and chain-section traffic.
Step 2: Time estimates
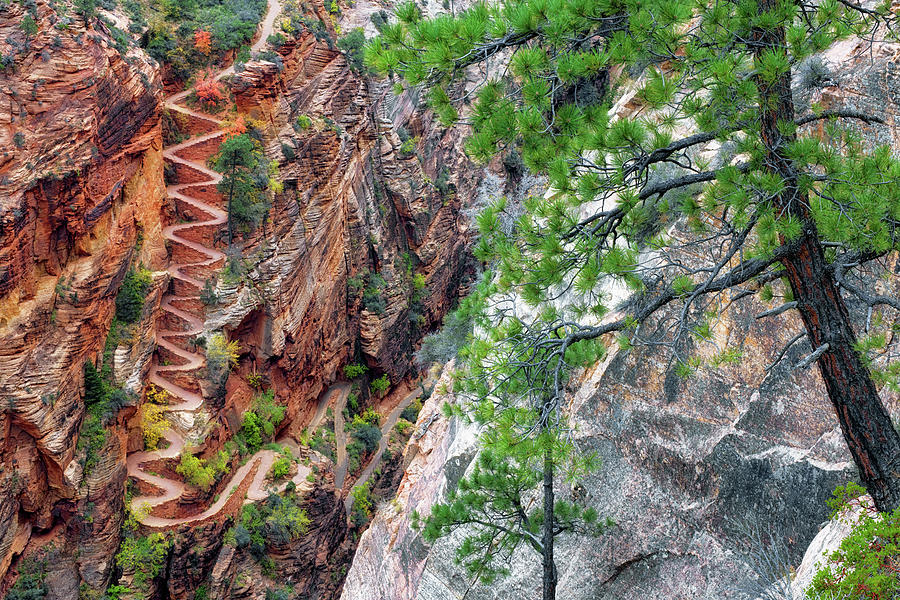
- To Scout Lookout: commonly 1.5 to 2.5 hours up for many hikers, depending on breaks and crowding on Walter’s Wiggles.
- Scout Lookout to summit (chains): often 30 to 60 minutes each way, depending heavily on traffic and comfort on exposure.
- Round-trip total: many day hikers land around 4 to 6 hours moving time, plus breaks and shuttle time.
If your permit window is later, you can hike to Scout Lookout early, snack, hydrate, and wait for your slot. Bring patience. This is a popular ridge, and sometimes the pace is dictated by the line, not your legs.
What to pack
Angels Landing is short on miles but big on consequences. Pack like you might be stuck behind slow traffic on exposed rock longer than expected.
Essentials
- Water: more than you think you need, especially in warm months. There is little shade and no water on trail.
- Food: salty snack plus something substantial for Scout Lookout.
- Footwear: trail runners or hiking shoes with reliable grip. Slick soles and wet sandstone are a bad combo.
- Sun protection: hat, sunglasses, sunscreen. The canyon reflects light.
- Layers: mornings can be cool, ridge winds can surprise you even on sunny days.
- Headlamp: smart insurance if you start early or finish late.
- Small first aid: blister care is the MVP.
Nice-to-have for the chains
- Light gloves: for comfort on chains, especially in cold weather. Grippy work gloves are great if they fit well.
- Trekking poles: helpful to Scout Lookout, but many hikers stow them before the chains to keep hands free.
- Phone strap or secure pocket: the easiest way to avoid dropping your camera into the canyon.
- Winter traction: if conditions are icy, microspikes are a common choice. Ask a ranger what is appropriate that day.
My rule for Angels Landing: if something requires two hands to manage, it is not coming onto the ridge with me. Secure it before the chains start.
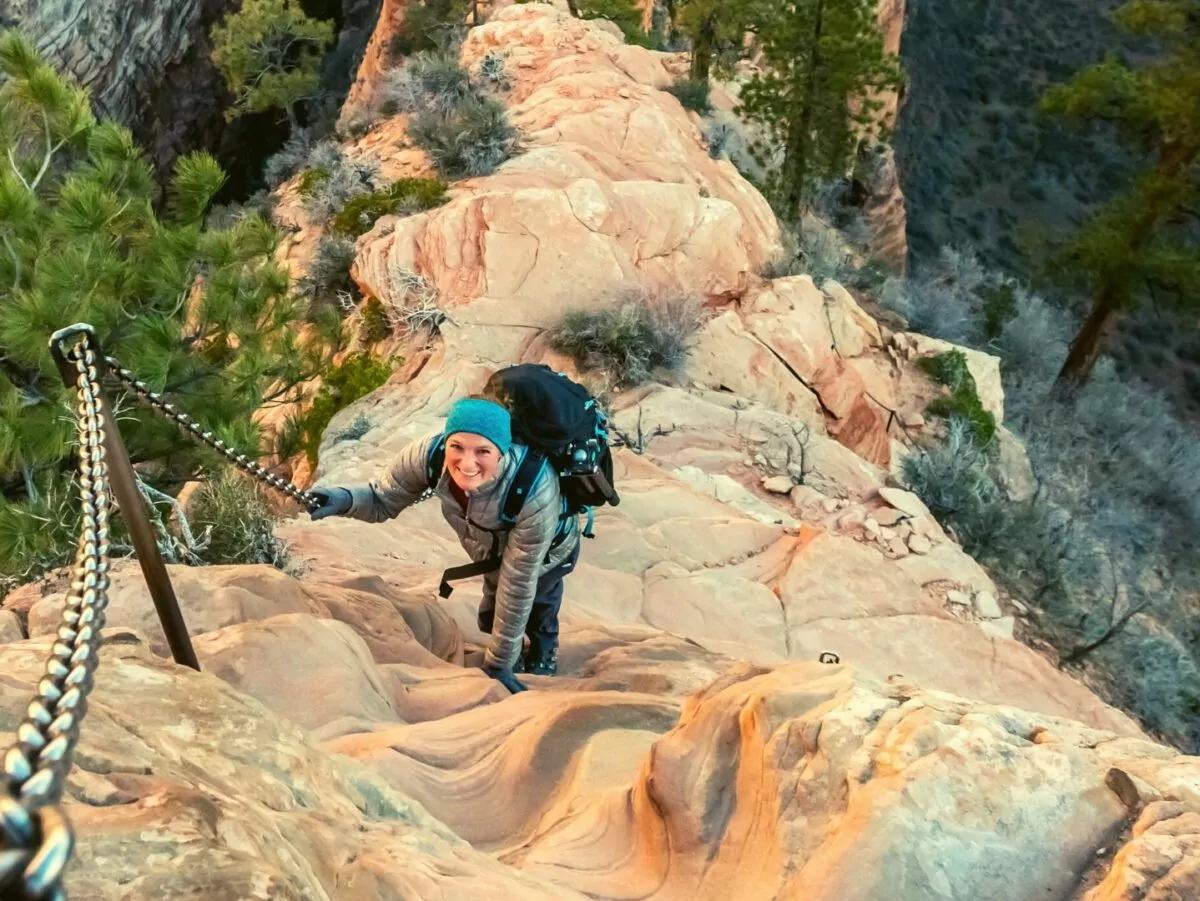
Chain safety
You do not need to be fearless to hike Angels Landing. You do need to be honest with yourself, move deliberately, and respect the reality that people make unpredictable choices in crowded places.
Chain checklist
- Three points of contact: keep two feet and one hand, or two hands and one foot, stable before shifting.
- Hands first: if you need to pass someone, wait for a wider spot. Do not squeeze by on the narrowest ledges.
- One person per anchor zone: avoid bunching up where the chain is fixed to the rock.
- Keep your center low: a slightly bent-knee stance improves balance.
- Let faster hikers go: step into a wider turnout and allow passing when you feel stable.
- Secure loose items: hats, bottles, phones. Dropped gear becomes a hazard.
- Watch for polished rock: high-traffic spots can be slick, especially with sand, rain, or frost.
- No storms: lightning and gusty winds are non-negotiable turn-around signals.
Smart turn-around points
There are several natural decision points where you can assess comfort and conditions.
- Refrigerator Canyon: if the climb already feels overwhelming, it may not get better higher up.
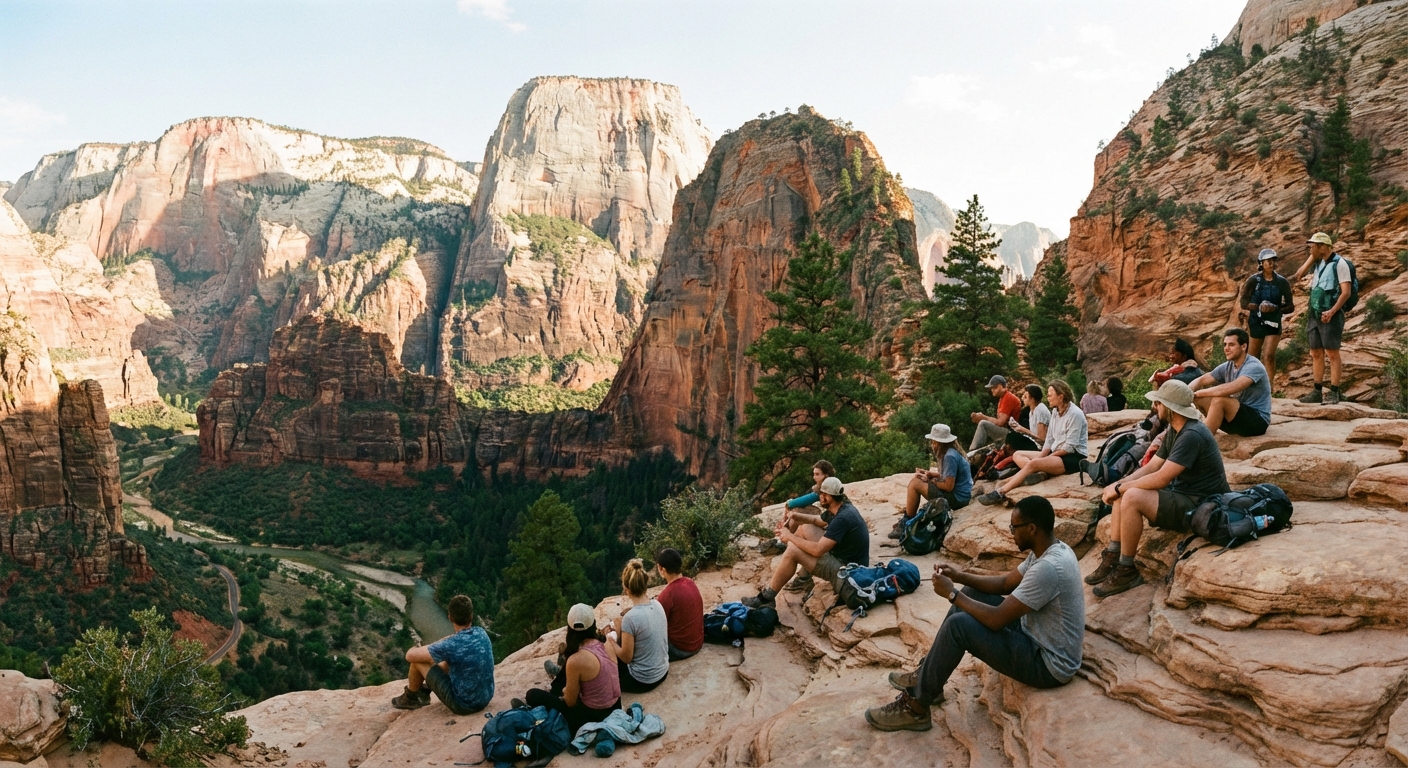
- Scout Lookout: the best no-permit-needed finish line. Big views, space to rest, and the last restrooms.
- Start of the chains: pause, watch the flow for a minute, and decide. If your heart is pounding before you even step onto the ridge, turning around is the right call.
- First narrow fin: if exposure triggers panic, stop early. Most accidents happen when people push through fear rather than responding to it.
If you do turn around, move carefully and communicate. A calm “I’m going to wait here and come back when it’s clear” does wonders in a crowded corridor.
Weather and closures
Zion conditions can shift fast. The chain section is exposed and becomes dramatically more dangerous when wet, icy, or windy.
Turn-back triggers
- Thunderstorms and lightning: avoid ridgelines and exposed rock.
- High winds: gusts can destabilize even experienced hikers.
- Ice or snow: traction devices may be necessary in winter conditions, and even then the ridge may be unsafe for many people.
- Heavy rain: slick sandstone plus crowding is a rough combo.
- Extreme heat: summer heat illness risk is real, especially mid-day.
Check the National Park Service Zion conditions update before you go, and ask a ranger if you are unsure. If the park closes the route, respect it. The canyon always gets the last word.
No permit? Do this instead
Striking out on permits stings, but it does not have to derail your day. Here are hikes that deliver huge views without the same permit bottleneck.
Scout Lookout
Do the classic climb, take in the view, and call it a win. For many visitors, Scout Lookout is the perfect blend of thrill and comfort.
Observation Point
Observation Point offers a top-down perspective that many people like even more than Angels Landing. The traditional main-canyon approach via Weeping Rock has been closed long-term due to major rockfall, so access is most commonly via routes like East Mesa (outside the main canyon). Trailhead access can involve rough roads or private land logistics depending on current conditions, so verify your route before you drive out.
The Narrows
Trading chains for river walking is a very Zion move. The Narrows experience depends heavily on water level and flash flood risk, so check conditions and closures the day of. Outfitters in Springdale rent boots, socks, and a walking stick if you want to go full comfort mode.
Canyon Overlook
When you want high reward with minimal time, Canyon Overlook is a favorite. Parking is limited, so sunrise and later afternoon tend to be your best bet.
West Rim Trail
If you have the legs and want fewer people, continuing up the West Rim Trail (staying off the Angels Landing spur if you do not have a permit) can feel wonderfully spacious.
Quick checklist
- Apply for the seasonal lottery if your dates are set, or the day-before lottery if you are flexible.
- Confirm permit fees, time slots, and rules on Recreation.gov right before you apply.
- Check the current Zion shuttle schedule and build your day around it.
- Get off at Shuttle Stop 6 (The Grotto) to start the hike.
- Start early to reduce heat and crowd stress.
- Pack water, food, sun protection, and a layer for wind.
- At Scout Lookout, reassess weather, crowding, and nerves before committing to the chains.
- If conditions feel wrong, turn around and choose a backup hike. Zion has options.
Angels Landing is unforgettable, but the best story is the one where you come home safe, still hungry for your next trail and maybe a good coffee in Springdale afterward.