Best Day Hikes in Yosemite for Every Skill Level
Maya Lin
Maya Lin is a travel journalist and outdoor enthusiast who believes the best trips combine rugged adventures with urban comforts. After spending six years backpacking across four continents, she founded Trail & Town Guide to help fellow travelers navigate both hidden mountain passes and bustling city neighborhoods with confidence.
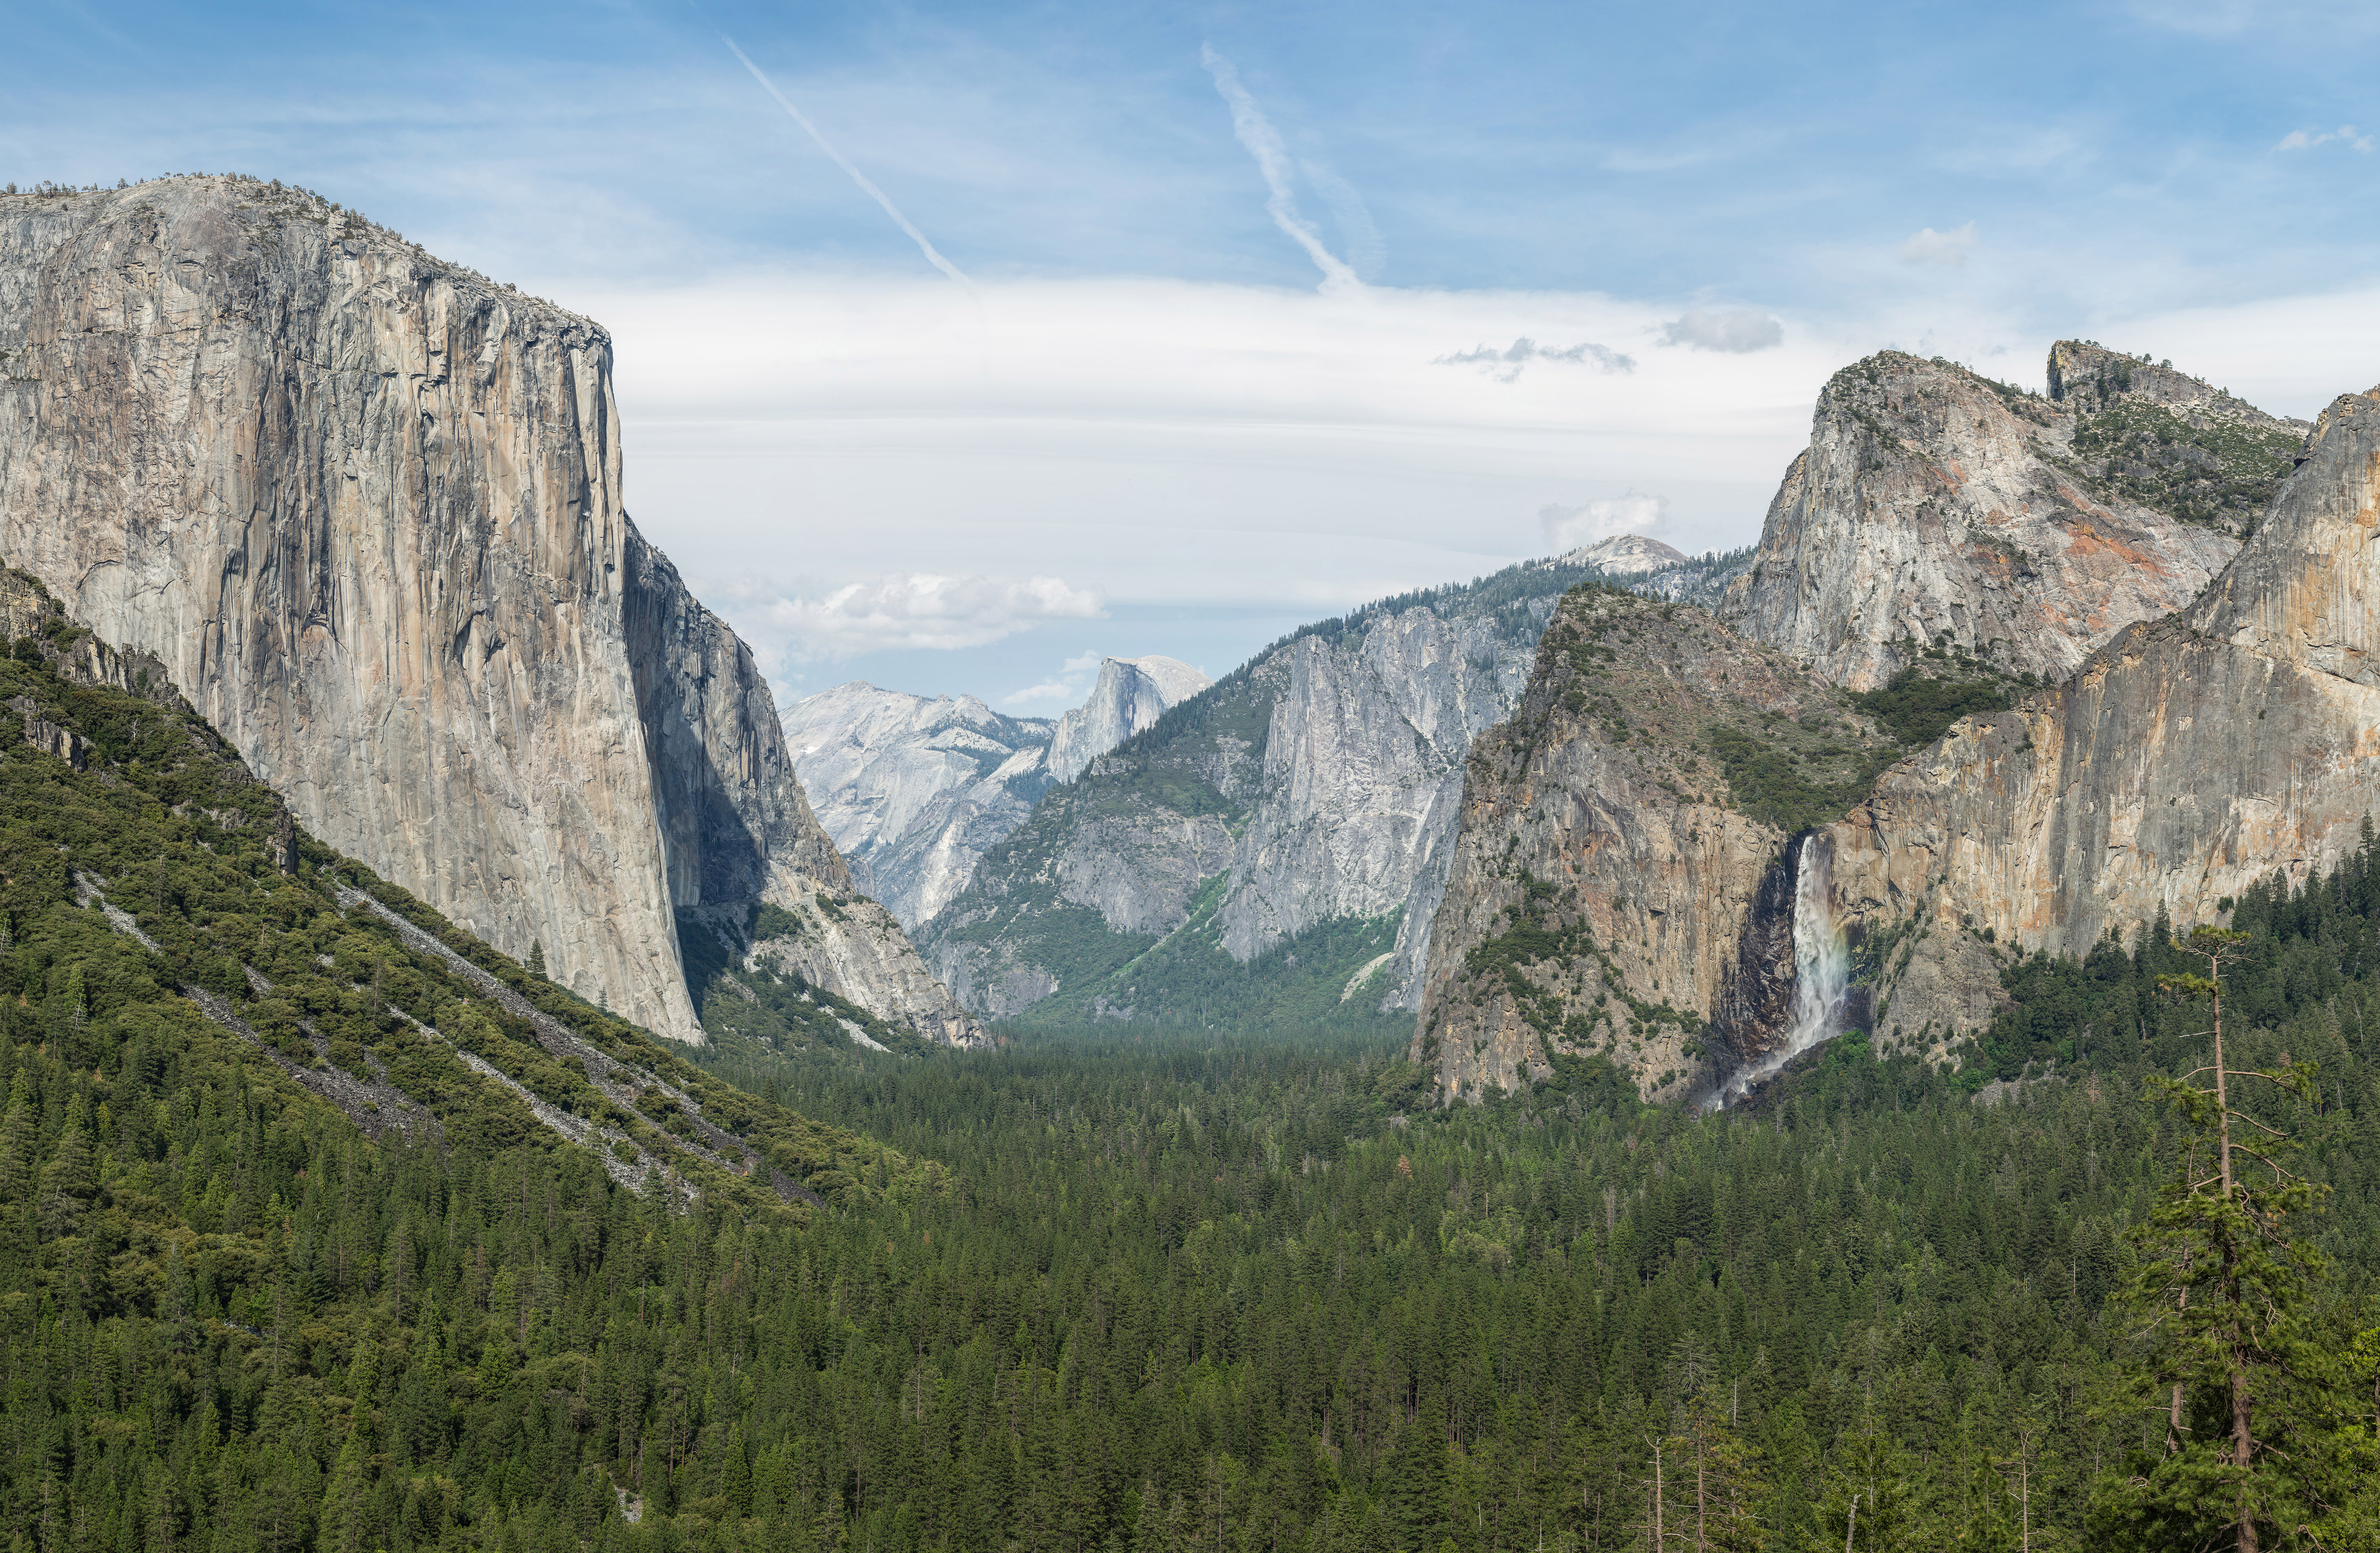
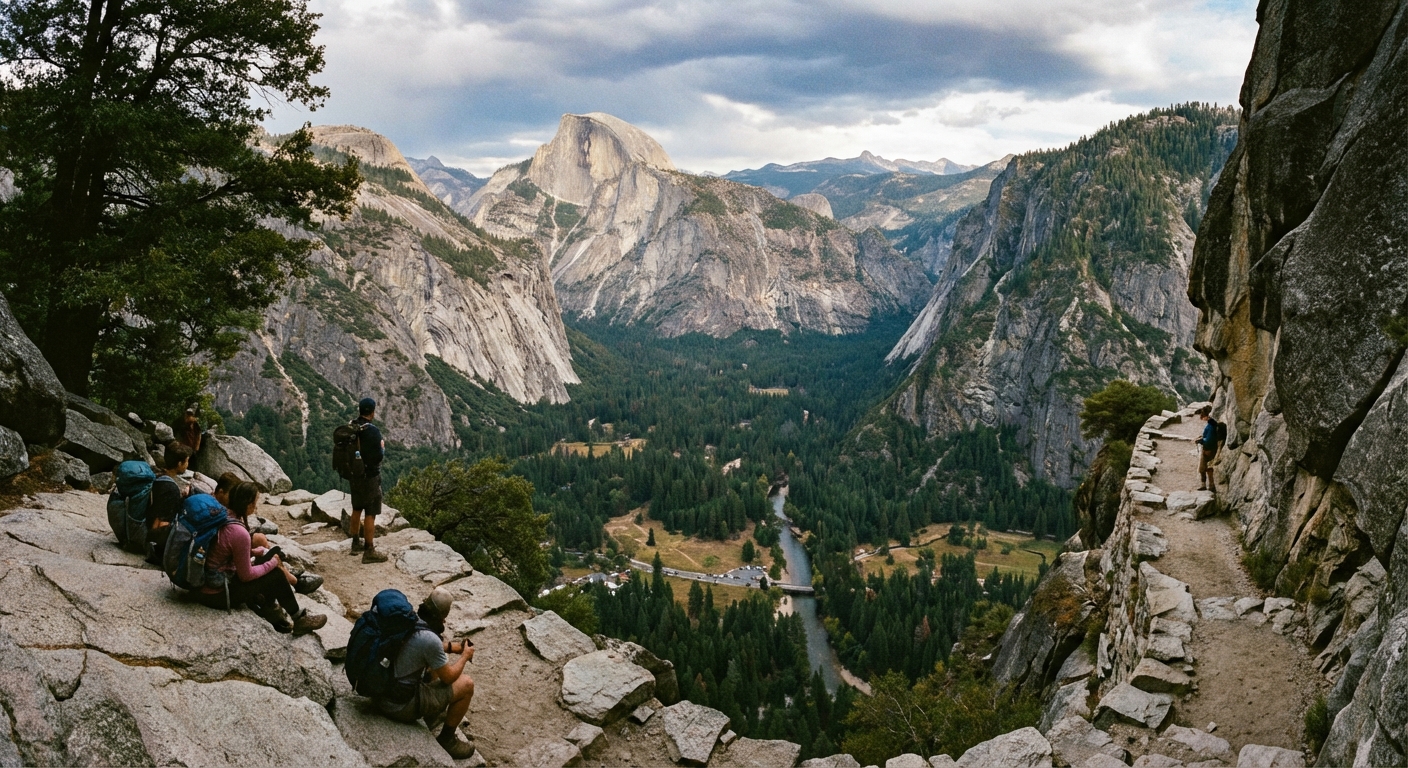
Yosemite can feel like two trips at once. One minute you are strolling a paved riverside path with Half Dome framed like a postcard, and the next you are sweating up a granite staircase with waterfall mist on your face. This guide is built for both versions of you.
Below, I have organized Yosemite’s best day hikes by skill level, from easy Valley walks to classic waterfalls to leg-burning climbs. Each hike includes the practical stuff you actually need: where to start, how far, how steep, how to dodge crowds, when to go, and where to refuel and sleep nearby.
Before you hike: quick Yosemite logistics
- Start early. In peak season, trailhead parking can fill by mid-morning, and popular trails get crowded and hot.
- Check conditions daily. Waterfalls vary by season, winter ice can linger on shaded steps, and smoke can change air quality in late summer.
- Carry more water than you think. Yosemite’s granite reflects heat. A good baseline is 1 liter per 2 hours, more on big climbs.
- Know the altitude shift. Yosemite Valley sits around 4,000 feet. A “moderate” hike can feel harder if you arrived from sea level yesterday.
- Plan for shuttles (and confirm the schedule). When the Yosemite Valley shuttle is operating, it can save your day. Service can be seasonal or reduced, so check the current NPS shuttle page before you go.
- Bear-safe food rules are not optional. Do not leave food, coolers, toiletries, or any scented items in a parked car at trailheads. Use bear lockers and follow posted storage rules.
Best overall hiking windows: May to June for big waterfalls, September to October for clearer air and fewer peak-summer crowds, and winter for quiet Valley wandering (with icy patches and shorter daylight).
Verify before you go: Trail conditions and closures (especially on Mist Trail and Four Mile Trail), road openings (Glacier Point Road and Tioga Road), shuttle status, and dining hours can change by season and year. A quick check on the NPS Yosemite site saves headaches.
At-a-glance: Yosemite day hikes by difficulty
| Difficulty | Hike | Distance (round trip) | Elevation gain | Why go |
|---|---|---|---|---|
| Easy | Lower Yosemite Fall | ~1.0 mi | Minimal | Iconic waterfall with a short, paved loop |
| Easy | Mirror Lake (to lake/bridge) | ~2.0 mi | ~100 ft | Classic Half Dome reflections when conditions line up |
| Easy | Cook’s Meadow Loop | ~1.0 mi | Minimal | Meadows, boardwalks, big Valley walls |
| Moderate | Vernal Fall Footbridge (Mist Trail) | ~1.6 mi | ~400 ft | Waterfall power without the full climb |
| Moderate | Vernal Fall (top) | ~3.0 mi | ~1,000 ft | Up-close Yosemite waterfall classic |
| Moderate | Nevada Fall via Mist Trail and JMT loop | ~5.4 mi | ~2,000 ft | A top choice if you only do one big Valley hike |
| Moderate | Sentinel Dome | ~2.2 mi | ~400 ft | Huge views for relatively low effort (Glacier Point area) |
| Strenuous | Upper Yosemite Fall | ~7.2 mi | ~2,700 ft | Relentless climb, massive payoff |
| Strenuous | Four Mile Trail (to Glacier Point) | ~9.6 mi | ~3,200 ft | High drama views, strong legs required |
Note: Distances and elevation gains are approximate and can vary slightly by exact starting point, seasonal reroutes, and what you consider the “end.” When in doubt, trust the current NPS trail page for the route you plan to hike.
Easy hikes: paved paths, big scenery
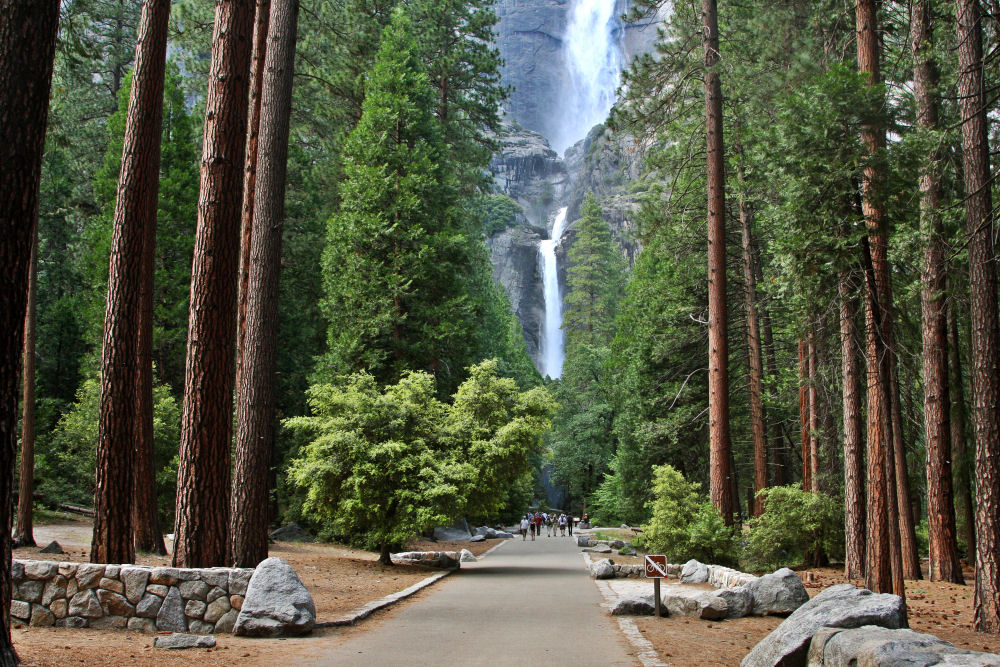
Lower Yosemite Fall Trail
Distance: ~1.0 mile loop
Elevation gain: minimal
Trailhead access: Yosemite Valley. Park at Yosemite Falls parking area if available, or use the Valley shuttle when operating.
This is the “I want to see a famous Yosemite waterfall in the shortest amount of time” walk. The loop is mostly paved and flat, which makes it ideal for families, jet-lagged arrival days, and anyone saving energy for bigger adventures.
Accessibility note: This is one of the more accessible-friendly walks in the Valley, with a paved route and minimal grade.
Crowd tips: Go at sunrise or within the last hour of daylight. Midday can feel like a theme park walkway in summer.
Best time to go: April to early June for the strongest flow. By late summer, the waterfall can be a trickle in dry years.
Nearby dining: Grab a casual bite at Yosemite Valley Lodge area dining options. It is one of the most convenient places to refuel near the falls.
Nearby lodging: Yosemite Valley Lodge for proximity, or Curry Village if you want a more campy vibe without committing to full tent camping.
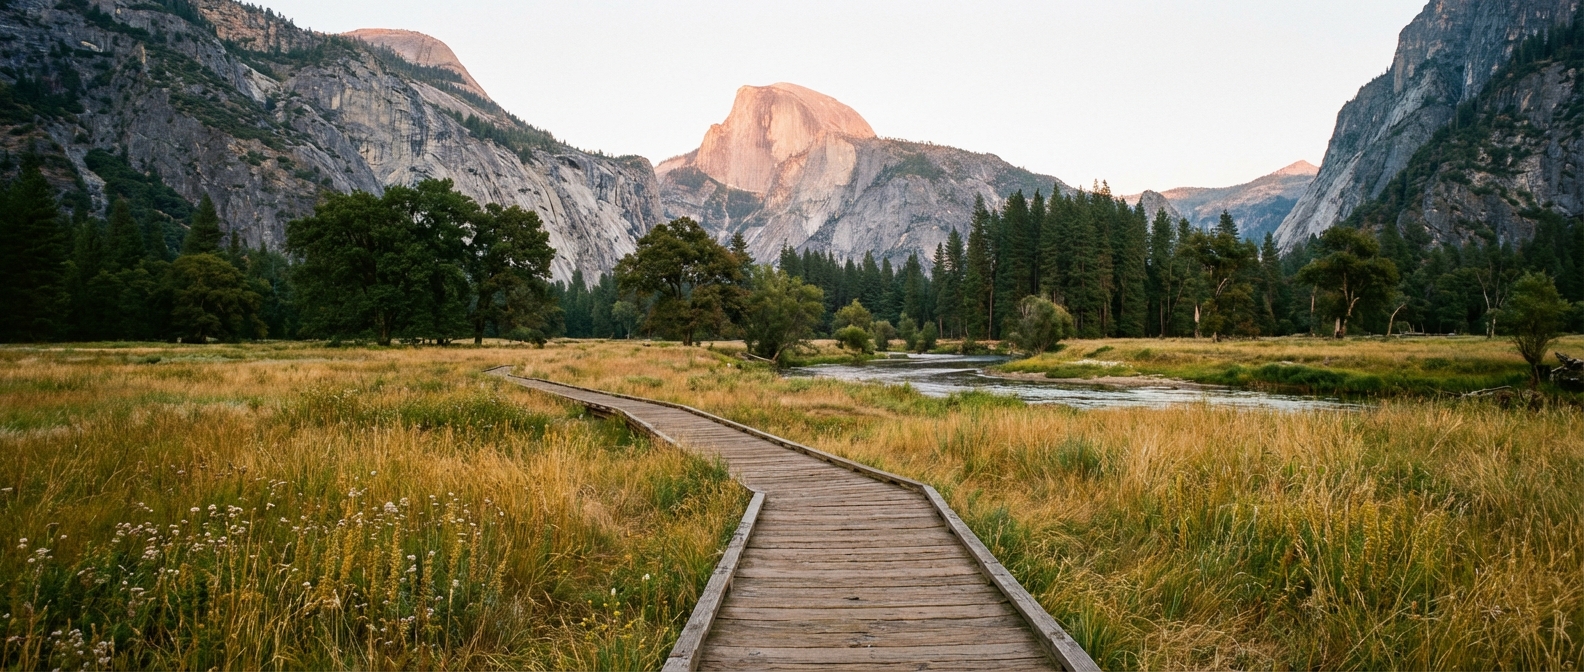
Cook’s Meadow Loop
Distance: ~1.0 mile (easy to extend)
Elevation gain: minimal
Trailhead access: Yosemite Valley. Multiple access points near Yosemite Valley Visitor Center area and shuttle stops.
When I want maximum “Yosemite Valley grandeur” for minimal effort, I go to the meadows. The boardwalk-style paths give you open views of Half Dome and Glacier Point, and in spring the meadows feel like someone turned up the saturation.
Accessibility note: This is another accessible-friendly option with mostly flat paths and boardwalk sections.
Crowd tips: This is popular all day. Your best move is to slow down, take your time, and enjoy the fact that it is not a sufferfest.
Best time to go: Spring for green meadows and high water, fall for calmer weather and golden light.
Nearby dining: Base Camp Eatery (near the Yosemite Valley Visitor Center area) is a convenient option for quick, casual meals. Verify current hours and seasonal operations.
Nearby lodging: The Ahwahnee if you want historic, iconic comfort, or Yosemite Valley Lodge for an easy, central base.
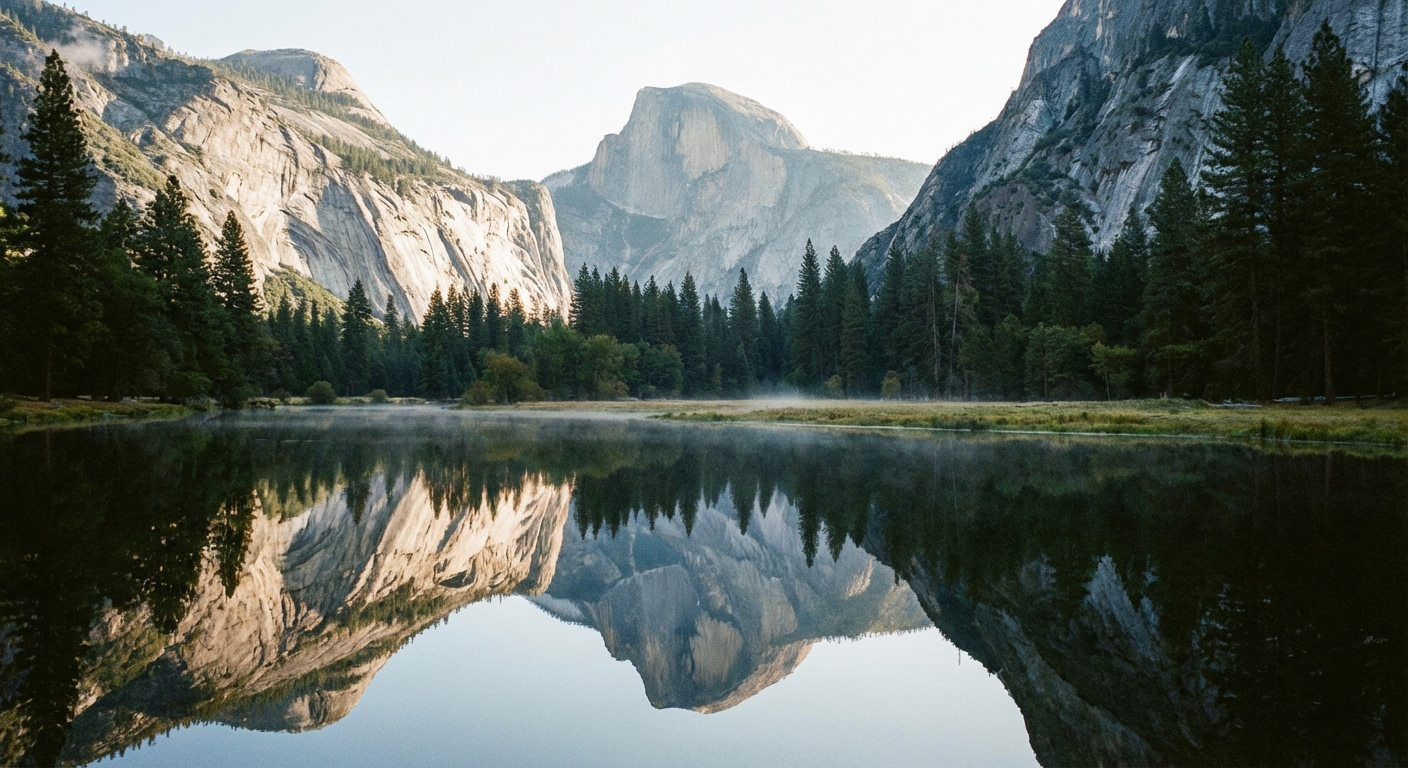
Mirror Lake (to the bridge or lake)
Distance: ~2.0 miles round trip to the bridge/lake viewpoint from the Valley trail access (often shuttle-based). The loop around Mirror Lake is commonly closer to ~5 miles round trip depending on where you start and how far you continue.
Elevation gain: ~100 feet
Trailhead access: Yosemite Valley, near the end of the Valley. Start near the Mirror Lake trailhead area. Shuttle access is often the least stressful option.
Mirror Lake is a reminder that Yosemite’s “lakes” can be seasonal personalities. In spring, you might get those famous Half Dome reflections. In late summer, it can look more like a sandy basin with a creek. Either way, the walk up Tenaya Canyon is beautiful.
Crowd tips: Go early for quieter reflections and better photos. Late afternoon can also be calm once day visitors start leaving.
Best time to go: Spring to early summer for water and reflections.
Nearby dining: Pack a picnic and eat by the Merced River back in the Valley, or head to Curry Village for casual food options (double-check hours if you are traveling in shoulder season).
Nearby lodging: Curry Village is a great base for early starts toward Happy Isles and the east Valley trailheads.
Moderate hikes: classic Yosemite without the full suffer
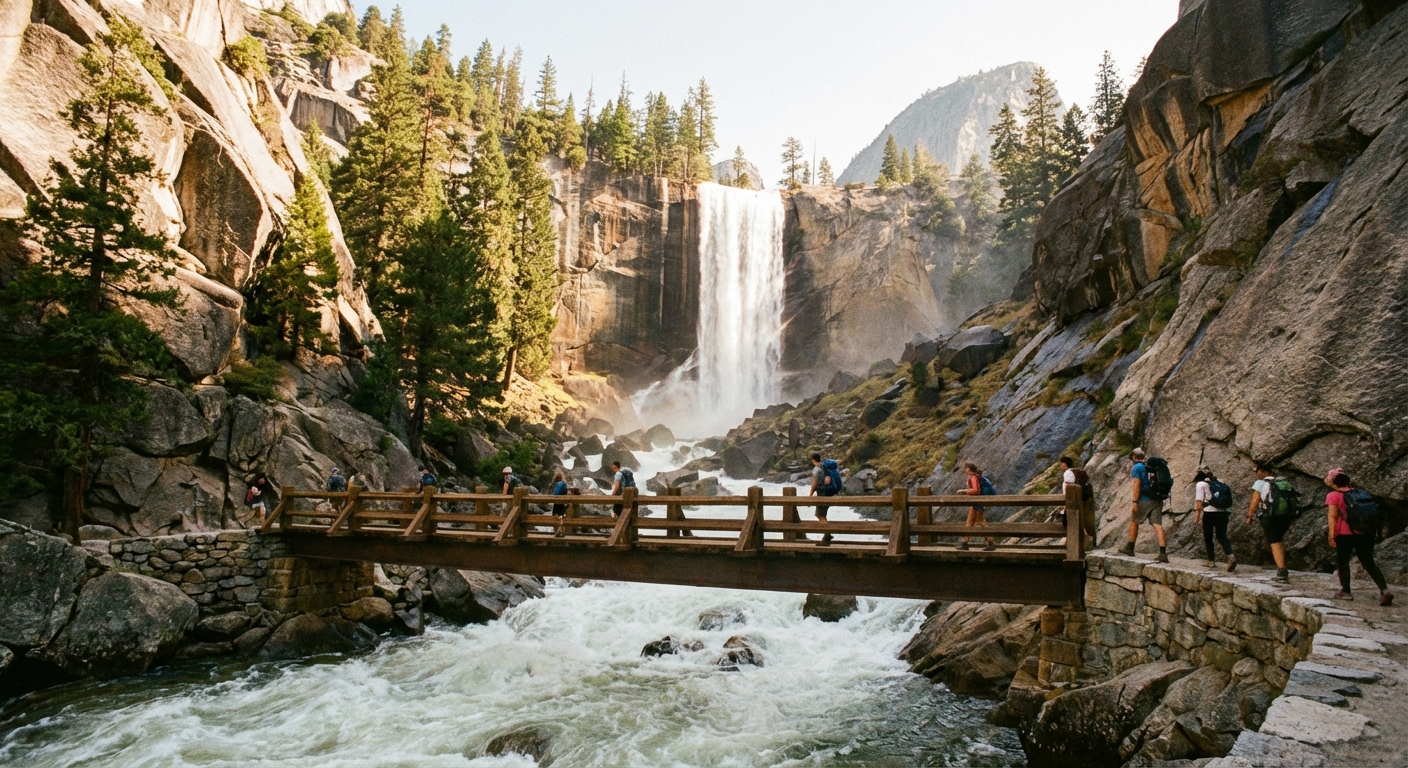
Vernal Fall Footbridge (Mist Trail sampler)
Distance: ~1.6 miles round trip
Elevation gain: ~400 feet
Trailhead access: Start at Happy Isles in Yosemite Valley. Use the Valley shuttle when available, or arrive very early for parking.
If you want the energy of the Mist Trail and the roar of the Merced River without committing to the steep stone steps, the footbridge viewpoint is your sweet spot. You still feel the canyon tighten and the water get louder, and the payoff comes quickly.
Safety note: Stay back from river edges and slick rocks. People underestimate how fast the current moves here.
Crowd tips: This section gets busy fast. Start before 8 am in peak months if you want breathing room.
Best time to go: May to June for spray and thunder. Bring a light shell if you run cold.
Nearby dining: Post-hike, Curry Village is a reliable, casual stop, especially if you want something quick and kid-friendly. Verify hours and options seasonally.
Nearby lodging: Curry Village for convenience to Happy Isles, or Yosemite Valley Lodge if you prefer more traditional rooms.
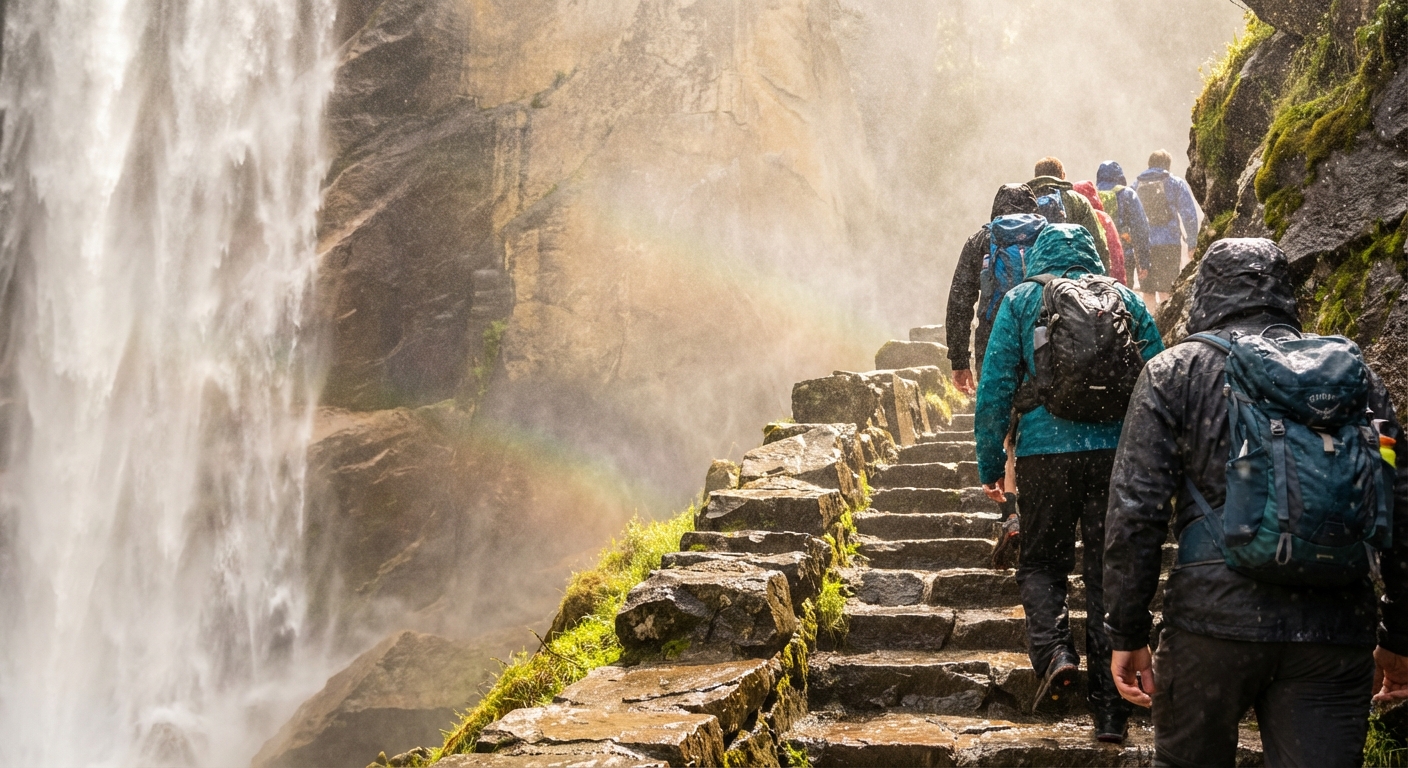
Vernal Fall (top via Mist Trail)
Distance: ~3.0 miles round trip from Happy Isles
Elevation gain: ~1,000 feet
Trailhead access: Happy Isles trailhead in Yosemite Valley.
This is Yosemite’s stair workout, and it is worth it. The Mist Trail steps are steep and can be slick when the waterfall is pumping. At the top, you get that satisfying moment of standing above the fall, watching the river funnel into a granite chute.
Safety note: Mist Trail can be wet, crowded, and slippery, and the park sometimes uses seasonal closures or one-way controls. Follow signs, be patient on narrow stair sections, and stay well back from the river above the fall.
Crowd tips: Start early. If you prefer a loop, many hikers go up one route and down the John Muir Trail for slightly wider trail and different views.
Best time to go: Spring and early summer. By late summer, you get less mist, more heat.
Nearby dining: Reward yourself with a sit-down meal at The Ahwahnee if you can snag a reservation, or grab something easier around Yosemite Valley Lodge. Dining hours can shift, so confirm day-of.
Nearby lodging: The Ahwahnee for a special-occasion stay, or Curry Village for location and early trail access.
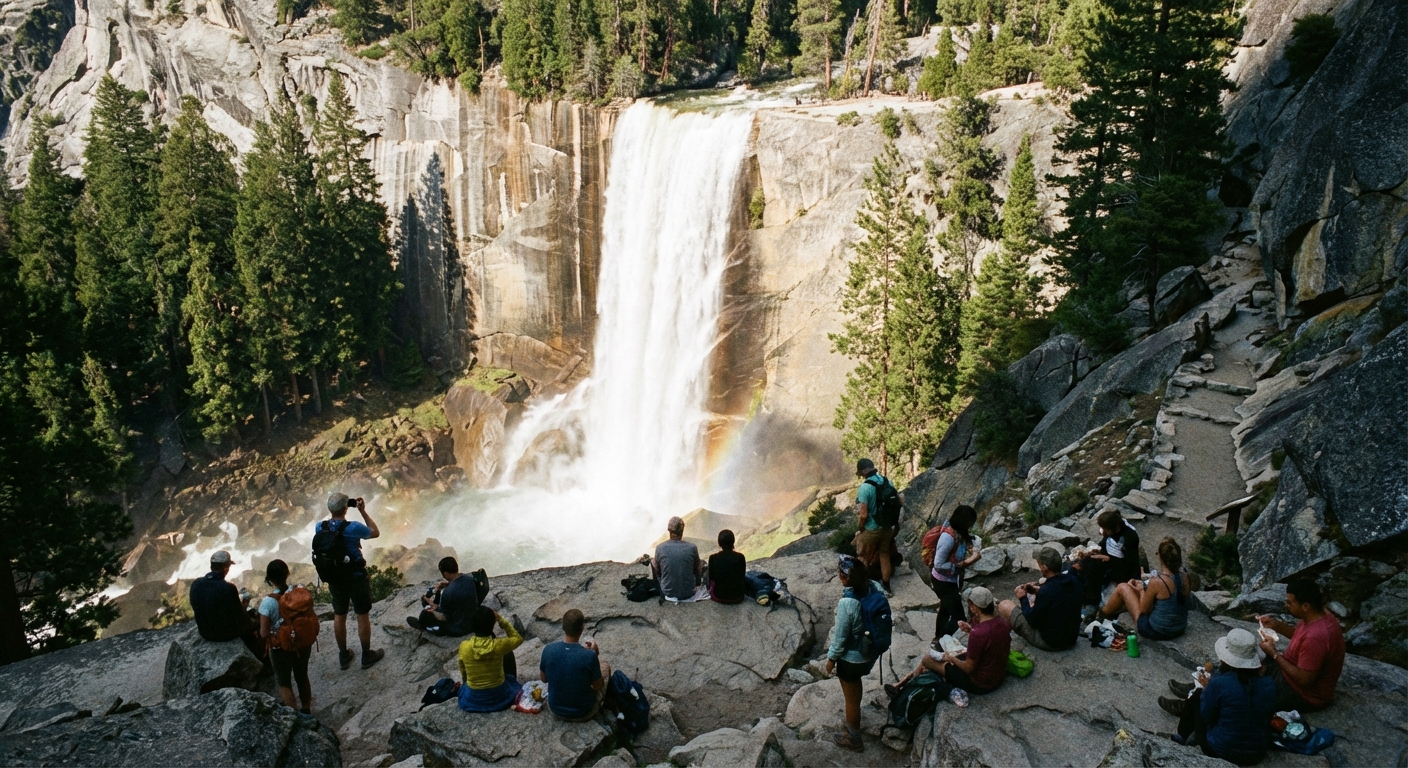
Nevada Fall loop (Mist Trail up, John Muir Trail down)
Distance: ~5.4 miles round trip (classic loop) from Happy Isles
Elevation gain: ~2,000 feet
Trailhead access: Happy Isles in Yosemite Valley.
If you only do one “real” day hike in Yosemite Valley, make it this (or at least put it at the top of your list). You get Vernal Fall’s up-close drama, Nevada Fall’s taller, more powerful drop, and a variety of viewpoints as you loop back down. The John Muir Trail descent trades mist for expansive canyon views.
Safety note: The river above Vernal and Nevada is not a swimming pool, even when it looks calm. Stay back from edges and smooth granite near the water, and follow all closure signs.
Crowd tips: Hike early and aim to be above Vernal Fall before the busiest hours. Weekdays are noticeably calmer. On hot days, this route feels significantly better before noon.
Best time to go: May to June for peak flow, September for fewer people and water that is typically less snowmelt-cold (still cold, and still not a place to mess around near the rapids).
Nearby dining: After a big loop, I like something easy and filling close to where I am sleeping. In the Valley, Curry Village or the Yosemite Valley Lodge area are the most straightforward. Check hours in advance if you are hiking outside peak season.
Nearby lodging: Curry Village is strategically placed for early starts at Happy Isles. Yosemite Valley Lodge is also convenient, especially if you want a quieter evening.
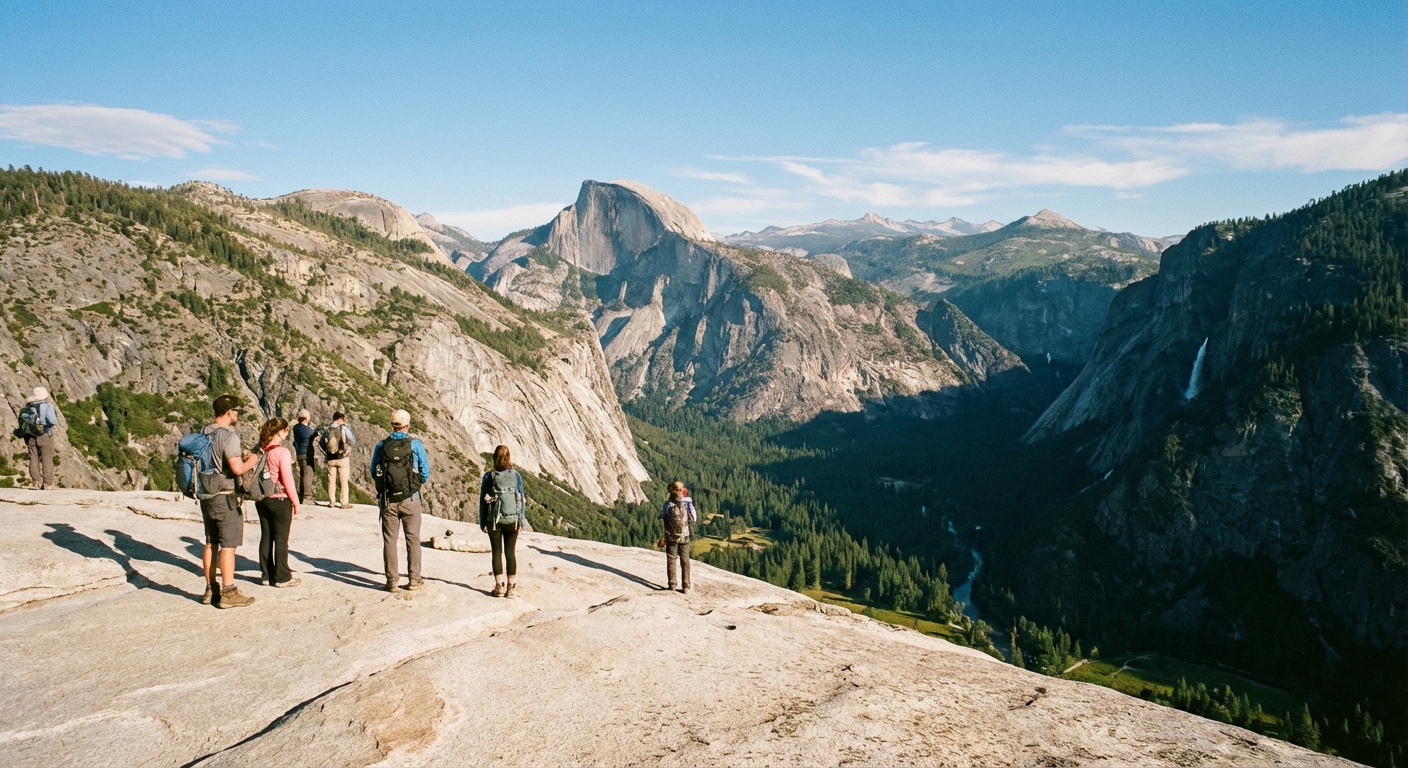
Sentinel Dome (Glacier Point Road area)
Distance: ~2.2 miles round trip
Elevation gain: ~400 feet
Trailhead access: Trailhead is off Glacier Point Road (when open). You will drive from Yosemite Valley up to the high country road corridor.
Sentinel Dome is the hike I recommend to people who want “epic summit vibes” without a soul-crushing ascent. The top is a rounded granite perch with huge 360-degree views, and it is especially magic near sunset.
Safety note: Domes are exposed. If weather is building, especially afternoon thunderstorms, get off the high point early and do not wait it out on bare granite.
Crowd tips: Arrive earlier in the day to secure parking near the trailhead. Sunset is beautiful but popular.
Best time to go: Late spring through fall, depending on road access. Check seasonal road openings.
Nearby dining: If you are heading back into the Valley, plan dinner there. Options along Glacier Point Road are limited compared to the Valley, and hours can be seasonal.
Nearby lodging: Stay in Yosemite Valley for the widest range of services, or consider Wawona Hotel (seasonal) if you want a quieter base south of the Valley.
Strenuous hikes: earn-your-view Yosemite
Upper Yosemite Fall
Distance: ~7.2 miles round trip
Elevation gain: ~2,700 feet
Trailhead access: Yosemite Valley. Start near the Yosemite Falls trailhead area (look for signed access near Camp 4 and the Yosemite Falls vicinity). Arrive early for parking, or plan to walk from shuttle stops when operating.
This trail is a steady uphill negotiation with gravity. There are not many flat sections to recover, which is exactly why the views feel so earned. The payoff is both the waterfall perspective and the sweeping look back across the Valley to Half Dome.
Crowd tips: Start at first light in summer. You will beat heat on the climb and be on your way down as the trail turns into a slow-moving line of hikers.
Best time to go: Spring for water volume, fall for cooler hiking temperatures. In midsummer, go very early and carry extra water.
Nearby dining: Post-hike, the closest easy option is the Yosemite Valley Lodge area for casual food. You will be grateful you do not have to drive anywhere.
Nearby lodging: Yosemite Valley Lodge for proximity to the trailhead, or Camp 4 (seasonal, popular) if your ideal recovery looks like a picnic table and a sleepy evening under pines.
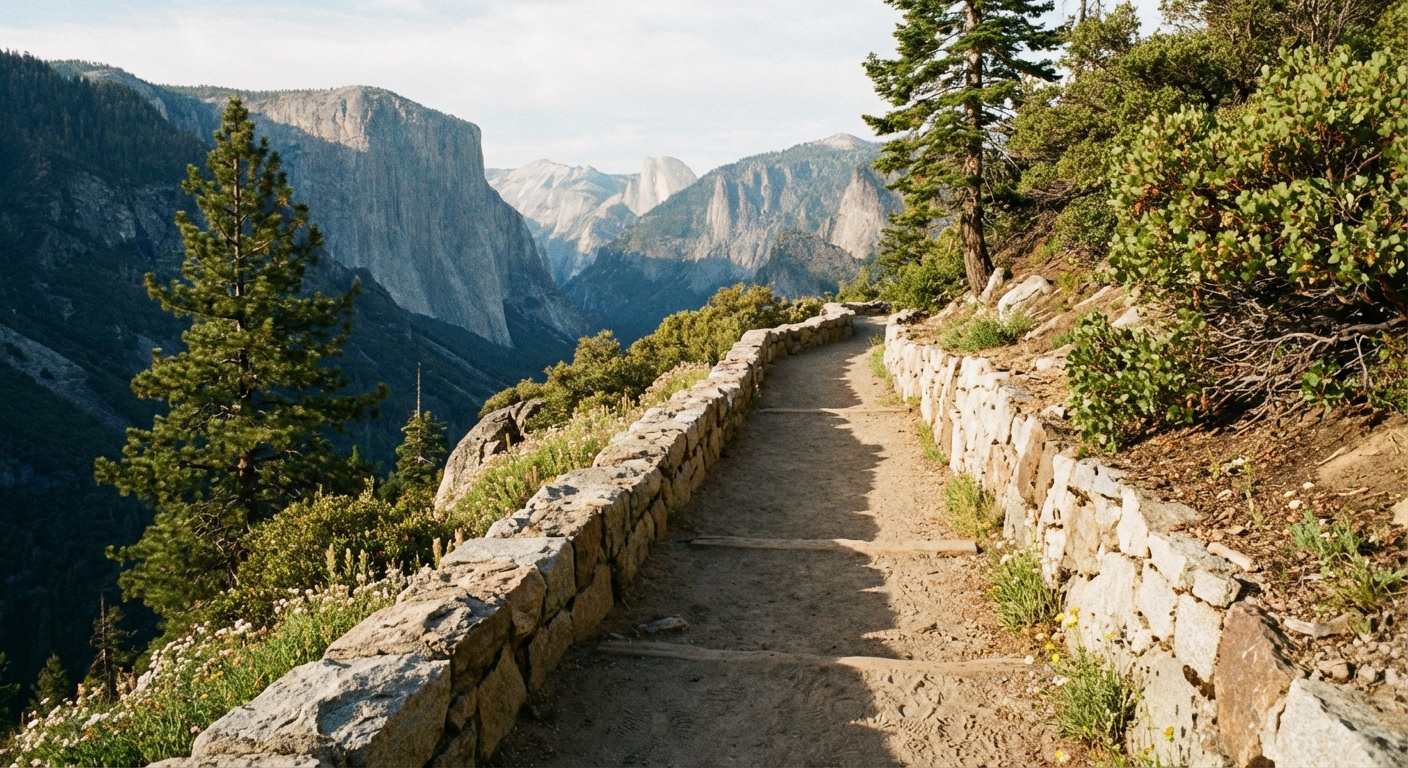
Four Mile Trail to Glacier Point (out and back)
Distance: ~9.6 miles round trip
Elevation gain: ~3,200 feet
Trailhead access: Yosemite Valley. The lower trailhead is near the Valley floor on the south side of the Valley. This hike is easiest when you can pair it with shuttle or ride logistics. A popular option is the Glacier Point Tour bus, which may offer one-way tickets so you can ride up and hike down (availability varies). Always confirm current operations and schedules.
If your dream is to stand at Glacier Point and look straight down into Yosemite Valley, this is the human-powered way to do it. The views open quickly, and they keep coming. Expect sun exposure, switchbacks, and a consistent climb that does not let you bargain your way out of it.
Safety note: Four Mile Trail is often closed in winter and early spring due to ice and rockfall risk. Check current status before you commit.
Crowd tips: Going up early helps. If Glacier Point is accessible by road, expect more people at the top even if the trail itself feels quieter.
Best time to go: Shoulder seasons for cooler temperatures. Check trail status in winter and early spring when ice or closures can occur.
Nearby dining: Plan a low-effort dinner back in the Valley. If you want a classic Yosemite evening, consider The Ahwahnee for a more formal meal or dessert and coffee. Reservations and hours can be seasonal.
Nearby lodging: The Ahwahnee for comfort close to the action, or Curry Village for a lively, walkable base that makes early starts feel doable.
How to pick the right hike
- If you have 1 to 2 hours: Lower Yosemite Fall or Cook’s Meadow.
- If you want waterfalls without a full-day commitment: Vernal Fall Footbridge or the top of Vernal Fall.
- If you want a top “classic Yosemite” day hike: Nevada Fall loop via Mist Trail and John Muir Trail.
- If you want a summit feel with moderate effort: Sentinel Dome (when Glacier Point Road access allows).
- If you want a true challenge: Upper Yosemite Fall or Four Mile Trail to Glacier Point.
My personal rule: if it is already warm in the Valley at breakfast, pick a shorter hike or start before sunrise. Yosemite’s big climbs are amazing, but the granite does not forgive a late start.
Town Wander picks: where to eat and sleep
Best for location
- Curry Village: Central for Happy Isles and easy access to Valley highlights. A great base if you want to hike early and keep evenings simple.
- Yosemite Valley Lodge: Very convenient for the Yosemite Falls area and a comfortable, low-fuss stay.
Best for a splurge
- The Ahwahnee: Historic, iconic, and a genuinely special place to wind down after a big hike.
Best quick meal strategy
- Eat early or late: Avoid the main rush after popular hikes.
- Keep snacks in your daypack: Even a short Yosemite walk can turn into a longer meander once the light hits right.
- Pack picnic basics: A sandwich and fruit by the river is one of the best “restaurants” in the park.
Small reality check: Dining names, menus, and hours can change. If you have your heart set on a specific spot, confirm the latest details before you hike.
Seasonal timing and crowds
Spring (April to June)
Best waterfall season. Expect higher crowds as soon as roads and trails open up. The Mist Trail is at its most dramatic, and also at its most slippery and crowded.
Summer (July to August)
Longest days, biggest crowds, hottest hikes. This is the season to start early, pick shaded or shorter routes, and prioritize water management. Waterfalls can drop significantly by late summer depending on snowpack.
Fall (September to October)
My favorite shoulder season for comfortable hiking temperatures and fewer families on school schedules. Waterfalls may be lower, but the trails feel more peaceful.
Winter (November to March)
Quiet, moody Valley views and a totally different Yosemite vibe. Stick to safer Valley paths unless you are prepared for winter conditions. Some routes may be icy or closed.
Lightweight day-hike packing list
- Water (and a backup plan like a filter on longer routes)
- Salty snacks and a real lunch for moderate to strenuous hikes
- Sun protection: hat, sunglasses, sunscreen
- Light rain shell or wind layer (especially for Mist Trail spray)
- Grippy shoes with solid traction
- Headlamp if you are starting early or finishing near dusk
- Small first-aid kit and blister care
- Food storage plan: use bear lockers, and keep scented items out of your car
And yes, I still hunt for good coffee on hiking days. If you are coffee-motivated like me, aim to grab it early, then get on trail before Yosemite wakes up.
Final notes
Yosemite rewards patience and planning. If a trail feels crowded, lean into timing instead of frustration. Start earlier, hike midweek, or choose a short easy walk at golden hour when the Valley looks like it is lit from within.
Want a simple way to decide? Pick your priority (waterfalls or wide-open views), check current trail and road status on the NPS site, and build your day around an early start. That combo fixes more Yosemite problems than any secret hack.