E-Bikes in U.S. National Parks

If you have ever stood at a trailhead sign in a national park doing mental gymnastics like, “This looks like a bike trail… but is it an e-bike trail?” you are not alone. E-bike rules in U.S. National Parks can feel simple in theory and messy in practice, especially when you add dirt routes, multi-use paths, concession rentals, and the very real fact that some people mean “eMTB” when they say “e-bike.”
This guide is built for the way most of us actually plan trips: you want a beautiful ride, you want to stay on the right side of the rules, and you do not want to be the person getting side-eyed by a ranger or hikers because your route choice or speed etiquette was off.

The rule that matters most: where bikes can go
In most national parks, the e-bike question starts with a simpler one: are bikes allowed there at all? NPS policy allows parks to treat e-bikes like traditional bicycles on routes already open to bicycles, when the superintendent specifically designates those routes for e-bike use. Translation: you always want the park’s current bicycling and e-bike page plus the superintendent’s compendium if you are trying to be 100% sure.
Most of the time, if a route is closed to bicycles, it will also be closed to e-bikes. And in some parks, the rules can be tighter for e-bikes than for traditional bikes (especially for higher-speed classes or in crowded areas). So instead of thinking “Is this trail open to e-bikes?” start with:
- Road: Bikes are usually allowed on park roads, but some have restrictions (tunnels, narrow shoulders, seasonal closures, or shuttle-only corridors).
- Paved multi-use path: Often the most e-bike-friendly option and commonly where parks intentionally route bikes to reduce car congestion.
- Dirt road or doubletrack: Sometimes open to bikes, sometimes not. If it is open to bikes, e-bikes may be allowed depending on how the park has implemented policy and how the route is designated.
- Singletrack trail: In many national parks, singletrack is hiker or horse only. Even where bikes are allowed, e-bike allowances can vary by designation and local rules.
Key takeaway: E-bike access is rarely about whether it is paved or dirt by itself. It is about whether that specific route is designated for bicycle use and, in many parks, whether it is designated for e-bike use.
E-bike vs eMTB: what parks regulate
In everyday trip planning, people use “e-bike” as a catch-all. On the ground, regulations usually focus on e-bike classes and where bikes are allowed, not on marketing labels like “eMTB.”
The class system (and the fine print)
Most U.S. policies and manufacturers refer to these three classes. Not every state uses the 3-class framework, and some NPS documents may instead reference “electric bicycles” as defined in federal regulations or in the park’s compendium, but this is still the most common way you will see bikes labeled:
- Class 1: Pedal-assist only, assist up to 20 mph.
- Class 2: Throttle-capable, assist up to 20 mph.
- Class 3: Pedal-assist only, assist up to 28 mph, often with additional equipment requirements in some jurisdictions.
An “eMTB” is typically just an e-bike designed for off-road riding, often Class 1. (There are also MTB-styled models sold as Class 2 or Class 3, so do not assume based on the frame and tires alone.) That does not automatically make it legal on dirt trails in a national park. The route still has to be open to bicycles, and the park still may limit e-bike classes or locations.
Think of it this way: your bike’s class matters, but the route’s designation matters more.
One important distinction: ride access vs motor use
Some parks phrase rules in a way that effectively separates two questions:
- Where can bicycles ride? (road, path, or trail open to bikes)
- Where can you use electric assist? (motor use allowed on that segment, sometimes with class limits)
If a park says “e-bikes are allowed where traditional bicycles are allowed,” they usually mean you can ride there with your e-bike. But you still want to confirm whether the park allows motor assistance on that exact route and whether it limits classes.
What parks often restrict in practice
- Singletrack access: Many parks do not allow any bicycles on most hiking trails, which makes the eMTB debate irrelevant in those areas.
- Class limitations: Some parks are comfortable with Class 1 (and sometimes Class 2) on shared paths but restrict Class 3 in certain locations due to speed differential. The compendium is where you will see this spelled out.
- Where you can use the motor: Even if bikes are allowed on a road, a park may specify where electric assistance may be used, and it may require you to follow posted speed limits or local restrictions.
Paved vs dirt: plan by designation
The best way to avoid a mid-ride reroute is to plan with “surface + designation” in mind.
Quick definition: In this context, “designated” means the route is specifically listed or shown as open to bicycles (and often to e-bikes) in official park materials like the park map, the park’s bicycling or e-bike page, posted signage, and the superintendent’s compendium.
Paved multi-use paths
Paved multi-use paths are where e-bikes shine in national parks: you can cover more ground, skip parking headaches, and keep your legs fresh for a hike later.
What to look for:
- Paths specifically described as bike paths, multi-use paths, or shared-use paths
- Routes connecting visitor centers, campgrounds, lodges, or viewpoints
- Posted speed limits and yield rules (take them seriously)
Dirt roads and doubletrack
Some parks have unpaved roads or old service roads that are open to bicycles. These can be amazing for quieter riding, but they are also where rules get murkier because the “trail” may not be signed like a trail.
Before you go:
- Confirm the route is open to bicycles (and e-bikes) in the park’s official materials or at the visitor center.
- Check for seasonal wildlife closures and wet-weather damage closures.
- Know your rental’s tire and battery limitations. Dirt climbs eat range fast.
Singletrack
In many national parks, singletrack trails are managed primarily for hiking and resource protection, and bikes may be limited to a small set of designated routes, if any. If you are dreaming of true mountain bike singletrack, you may find better options in nearby National Forests, state parks, or purpose-built trail systems outside park boundaries.
Planning move that saves time: build your trip around a national park paved ride day, then add a nearby non-NPS singletrack day if the region has it.
Speed etiquette: how to keep it chill
E-bikes are not the problem. Speed differential is. In crowded parks, the social contract matters as much as the written rule, and it is one of the fastest ways to turn a shared-use path into a bad day for everyone.
On paved shared-use paths
- Ride for conditions, not capability. Just because your bike can do 20 mph does not mean the path can.
- Announce passes early and politely. Use a bell or your voice, then pass wide and slow.
- Expect families, dogs, and sudden stops. Tourist paths have unpredictable movement.
- Coast in pinch points. If you are approaching a viewpoint pullout, bridge, or tight curve, ease off early.
On park roads
- Be visible. Lights help even in daylight, especially in tree shade or canyon sections.
- Know tunnel rules. Some parks restrict bikes in tunnels or require specific procedures.
- Do not draft vehicles. It is tempting, it is risky, and it reads poorly.
On dirt routes open to bikes
- Yield expectations still apply. Hikers and horses often have the right of way. For horses, slow to a crawl, speak calmly, and be ready to stop completely.
- Control your speed on descents. Dust, blind corners, and wildlife are real.
- Stay on durable surfaces. Cutting corners or riding muddy edges causes the kind of impact that leads to closures.
How to check rules fast
Policy churn is real. Signs get updated, web pages move, and special closures happen. Here is the quickest workflow I use on reporting trips.
- Start with the park’s official “Bicycling” and “E-bikes” pages on the NPS site and note which areas are specifically listed as open.
- Look up the superintendent’s compendium for the park unit. This is often where class limits, motor-use language, and route-specific details live.
- Open the park map and identify whether your intended route is a road, a paved path, or a trail.
- Call or chat with a visitor center if you are unclear about a specific segment, especially dirt roads that may not be labeled as trails.
- Ask one crucial question: “Is this route currently open to bicycles, and are e-bikes allowed there? If yes, are there class limits or motor-use limits on that segment?”
- Screenshot the relevant page before you lose service.
Pro tip from a carry-on only traveler: download offline maps before you arrive. Parks love to surprise you with zero bars at the exact moment you need clarity.
Reality check: If you get stopped, enforcement is usually based on posted signs and the compendium. “I did not know” rarely changes the outcome.
Rentals and concession rules
Many visitors ride e-bikes via rentals, and that adds a second layer: the concessionaire’s rules. Even if the park allows e-bikes on a given path, a rental operator may restrict where you can take their bikes for safety, theft risk, or recovery logistics.
Questions to ask before you book
- What class are the e-bikes? Ask directly: Class 1, 2, or 3.
- Where are riders allowed to take them? Roads only, paved paths, or certain dirt routes?
- Is there a geofence or speed limiter? Some rentals limit speed on crowded paths.
- What happens if the battery dies? Is roadside pickup included, and from where?
- What equipment is included? Helmet, lock, lights, repair kit, and a charger if it is a multi-day rental.
Typical mismatch to avoid
You plan a mellow dirt road loop. The rental shop hands you a city-style e-bike with slick tires and a “paved only” contract. Result: you either break the rules or scrap your route. Clarify first, then plan.
Examples: what this looks like
Instead of trying to list every park and every rule, here are a few well-known examples that show the patterns you will see nationwide. Always confirm details before you go, since routes and allowances can change.
Zion: paved-path classic
Zion is a great example of a park where e-bikes can be a practical alternative to driving. One well-known, bike-friendly option is the Pa’rus Trail, a paved shared-use path that makes it easy to link scenic riding with short hikes and town logistics. The riding experience is social and high-traffic in peak season, which makes speed etiquette and clean passing especially important.
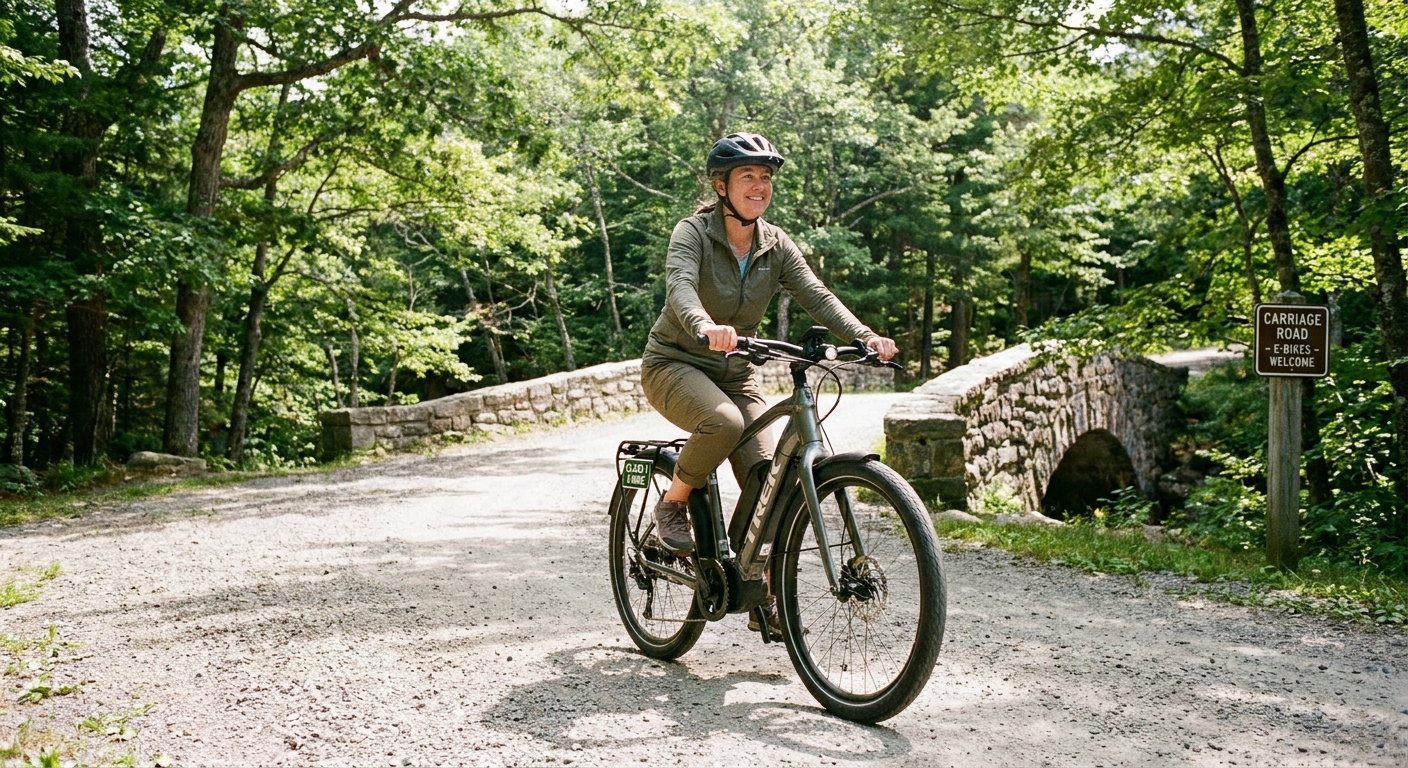
Acadia: carriage roads with class limits
Acadia shows how “not paved” does not necessarily mean “not bike-friendly.” The park’s historic carriage roads are wide and well-suited to steady, moderate riding. They are also a concrete example of class restrictions: Acadia limits e-bikes on carriage roads to Class 1 only. Ride gently, yield often, and enjoy the fact that you can hear birds instead of engines.
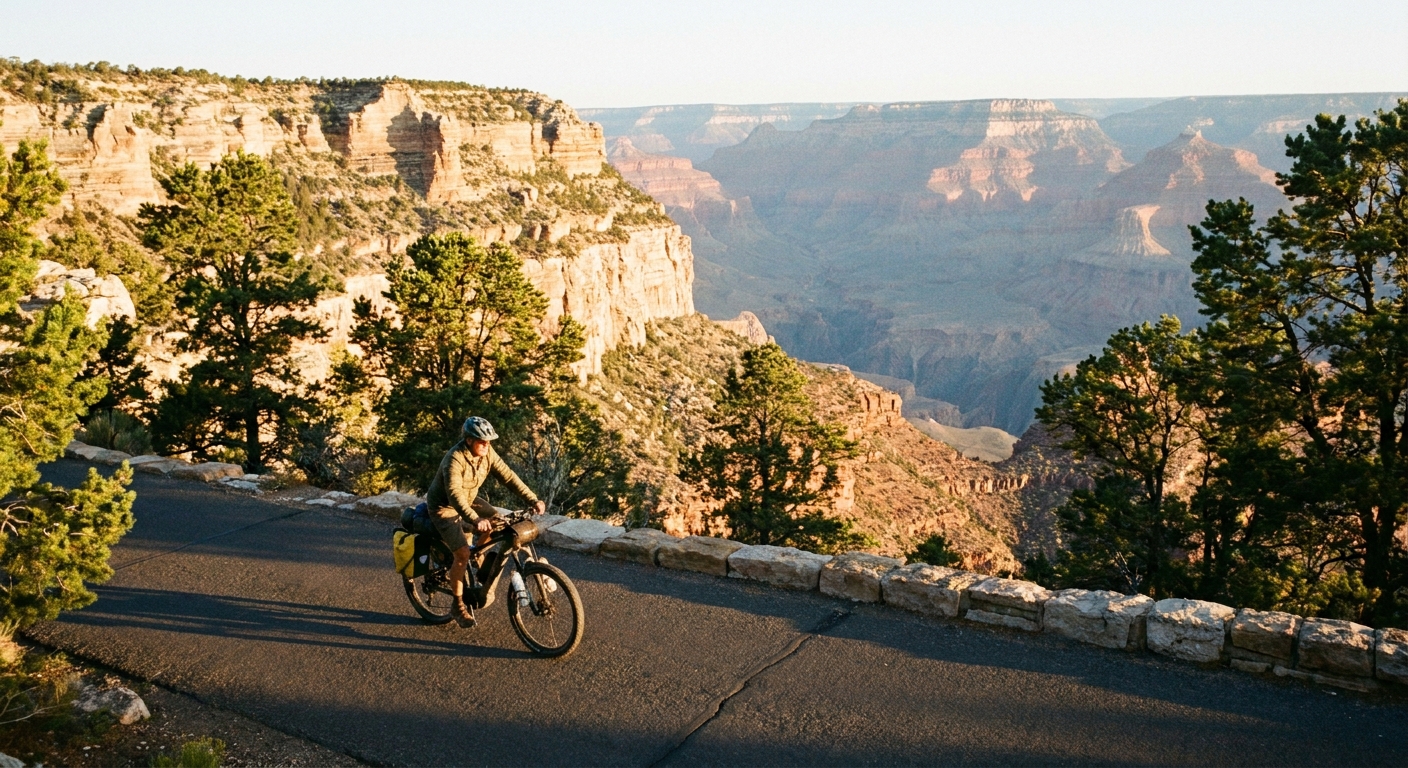
Grand Canyon: roads and viewpoints
The Grand Canyon illustrates a common reality: the most iconic landscapes are sometimes best accessed by roads and paved greenways, while most inner-canyon trails remain hiking-focused. On the South Rim, Hermit Road is a classic corridor for a viewpoint sampler with legs, especially when private vehicles are restricted seasonally. It is a great way to catch sunset without the parking chaos, as long as you follow posted rules and ride defensively.
Urban-adjacent park units
Parks near cities often have established multi-use paths and clearer bike infrastructure. These can be ideal “town wander” days: a morning ride, an afternoon museum, and a coffee stop that feels like a local ritual instead of a hurried fuel-up.
Ride planning checklists
Paved ride
- Choose a route with predictable intersections and wide shoulders or dedicated paths.
- Start early to avoid peak pedestrian traffic.
- Bring a bell, lights, and a lock for viewpoint stops.
- Plan a short hike add-on so your day is not all saddle time.
- Follow posted speed limits. Many shared paths have explicit caps.
Dirt ride
- Confirm bicycle and e-bike access for each segment, not just the “main road name.”
- Check weather. Mud increases damage and enforcement risk.
- Carry more water than you think you need and a basic repair kit.
- Budget extra battery for climbing, soft surfaces, and headwinds.
- Know wildlife etiquette and keep distance. Quiet motors can surprise animals.
Quick answers
Are e-bikes allowed on hiking trails in national parks?
Usually no, unless that trail is specifically designated for bicycles and the park also designates it for e-bike use. Many parks restrict bikes, electric or not, from most hiking trails.
Can I ride an eMTB on singletrack in a national park?
Only if that singletrack is open to bicycles and the park allows e-bikes there. In many parks, singletrack is not open to bikes at all.
If bikes are allowed, are Class 3 e-bikes allowed too?
It depends on the location and the specific route. Some parks allow Class 1 (and sometimes Class 2) on shared paths but restrict Class 3 in certain areas due to higher assisted speeds. Check the park’s e-bike page and the superintendent’s compendium for the definitive answer.
Do I need a license or registration?
Typically no for standard e-bikes, but rules vary by state and local jurisdiction. National park rules focus more on where you can ride and where motor assistance may be used, but always follow any posted requirements.
Do I need a helmet?
Helmet rules vary by state and by age. Even where not required, a helmet is a smart default for busy shared-use paths and park roads. If you are traveling with kids, check local youth helmet requirements before you roll out.
The smartest way to plan
Many people choose e-bikes for mobility, stamina, or simply to make a big scenic day more doable. Whatever your reason, the best national park e-bike days look like this: a sunrise paved ride for the big scenery, a mid-morning coffee stop back near town, and a slow afternoon on foot. It is the best of both worlds, the legs-and-lattes balance that keeps trips feeling expansive instead of exhausting.
If you only remember one thing, let it be this: plan by designation, ride by etiquette. Start with where bicycles are allowed, confirm the park’s current e-bike designation and class limits, and keep your speed in harmony with the people and wildlife around you.