Half Dome Cables: Permits, Timing, and Fitness Prep
Maya Lin
Maya Lin is a travel journalist and outdoor enthusiast who believes the best trips combine rugged adventures with urban comforts. After spending six years backpacking across four continents, she founded Trail & Town Guide to help fellow travelers navigate both hidden mountain passes and bustling city neighborhoods with confidence.
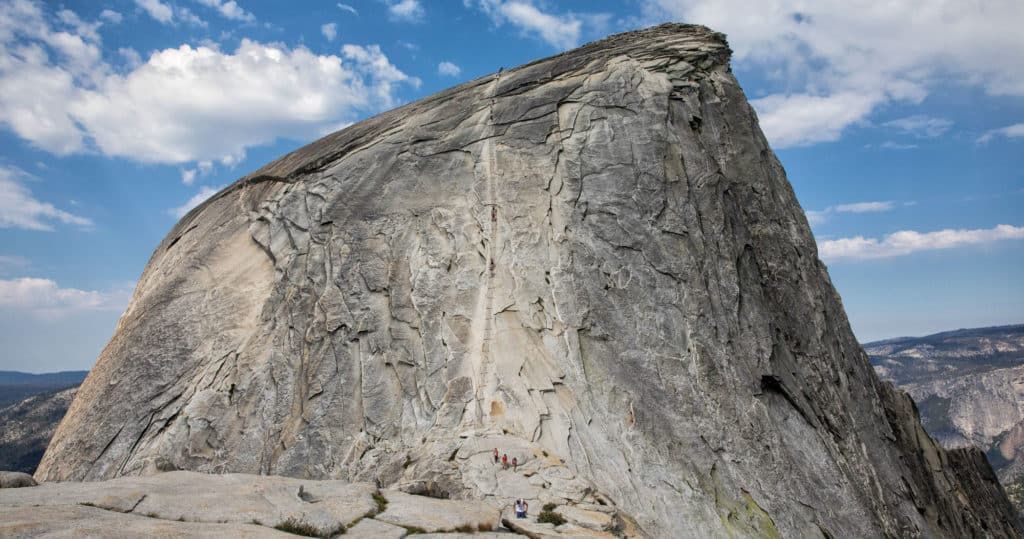
Half Dome is not just a hike. It is a long, commit-yourself kind of day with a permit checkpoint near Subdome and a final about-400-foot cable-assisted climb that can feel equal parts thrilling and humbling. If you are planning to go for it, the best prep is not hype. It is logistics, fitness, and the kind of judgment that keeps your story fun when you tell it later.
This page focuses on the cables, permits, and readiness. It is not a general list of Yosemite day hikes. The goal is to help you decide if Half Dome is right for this trip, and if it is, how to stack the odds in your favor.
Permits: preseason and daily
Preseason lottery (the main way most people get in)
The standard Half Dome permit is awarded through a preseason lottery run by the National Park Service via Recreation.gov. You apply during the announced application window, list your preferred dates, choose an acceptable group size, and pay the required fees if you win.
- Where: Recreation.gov (search for “Half Dome”).
- What you choose: Trip dates and group size. Keep your group size realistic. Oversizing can reduce your chances.
- What you need on hike day: A copy of the permit and matching photo ID for the permit holder. Rangers check near the Subdome area.
Strategy that actually helps: Be flexible on dates and keep your group small. Put the application window on your calendar so you do not miss it. There is no secret hack beyond flexibility and persistence.
Daily permits (when your plans change or you got unlucky)
There is also a daily lottery that happens two days in advance of your intended hiking date. It can be a lifesaver if you are already in Yosemite and the forecast looks perfect, but competition is intense and the turnaround is fast.
- Plan for fast turnaround: Cellular service in Yosemite Valley is inconsistent. If you are relying on the daily lottery, submit while you have service and screenshot confirmations.
- Have a backup day: Treat daily permits like a bonus, not a promise. Build your Yosemite itinerary so you still have a great day if you do not win.
Permits and cable season
The permit system discussed here applies to ascending Half Dome via the cables route when the cables are installed and managed for public use. If the cables are down or conditions are unsafe, Half Dome travel can be restricted, strongly discouraged, or simply a bad idea for most hikers, even if you are strong.
Always confirm current conditions: Check Yosemite National Park’s official conditions page and Recreation.gov updates before you travel. Dates vary year to year based on snowpack, trail damage, and maintenance schedules.
Cable season basics
“Cables are up” sounds like a simple yes or no, but the experience changes dramatically with conditions.
When cables are up
- Often late May or June through early or mid October, depending on snowpack and maintenance.
- Expect crowds and delays on the steepest section. The climb often becomes a slow-moving line.
- The route is still serious. Heat, thunderstorms, and fatigue make this a high-consequence day even with the cables in place.
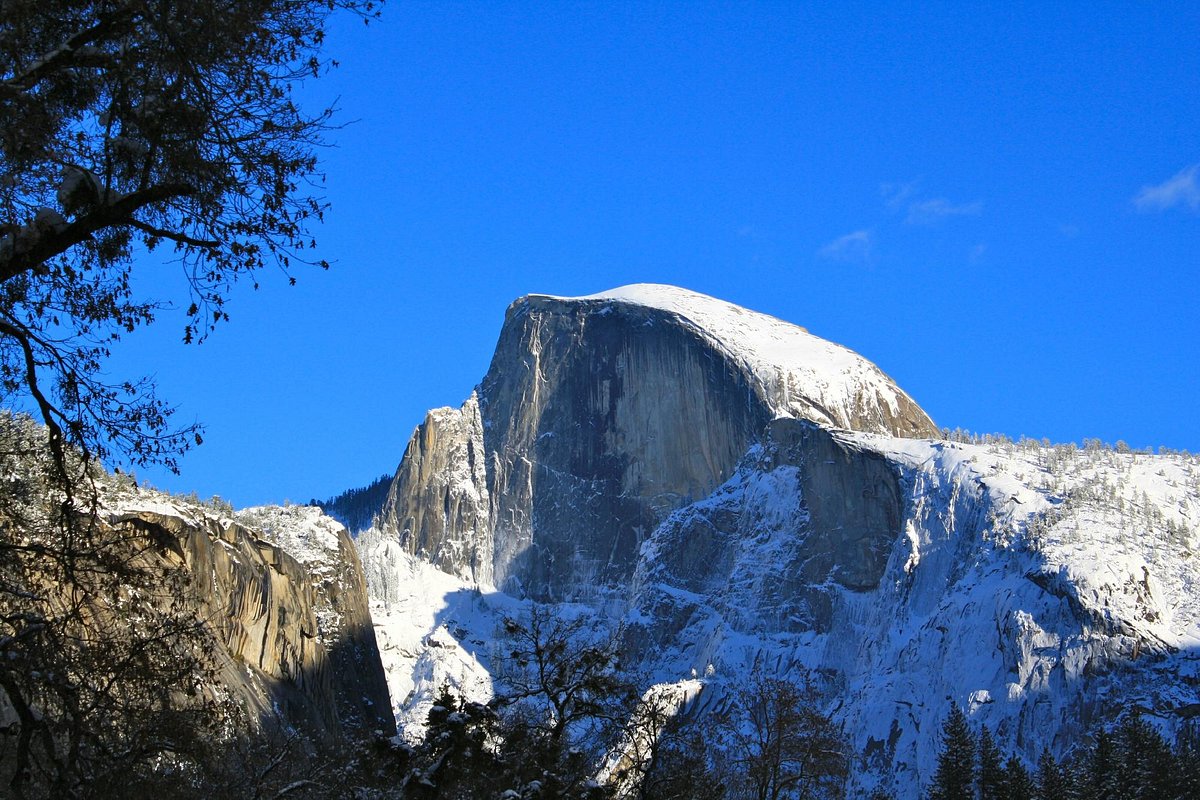
When cables are down or snow is lingering
When the cables are not installed for the season, the final slab can be slick with runoff, ice, or early-season snow. Even experienced hikers can get into trouble quickly because the terrain is steep, smooth, and exposed. If your plan hinges on “maybe we can still do it,” build in an ego-free alternative now.
If conditions are wet, icy, or stormy, Half Dome is not a place to negotiate with the mountain. It is a place to turn around and still be proud of your day.
Day-of logistics
How big of a day is it?
From Yosemite Valley via the Mist Trail or John Muir Trail corridor, Half Dome is typically about 14 to 17 miles round trip (route-dependent) with roughly 4,800 feet of elevation gain. Many hikers take 10 to 14+ hours car to car, depending on fitness, crowds, and how long you wait at bottlenecks.
Start time
If you want a calmer cables experience and a safer weather window, an early start is your best friend. The most common problems on Half Dome are not technical. They are time and fatigue.
- Leave in the dark if you can do so safely. A headlamp and a tested pacing plan matter more than bravado.
- Build in waiting time at bottlenecks, especially on busy weekends and mid-summer days.
- Give yourself a hard turnaround time (more on that below). It is the difference between a tough hike and a rescue scenario.
Getting to the trailhead
Most hikers begin from Yosemite Valley and follow the Mist Trail or John Muir Trail route toward Nevada Fall, then continue on toward Little Yosemite Valley and the Half Dome spur. Trailhead details can shift with seasonal closures and construction, so confirm current access and shuttle information on the park’s site.
The permit checkpoint
Rangers typically check permits before you commit to the final Half Dome approach. Keep your permit accessible and your ID handy. If you are in a group, stay together to reduce confusion and delays.
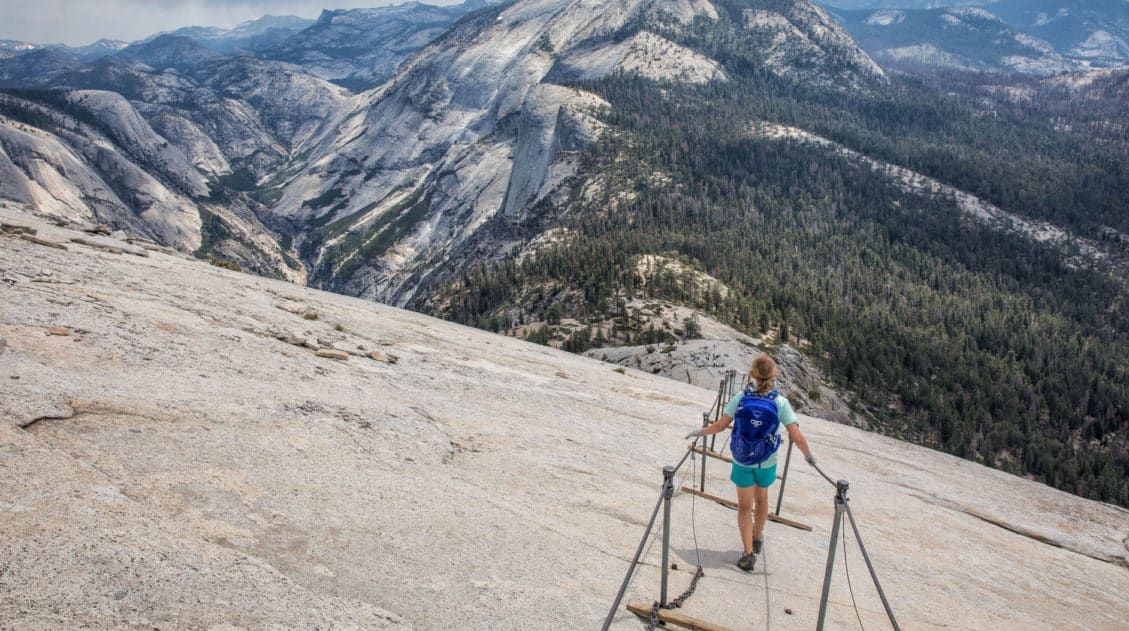
The cables: what it feels like
Grip matters, technique matters more
You do not need climber-level strength, but you do need enough hand endurance to hold the cables repeatedly on a steep angle, especially if you are stuck waiting behind others. Think steady, controlled movement rather than “haul yourself up.”
- Use your legs as the engine and your hands as the stabilizers.
- Move one step at a time and keep three points of contact whenever possible.
- Crowd etiquette: keep spacing, do not force passes, and let faster or slower parties sort themselves out at safe spots. Pressure from behind is not an emergency. Your footing is the priority.
Vertigo and exposure
Half Dome’s final section is exposed and visually intense. If you have a history of vertigo, panic on ladders, or freeze-ups on steep stairs, practice beforehand on smaller, lower-risk exposed hikes or viewpoints. The worst time to discover your threshold is midway up the cables with a line of people above and below you.
Weather changes everything
The granite can be grippy when dry and extremely slick when wet, even in light rain. Lightning is a deal-breaker. If thunderstorms are in the forecast, treat that as a no for the cables. Yosemite weather can shift quickly, and Half Dome is not where you want to be improvising a lightning plan.
Fitness prep
Half Dome is a stamina hike first and a cables climb second. The best prep looks a lot like training for other long Yosemite days: sustained uphill, long descents, and keeping your brain sharp when your legs are tired.
4 to 6 weeks out
- Hike uphill weekly, gradually increasing time on feet.
- Add stair training (real stairs or a step machine) to mimic relentless climbing.
- Practice downhill durability. Sore quads end more Half Dome attempts than weak lungs.
Grip and core
- Farmer carries with dumbbells or heavy grocery bags, 2 to 3 times per week.
- Dead hangs from a pull-up bar in short sets, building comfort and endurance.
- Core stability work like planks and side planks for balance on steep terrain.
Altitude and heat
Even if you live near sea level, you can still prepare by arriving a day or two early, hydrating well, and doing a moderate acclimation hike before your Half Dome attempt. Summer heat in the Valley can also feel surprisingly brutal. Plan for sun exposure and reflected heat off granite.
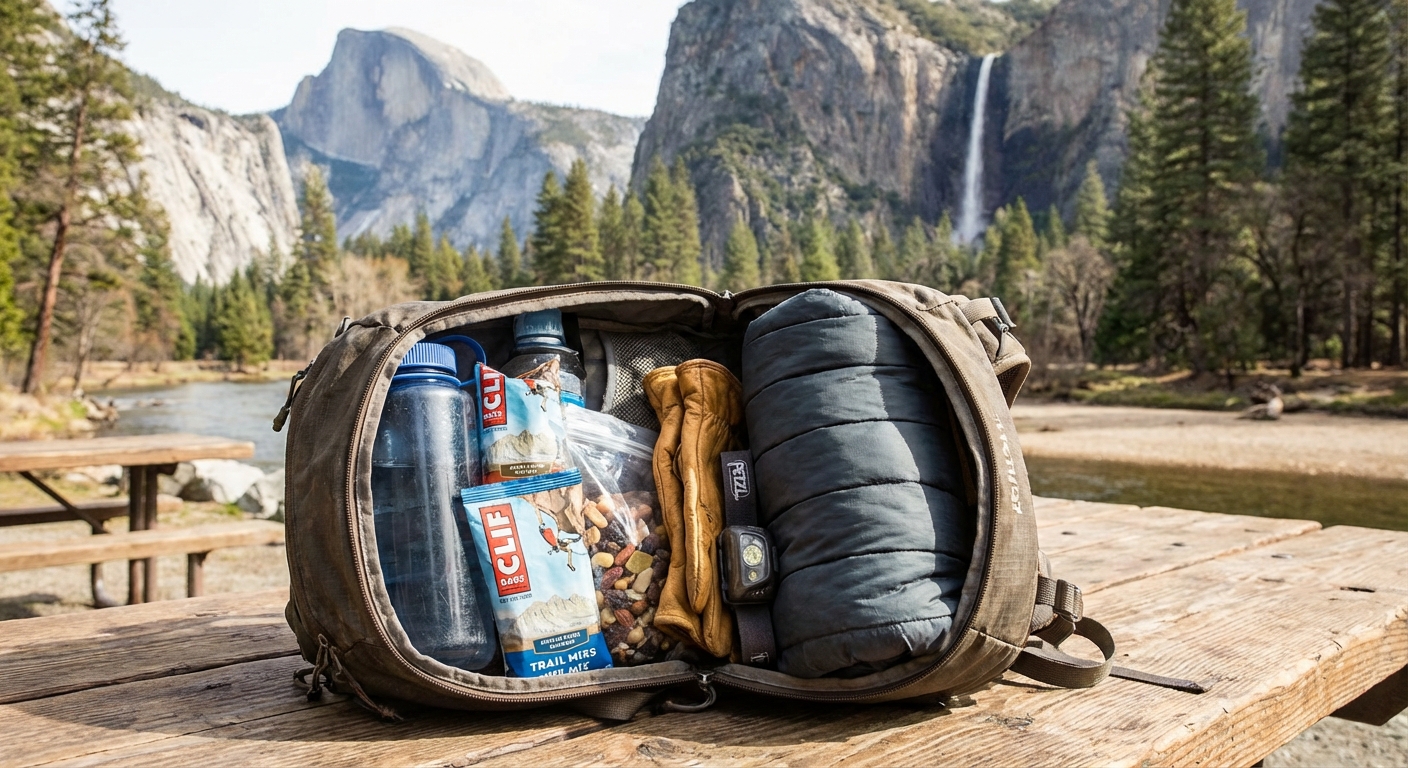
What to carry
My carry-on-only brain loves a tight kit, but Half Dome is not the day to under-pack essentials. You want light weight and high margin for safety.
Essentials
- Water: for most summer hikers, a good baseline is at least 4 liters (about 1 gallon) per person, more in heat. You may be able to filter along the way in some seasons, but do not bet your day on water sources without checking current conditions.
- Electrolytes and real calories: bring food you will actually eat when you are tired. Aim for a steady snack schedule.
- Headlamp: even if you “plan” to finish before dark.
- Layers: a light insulating layer and a rain shell. Weather changes at elevation.
- Sun protection: hat, sunglasses, sunscreen.
- Basic first aid: blister care, pain relief, and a small wrap.
- Navigation: offline map downloaded ahead of time.
Gloves
Most people are happier with gloves. You want something grippy that still lets you feel the cable. Avoid anything bulky that makes you clumsy. Test your gloves before the big day.
Shoes
Wear shoes with reliable traction on rock. If your tread is worn smooth, do not gamble. Granite rewards fresh rubber.
Leave behind
- Anything you are carrying “just in case” but have never used, unless it is a true safety item.
- Heavy glass water bottles and novelty gear that adds weight without function.
- Speakers. Half Dome is not the place for everyone else’s soundtrack.
When to turn back
Turning back is not failure on Half Dome. It is good mountain sense. Here are the situations where you should strongly consider calling it.
1) Thunderstorms, lightning, or wet cables
If storms are building, you hear thunder, or the granite is wet enough to feel slick, do not go up. The cables are exposed and the slab angle is unforgiving.
2) You are behind schedule
Half Dome takes most hikers a full day. If you reach key points later than planned, it is smart to turn around while you still have energy and daylight. Set a turnaround time before you start and keep it, even if you feel “close.”
3) Your body is flashing warning lights
- cramping that will not ease with rest and electrolytes
- headache plus nausea that suggests heat illness or altitude issues
- wobbly legs on descents, frequent stumbling, or confusion
Your descent is long and it is where mistakes happen. Save enough strength to get down safely.
4) Panic, vertigo, or freeze response
If you are already feeling locked up on the steep Subdome approach, listen to that signal. The cables amplify exposure. The strongest move you can make is to turn around early, enjoy the views, and hike out steady.
The best Half Dome mindset is not “summit at all costs.” It is “return to the Valley with enough energy to high-five your future self.”
How it compares
Half Dome shares a common thread with Yosemite’s other big day missions: the park rewards early starts, patient pacing, and a solid plan for water, heat, and descent. What makes Half Dome unique is the permit checkpoint and the cable climb exposure, which adds a psychological and safety layer you do not get on most trails.
If you have done a long Yosemite hike before and finished thinking, “I could do that again, but I needed one more snack and an earlier start,” you are closer to Half Dome readiness than you might think. If your last long hike ended with a bonk, sore knees, and a dark walk back to the car, treat that as useful data and adjust before you commit to the cables.
Quick checklist
- Permit confirmed and saved offline, ID packed
- Weather checked twice, including thunderstorm risk
- Early start plan, plus a firm turnaround time
- Gloves tested, shoes with good tread
- At least 4 liters (1 gallon) of water per person, plus electrolytes and enough calories for a full day
- Headlamp and layers
- Ego left in the car, along with a backup plan for tomorrow
Half Dome is iconic for a reason. Do it on a day when your logistics are clean, your body is ready, and the mountain is giving you a safe window. Yosemite will still be here if today is not the day.