Highline Trail From Logan Pass
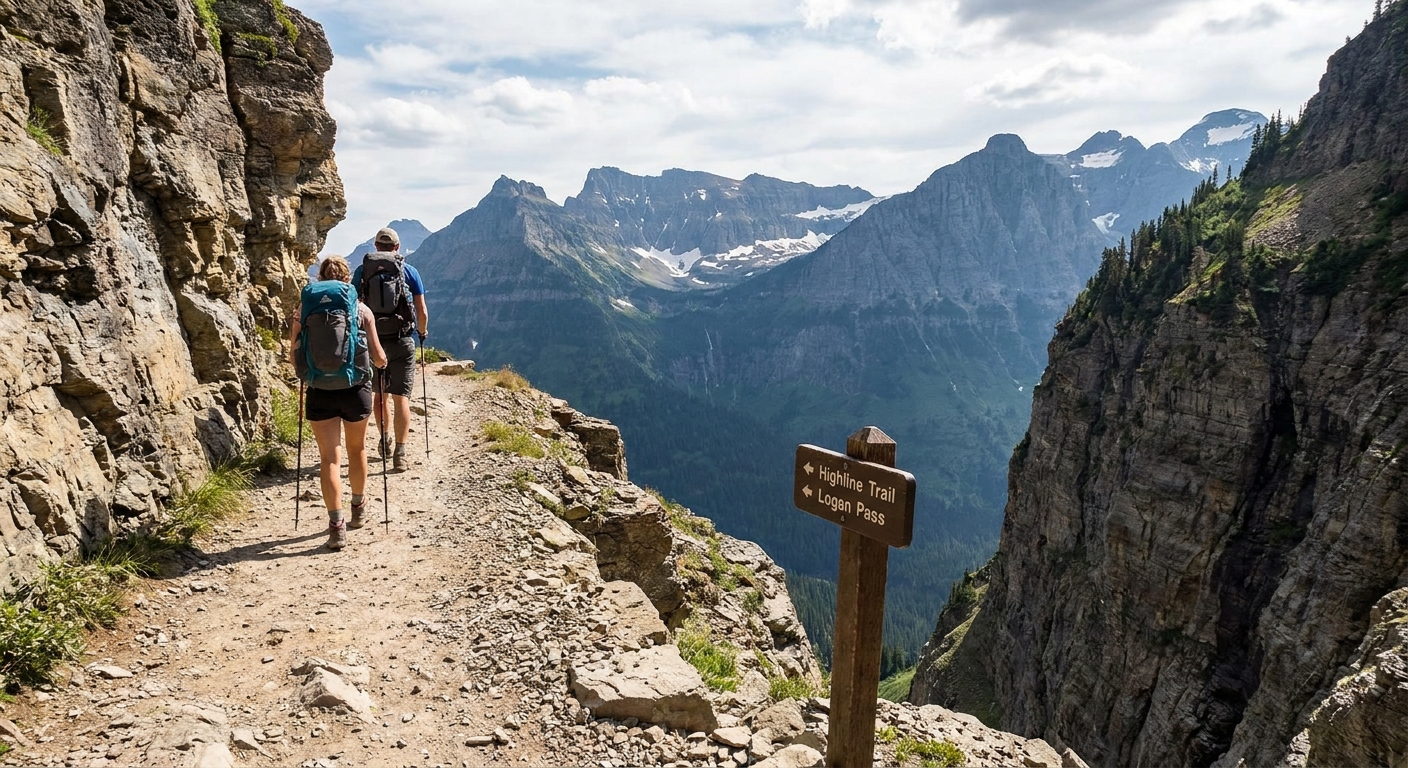
The Highline Trail is Glacier National Park’s greatest hits album in hike form. You start at Logan Pass, step onto a narrow slice of trail carved into the Garden Wall, then spend miles cruising above turquoise lakes and knife-edge ridgelines while mountain goats do their casual, gravity-defying thing.
It is also a hike where logistics matter as much as legs. Logan Pass parking fills early, the shuttle can save your day or complicate it if you miss the last run , and the most famous section comes with real exposure that is not for everyone.

Below is the trail-specific planning guide I wish I had the first time I tried to wing it: reservation and shuttle strategy, what the exposed section is actually like, grizzly-aware etiquette, and smart turnaround options if you want the views without the full commitment.
Highline Trail basics
- Trailhead: Logan Pass Visitor Center
- Typical season: Mid to late summer into early fall, depending on snow and trail work
- Core experience: A mostly contouring, high-elevation traverse with huge views and a short exposed segment near the start
- Choose-your-own distance: Out-and-back turnarounds are common, or make it a one-way traverse with a shuttle plan
Glacier is not the place to assume “it will be fine.” Snow can linger, closures happen for wildlife and conditions, and shuttles are a lifeline on Going-to-the-Sun Road. Before you go, check the National Park Service updates for current trail status, any area closures, and current shuttle operations.
Quick mileage note: Distances can vary slightly by mapping source and detours. The numbers below are solid planning estimates for the most common Highline milestones.
Vehicle reservations (do not skip this)
In peak summer, Glacier typically uses a vehicle reservation system to manage traffic on key corridors, including Going-to-the-Sun Road. If you plan to drive to Logan Pass or any Going-to-the-Sun Road access point during reservation hours, you may need both:
- Park entry pass (or annual pass), and
- Timed vehicle reservation for the corridor and date
This impacts Highline logistics in a big way. No reservation can mean you are not driving to Logan Pass when you planned, which can turn a straightforward hiking day into a shuttle-only scramble.
- Best move: Confirm the current year’s reservation requirements and hours before you build your itinerary.
- Workaround logic: If you do not have a reservation, you may still be able to enter outside reservation hours, or use the park shuttle from accessible areas depending on current operations. Policies shift year to year, so treat this as a “verify, then plan” step.
Logan Pass parking vs shuttle
Parking at Logan Pass
If you can snag a spot at Logan Pass, it is the simplest start and finish for an out-and-back Highline day. The catch is that the lot is small relative to demand, and it can fill very early in peak season.
- Best tactic: Arrive early in the morning. If you are aiming for a long Highline day or you want calm trail conditions, early is also better for hiking comfort.
- Backup tactic: If Logan Pass is full, you may be directed to keep driving. Do not count on circling. Have a Plan B for where you will park and catch the shuttle.
Using the free Going-to-the-Sun Road shuttle
The shuttle is free and designed to reduce traffic bottlenecks at Logan Pass. It can also be your best friend for one-way Highline options.
- Why it helps: You can park at a less hectic stop, ride up to Logan Pass, hike one way, then shuttle back from wherever you exit.
- Why it can be stressful: Lines get long, buses can be full, and the last shuttle sets a hard deadline that your feet cannot negotiate with.
My rule: Build your day around the shuttle, not the other way around. Start early, keep buffer time, and know where you will rejoin the road system in the afternoon.
Shuttle timing realities (what to plan for)
Exact shuttle schedules can vary by season and operations, so confirm times before your hike. That said, these patterns are consistent most years:
- Morning demand spike: Logan Pass-bound shuttles are busiest early, especially on clear days.
- Midday crowding: Expect waits at major stops, and consider hiking early to avoid riding at the peak.
- Last shuttle pressure: The final runs in late afternoon or early evening are not something you want to cut close. If you miss it, you may be stuck trying to arrange a ride or walking long road miles.
If you are doing a longer one-way Highline day, take a screenshot of the current shuttle info while you have service and write down your key stops. Logan Pass can be a dead zone for data.
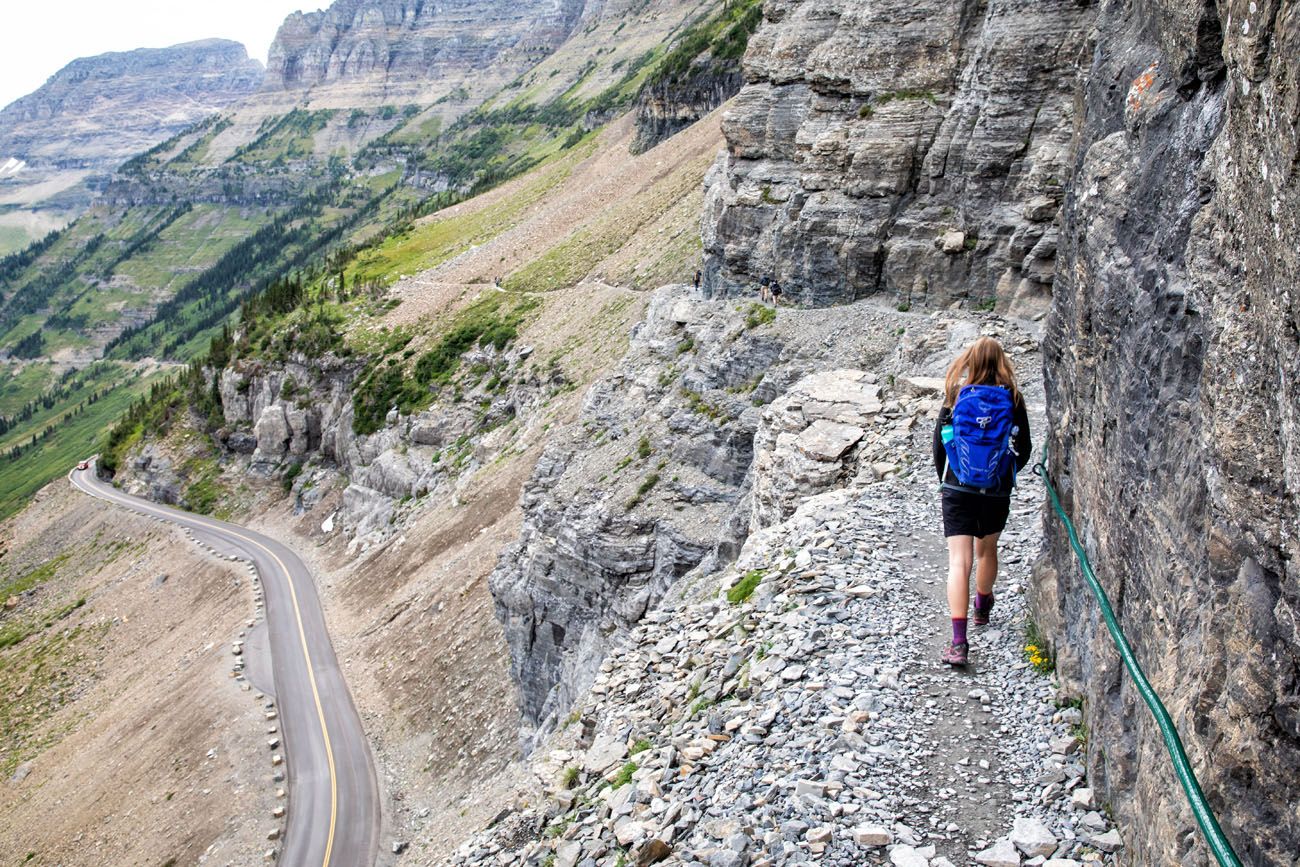
Exposure: what the “ledge” section is actually like
Right after you leave Logan Pass, the Highline’s most talked-about segment arrives quickly: a narrow bench-cut trail with a steep drop. There is a hand cable anchored to the rock.
Here is the honest version: it is not technical climbing, but it is real exposure. If you are comfortable on narrow trails and you can keep your eyes on your feet, it usually feels manageable. If heights make your legs go wobbly, this is the spot where you will know fast.
- How long it lasts: It is relatively short compared to the full hike, but it can feel longer if you are anxious.
- What makes it harder: Wind, crowds, and having to pass people going the opposite direction.
- What helps: Start early to avoid traffic, keep one hand on the cable, and let faster hikers pass when you find a wider spot.
Family and cautious-hiker note: Many people turn around right after the exposed cable section and still feel like they got the “Highline moment.” There is no shame in that. The mountain will still be there when your comfort level is, too.
Turnaround options
One of the best things about starting at Logan Pass is that you can tailor the Highline to your crew, your weather window, and your nerves.
Mileage cheat sheet: These are approximate distances one way from Logan Pass unless noted.
Option 1: After the cable
This is the “I did the iconic part” turnaround. You get the dramatic start, then you retreat before your brain spends all day negotiating with the drop-off.
- Approx distance: Roughly 0.5 to 1.0 mile in (varies by where you call it)
- Best for: Height-averse hikers, families with kids who are strong walkers, anyone testing comfort with exposure
- Tradeoff: You miss the longer, airy traverse where the views open up and the trail relaxes
Option 2: The Haystack
Many hikers aim for the Haystack, a prominent rock formation along the route. Past this point, the trail often feels less “ledge-like” and more like a high, open balcony.
- Approx distance: About 3.6 miles in
- Best for: People who can handle the start but want a reasonable out-and-back with big payoff
- Tradeoff: You will want to budget time for lingering, because this is where Glacier starts showing off
Option 3: Granite Park Chalet
Granite Park Chalet is the iconic mid-hike destination for a lot of Highline hikers. It is a historic backcountry chalet area and a natural place to rest and refuel.
- Approx distance: About 7.6 miles in
- Best for: Strong day hikers who want a clear “destination” and a longer day
- Logistics note: Services and availability can vary. Do not rely on purchasing food or water there. Carry what you need.
Option 4: One way to The Loop
The most famous point-to-point version goes from Logan Pass to The Loop on Going-to-the-Sun Road. It is a big day and it is best done with solid conditioning, stable weather, and a real shuttle plan.
- Approx distance: About 11.6 miles total (Logan Pass to The Loop)
- What people forget: The ending descent is steep, mostly unshaded, and more than 2,000 feet down. It is notoriously hard on knees, especially late in the day when your legs are already cooked.
- Best for: Experienced hikers who want a full-value Glacier day
- Biggest risk: Missing the last shuttle or underestimating time on tired legs, especially in heat or smoke
My practical advice: If you are unsure, aim for the Haystack or Granite Park and decide on the fly. The Highline is spectacular even without the full traverse.
Wildlife and grizzly-aware etiquette
Glacier is prime bear country. On the Highline, you are moving through open terrain with pockets of brushy cover and seasonal berry zones. The goal is not to be scared. The goal is to be predictable, loud enough to be noticed, and respectful of closures.
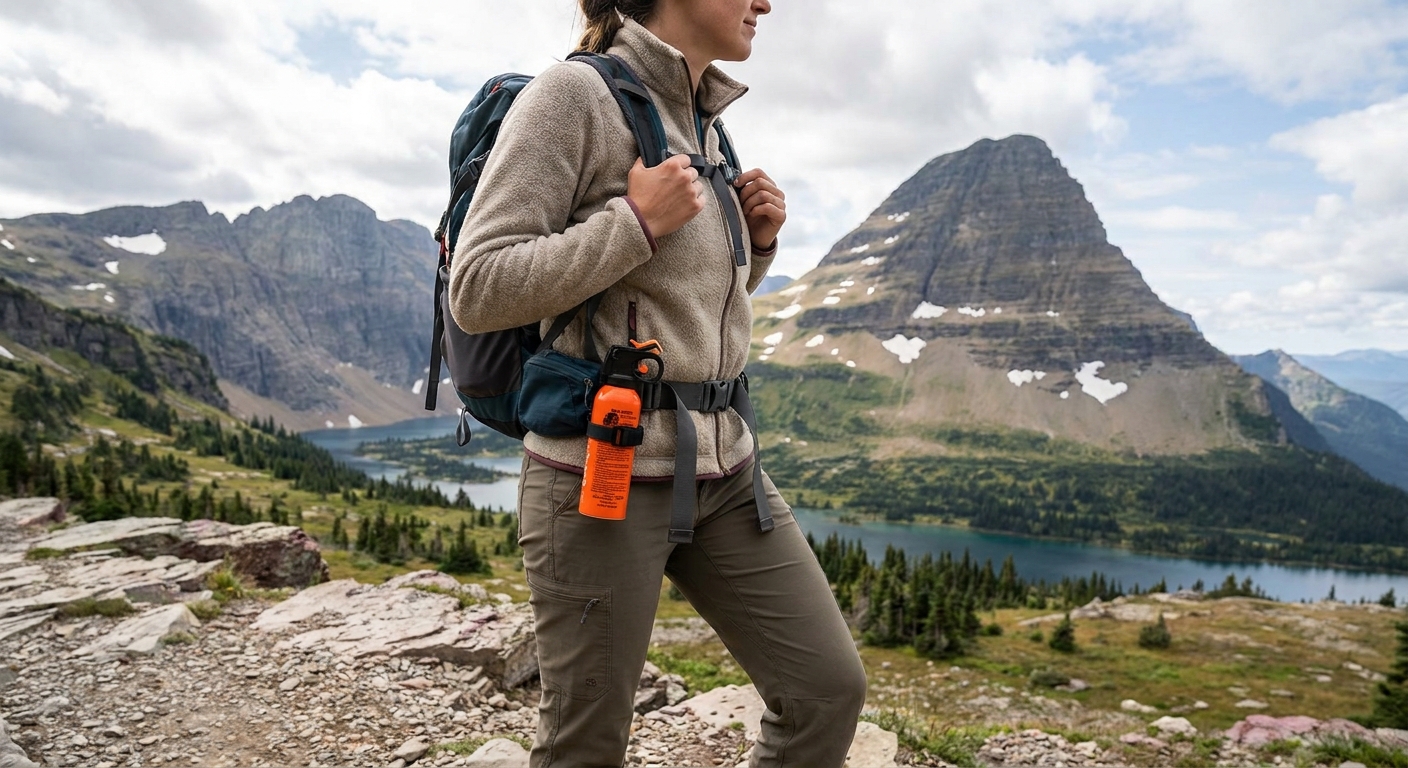
Carry bear spray and know how to use it
- Keep bear spray accessible, not inside your pack.
- Practice the safety clip at home so you are not learning under stress.
- Check park rules and airline restrictions if you are flying in. You typically cannot fly with bear spray.
Hike smart in a high-traffic corridor
- Make noise in low-visibility areas and when approaching blind corners.
- Do not run if you see a bear. Create distance calmly.
- Give wildlife space, especially mountain goats and bighorn sheep. They can be surprisingly assertive around salty sweat on packs and clothing.
Respect closures immediately
If an area is closed for bear activity, it is closed for a reason. Reroute your day. In Glacier, the trail does not negotiate.
Going-to-the-Sun Road pairings
The Highline pairs beautifully with a “trail plus town” Glacier day. Because you start at Logan Pass, your before and after stops tend to be the scenic pullouts and short walks along Going-to-the-Sun Road.
Pre-hike stops
- Lake McDonald area: Easy lakeshore strolls if you are staying on the west side.
- Apgar Village: Coffee and last-minute snacks before you commit to shuttle lines.
Post-hike wins
- Hidden Lake Overlook area: If you still have energy and the trail is open, it is a classic near-Logan Pass add-on.
- Big Bend and other pullouts: Perfect for golden-hour light if you finish with time to spare.
Timing tip: If you are doing a longer Highline day, save your scenic stops for after the hike. Morning is when you want to be moving, parking, and getting on trail before the road turns into a slow-moving parade.
What to pack
The Highline can feel summery in the sun and downright cold in wind or sudden weather. Pack like you are going to experience all four seasons between breakfast and lunch.
- Layers: Light insulating layer plus a rain shell or wind shell
- Water: Enough for a long day, plus a way to treat water if you plan to refill where permitted
- Sun protection: Hat, sunglasses, sunscreen. The exposure is scenic and solar.
- Traction and stability: Hiking shoes with good grip. Trekking poles help on tired descents and when passing on narrow tread.
- Bear spray: Accessible and not expired
- Food: More than you think you need. The views encourage long snack breaks.
Common mistakes
- Ignoring the vehicle reservation system: If you plan to drive Going-to-the-Sun Road during reservation hours, handle that detail first or your whole day may collapse into Plan B.
- Starting late and hoping for Logan Pass parking: If you arrive mid-morning in peak season, assume the lot will be full and your plan will change.
- Not budgeting shuttle buffer time: A “10-minute ride” can turn into an hour with lines and full buses.
- Underestimating exposure anxiety: If heights bother you, commit to an early start and a short turnaround plan so you do not feel trapped by crowds.
- Skipping bear spray because it is popular: Popular trails still see bears. Carry it.
- Forgetting that weather is the boss: If winds are ripping or storms build, turn around early. Ridge trails are not the place to be stubborn.
Three simple day plans
1) The cautious first-timer
- Start early from Logan Pass.
- Walk to and past the cable section.
- Turn around when your comfort says “enough,” not when the map says you should.
2) The classic out-and-back
- Take shuttle or park early at Logan Pass.
- Hike to the Haystack (about 3.6 miles) or Granite Park Chalet (about 7.6 miles).
- Return the same way to avoid shuttle dependency at the end.
3) The one-way adventure
- Confirm vehicle reservation requirements, shuttle operations, and last run timing before you lace up.
- Start as early as you can manage.
- Carry extra water and food, keep a steady pace, and leave margin for photos and wildlife delays.
Final notes
The Highline is iconic for a reason, but the magic is not just the scenery. It is the way the trail lets you feel simultaneously small and capable. Plan the transportation details, respect the exposure for what it is, and choose a turnaround point that keeps your day fun, not frantic.
If you want the best version of this hike, my hiker brain says: start early, pack light but smart, and end the day with something simple and perfect, like a local coffee and a lakeshore sunset back down the road.