How to Prevent and Treat Blisters While Hiking
Maya Lin
Maya Lin is a travel journalist and outdoor enthusiast who believes the best trips combine rugged adventures with urban comforts. After spending six years backpacking across four continents, she founded Trail & Town Guide to help fellow travelers navigate both hidden mountain passes and bustling city neighborhoods with confidence.
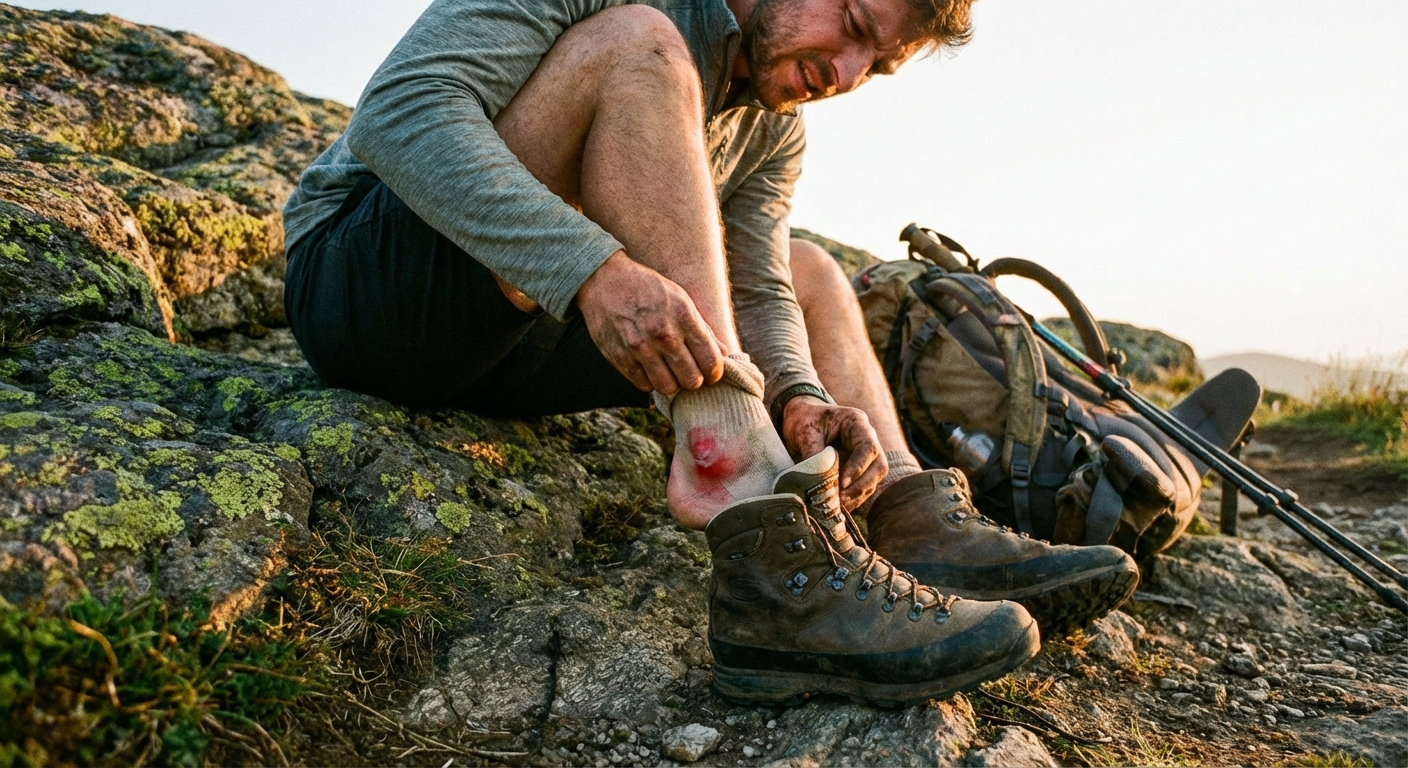
Blisters are the most annoying kind of hike-derailing problem because they start out so small. One tiny hot spot, and suddenly every step feels like you are walking on a pebble you cannot kick out. The good news: most hiking blisters are predictable, preventable, and very treatable if you catch them early.
This guide walks you through why blisters form, how to stop them before they start, and what to do when you are already on the trail with a painful bubble on your heel.
Quick note: This is general outdoor first aid advice, not medical care. If you have diabetes, poor circulation, immune suppression, or a worsening wound, get professional help early.
Why blisters happen
A blister forms when repeated rubbing causes the top layers of skin to separate. Fluid fills the gap, and you get that tender, raised bubble. On hikes, three factors usually combine:
- Friction: Your foot sliding even a few millimeters inside your sock or shoe with each step.
- Moisture: Sweat, rain, creek crossings, or humidity that softens skin and makes it easier to shear.
- Pressure points and fit issues: Footwear that is too small, too big, too stiff in the wrong place, or laced in a way that lets your foot move.
Common blister zones include heels, the back of the Achilles, the outside edge of the forefoot, toes (especially downhill), and the ball of the foot.
Prevention: what actually works
If you only remember one rule, make it this: treat hot spots immediately. Prevention is less about hero products and more about noticing early friction and fixing the cause before skin breaks down.
1) Get fit right (especially downhill)
Fit is the foundation. Even the best blister bandage is a backup plan if your footwear is wrong.
- Leave room for swelling: Feet expand over the day. Aim for a thumb’s width of space in front of your longest toe when standing.
- Lock the heel down: If your heel lifts, you are basically sanding your skin.
- Downhill test: When you kick your foot forward, your toes should not slam the front. Toe bang often turns into toe blisters fast.
- Match footwear to terrain: Trail runners can be more forgiving and breathable than boots for many hikers. Boots can be great when you need support, protection, or durability. Either way, fit wins.
2) Break footwear in the smart way
Breaking in does not mean suffering through a “toughening” hike. It means gradually shaping the shoe and spotting pressure points early.
- Wear them around town, then on short walks with the socks you hike in.
- Take them on a local half-day hike before committing to a big mileage day.
- If one spot keeps rubbing in the same place, it is a fit issue, not a break-in issue.
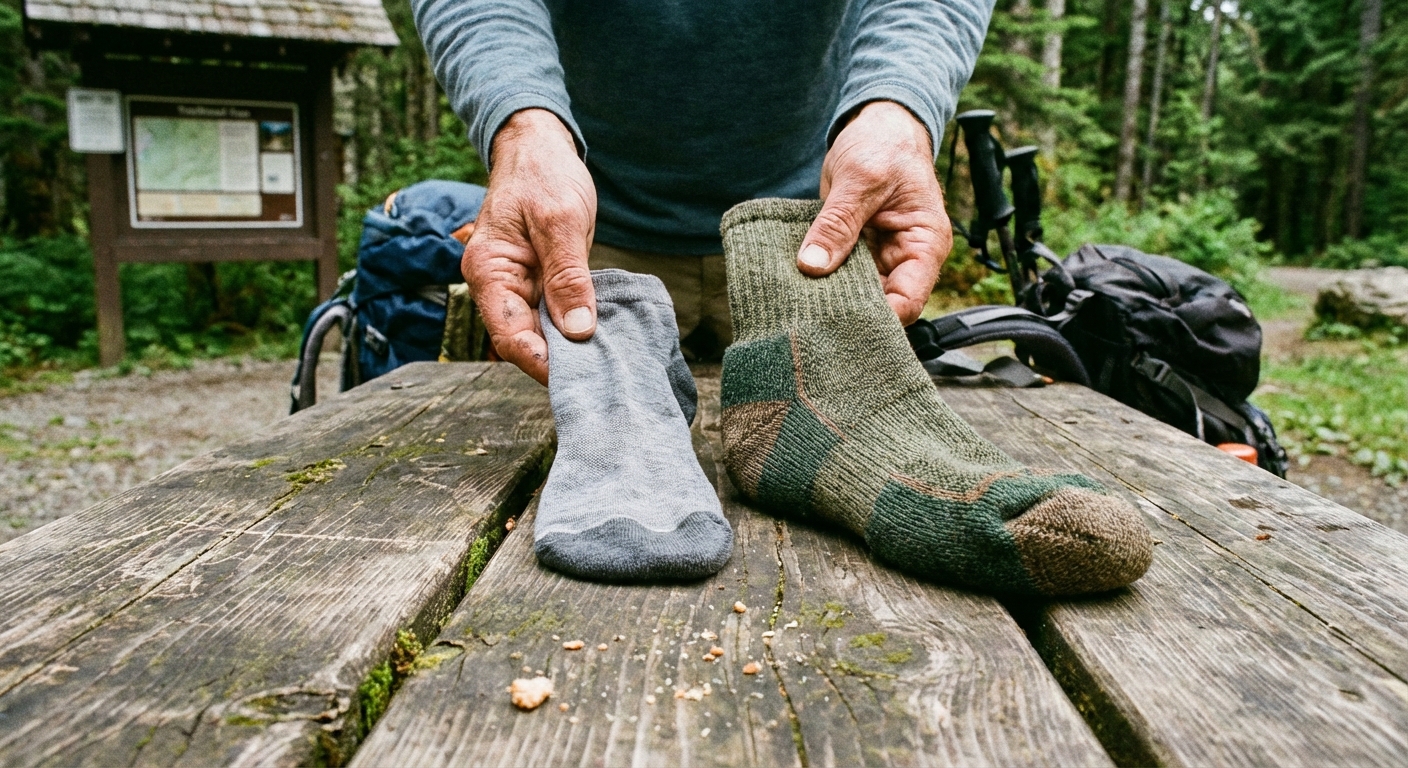
3) Dial in socks
Socks are your friction management system. The goals are to reduce moisture and reduce rubbing.
- Choose synthetic or merino: They wick better than cotton and dry faster. Avoid cotton for hiking.
- Snug, not sloppy: Wrinkles create friction. If you can pinch extra fabric at the toes or heel, try a different size or model.
- Consider liner socks: A thin liner under a hiking sock can shift friction between layers of fabric instead of on your skin.
- Try toe socks for toe rub: If you blister between toes, toe socks are a popular and surprisingly effective fix.
- Carry a dry pair: Changing socks at lunch can be a blister-prevention superpower on hot days or after a stream crossing.
Hot spot protocol
A hot spot is redness, tenderness, or a “burning” feeling before a blister fully forms. This is your moment to intervene.
- Stop and check: Sit down, take off the shoe, and look at the area.
- Dry it: If skin is damp, dry your foot and sock. If your sock is soaked, swap it.
- Reduce friction fast: On intact skin, tape directly over the hot spot (smooth, no wrinkles), or use a blister barrier. If a blister is already raised, protect it with a donut and a cover dressing instead of taping directly onto the blister roof.
- Re-lace if needed: Use a heel lock lacing technique to prevent heel lift, or loosen across the forefoot if you have pressure on top of the foot.
If you push through “just a little more,” you usually end up spending 20 minutes later treating a blister that is harder to protect.
Moleskin, tape, and blister bandages
Moleskin
Moleskin is best for building a donut that takes pressure off a tender spot. It can slip when your feet are sweaty, so many hikers use tape as the outer “keeper” layer.
- Cut a piece large enough to extend beyond the hot spot.
- If a blister is forming, cut a donut hole so the blister sits in the center without pressure.
- Press firmly and smooth edges to prevent peeling.
- For sweaty feet, secure moleskin with tape over the top.
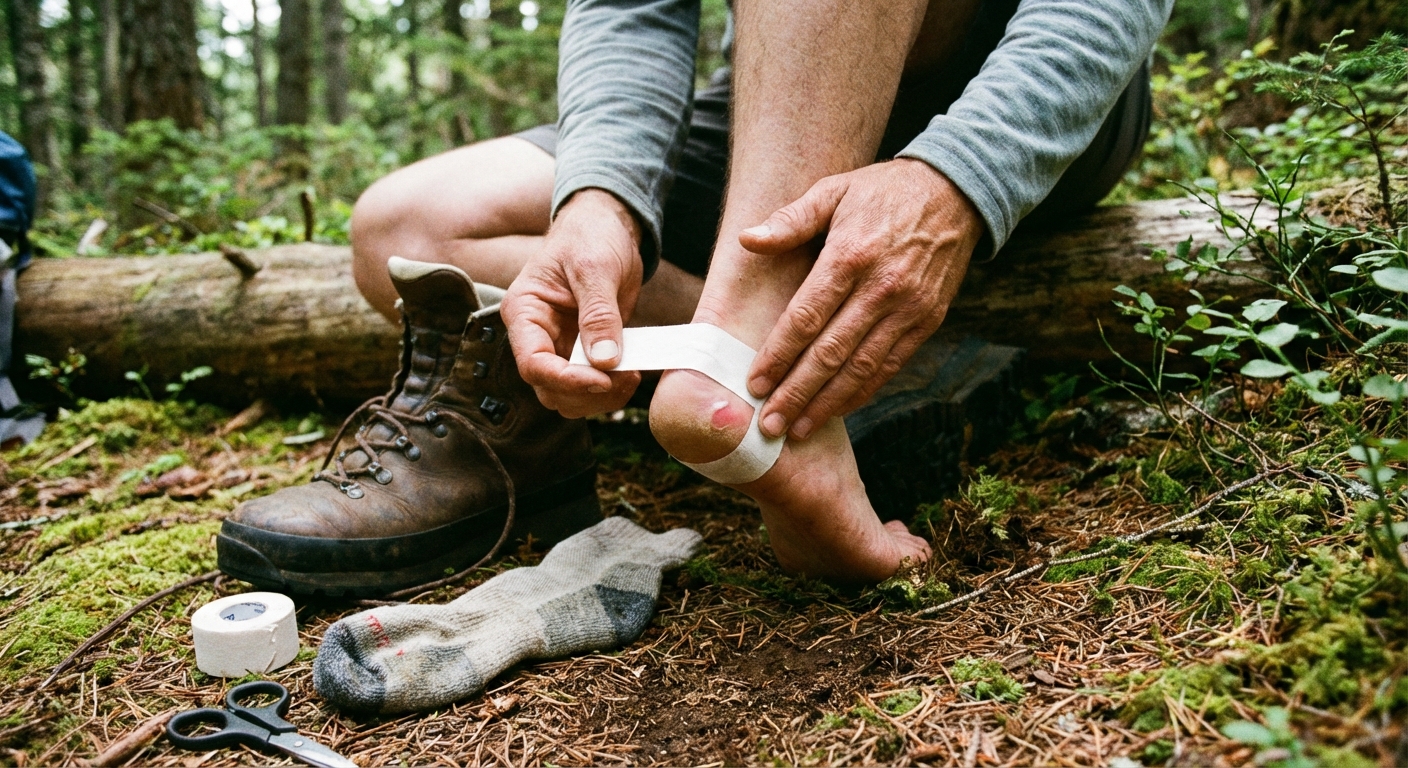
Leukotape or athletic tape
Tape is a workhorse for intact hot spots and other high-friction zones. Done right, it reduces shear and protects your skin. Done sloppy, it can create new friction, especially if it wrinkles or catches your sock.
- Do not put Leukotape directly on a formed blister. Leukotape is incredibly sticky and can tear the blister roof when removed. Use it on intact hot spots, or to secure a nonstick pad over a blister.
- Clean and dry the skin first. Tape does not stick to damp skin.
- Round the corners of the tape so it is less likely to peel.
- Apply with minimal tension and no wrinkles.
- If you react to adhesives, stop using that tape and switch to a different product or a liner sock system.
Hydrocolloid blister bandages
Hydrocolloid dressings cushion and can help protect skin while it heals. They work best when they can stay put.
- Apply to clean, dry skin.
- Let it ride. Hydrocolloids are meant to stay on for days and usually fall off on their own. Pulling one off early often rips the blister roof.
- Do not stack too many layers on top, or you may create new pressure in tight footwear.
Treating blisters on the trail
There are two questions that matter: Is it intact? and Is it likely to pop? Your goal is to protect the skin roof because it is natural armor against infection.
When to leave it alone
If the blister is small, intact, and not too painful, it is often best to:
- Clean the area.
- Protect it with a donut of moleskin or a hydrocolloid bandage.
- Reduce friction by adjusting socks and lacing.
When draining can make sense
Consider draining if the blister is large, very painful, or in a spot where pressure will almost certainly rupture it during the hike. Draining can reduce pain and prevent a messy tear.
Tradeoff: opening a blister increases infection risk. If you cannot keep the area reasonably clean and covered, do not turn a closed blister into an open wound.
If you drain a blister, aim to keep the roof intact. That skin layer is still useful protection.
How to drain a blister as cleanly as possible
- Wash or sanitize your hands.
- Clean the blister area. Soap and clean water is ideal when you have it. Antiseptic wipes work when you do not. Avoid scrubbing alcohol into open skin if you can, since it can be harsh on tissue.
- Use a sterile lancet or needle if you have one.
- Puncture at the edge of the blister, not the center.
- Gently express fluid with clean gauze. Do not rip the skin roof.
- Protect the roof: cover with a nonstick pad, then secure with tape. If you need padding, add a moleskin donut around it.
- Ointment is optional: a thin layer can help keep dressings from sticking, but some people get contact dermatitis from antibiotic ointments. If you use one and it irritates your skin, stop. Plain petroleum jelly can also reduce sticking.
If the blister roof has already torn, trim only loose, dirty flaps that will snag. Keep as much intact skin as you can, then cover with a nonstick dressing and secure well.
Trail reality: if you cannot keep the area reasonably clean and covered, do not turn your blister into an open wound by draining it unnecessarily.
When to turn back
Blisters are usually manageable, but sometimes the smart move is to cut the hike short. Consider turning back if:
- Pain changes your gait: Limping can lead to knee, hip, or ankle injuries.
- You cannot keep a dressing in place: Constant slipping means constant friction.
- The blister is worsening fast: Especially on multi-day trips where tomorrow will be more miles.
- Signs of infection appear: Spreading redness, warmth, swelling, pus, fever, or red streaks up the foot or leg require medical care.
- You cannot bear weight normally or pain is escalating quickly despite protection.
- You have diabetes, poor circulation, or immune suppression: Foot wounds can escalate quickly. Get help early.
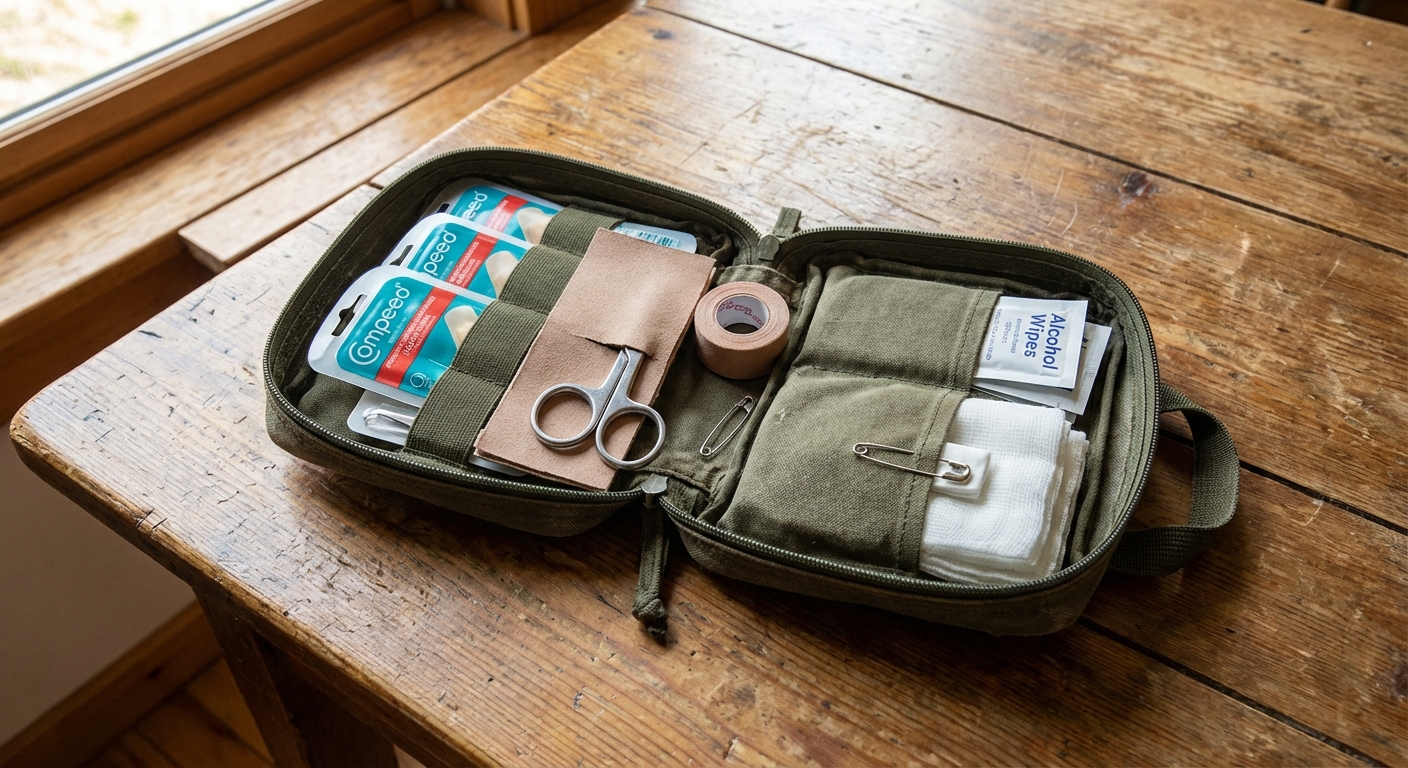
A simple blister kit
This is the small, high-impact kit I keep in a zip pouch. It weighs almost nothing and saves trips.
- Leukotape (wrap a few feet around a pencil or trekking pole segment so you do not carry the whole roll)
- Moleskin sheets (pre-cut a couple of donut shapes if you want to move fast)
- Hydrocolloid blister bandages (a few sizes)
- Alcohol wipes or antiseptic wipes (use thoughtfully on open skin)
- Sterile lancet or needle (for draining only when appropriate)
- Small gauze pads and nonstick pads
- Mini antibiotic ointment packet or a tiny dab of petroleum jelly (optional)
- Small scissors or a compact knife with scissors
- Nitrile gloves (optional, but great for hygiene)
Quick checklist
- Trim toenails before big mileage days.
- Start with dry socks and footwear that fits your downhill foot.
- Use heel lock lacing if your heel lifts.
- Stop at the first hint of a hot spot and tape it on intact skin.
- Change socks after a soaking or at mid-day if your feet are sweaty.
- Do not “tough it out” through rubbing. Blisters rarely get better while you keep walking.
If you want the most practical takeaway: tape early when you feel a hot spot. That tiny pause is what keeps rugged adventure from turning into a slow, limping march back to the trailhead.