Junior Ranger Programs: Best Parks and Easy Day Hike Plans
Junior Ranger programs are one of the best-kept secrets in the National Park Service for families who want more than “just a walk” but less than a full day of structured activities. They turn a regular hike into a scavenger hunt, a science lab, and a tiny confidence boost all at once. And the best part is that you can absolutely fit Junior Ranger tasks into a day hike without sacrificing the fun part: being outside.
I have seen kids power through the last half mile of a trail because they needed one more plant ID to finish their booklet. I have also seen parents accidentally schedule a 10-mile hike during the exact window of the only Junior Ranger swearing-in. This guide is built to help you land in the sweet spot.

How Junior Ranger programs work
What it is
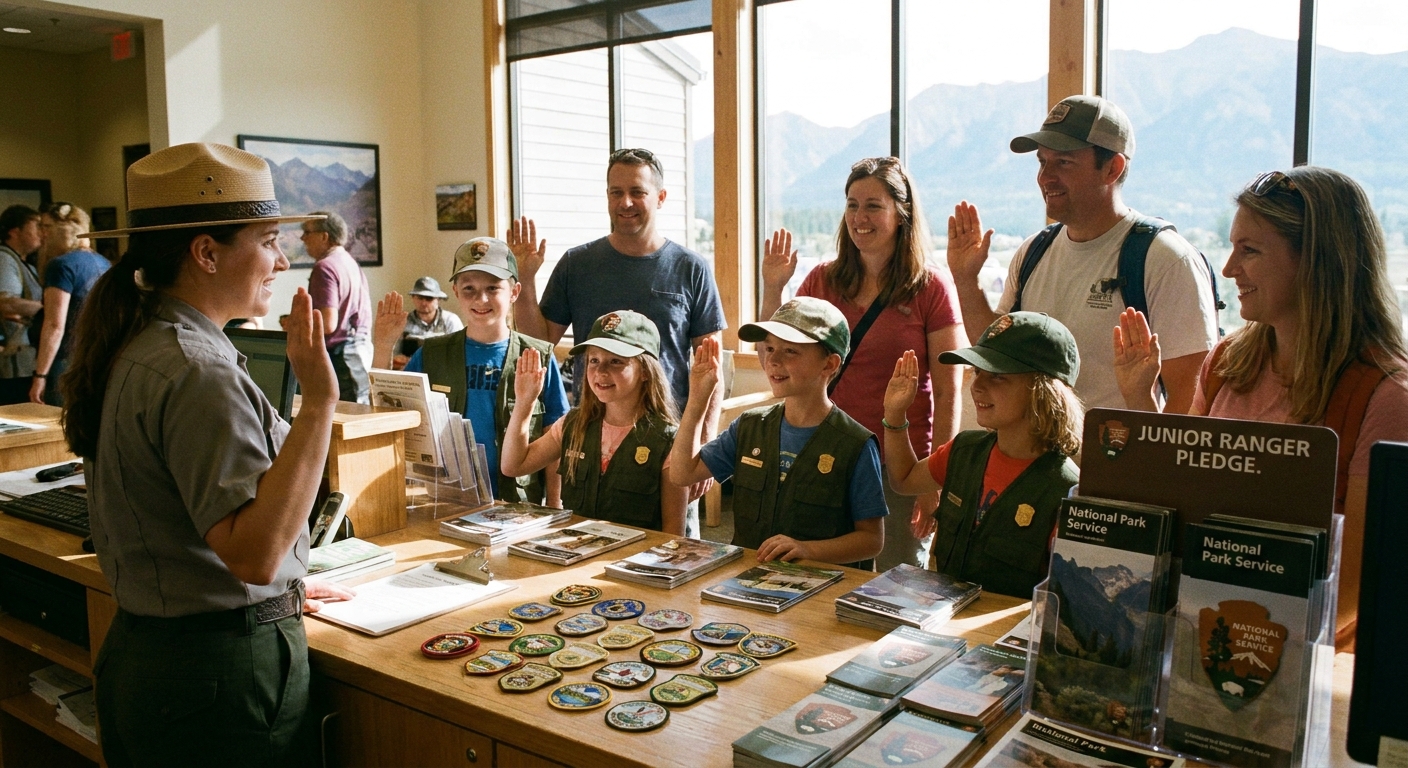
Most National Park Service sites (national parks, monuments, historic sites, and more) offer a Junior Ranger program. Kids complete a set of activities, chat with a ranger, and get sworn in to receive a badge or patch. Some places also offer add-on programs like “Junior Paleontologist,” “Junior Snow Ranger,” “Night Sky Junior Ranger,” or park-specific activity booklets.
Typical ages (and the real-life rule)
- Common target ages: roughly 5 to 12, but many booklets work well up to early teens.
- Little kids: many sites have a “Little Junior Ranger” version or allow parents to read questions aloud and help with writing.
- Teens and adults: many places will happily swear in anyone who completes the work, but not all. A few sites keep it kid-only or offer a separate version. If this matters to your family, ask at the desk.
Time cost: what to budget
Timing varies a lot by site, season, and how detailed the booklet is. Here are typical planning estimates that work for many families:
- Pick up booklet: 5 to 15 minutes (longer if there is a line).
- Complete activities: 30 to 120 minutes. Some are quick, others can take a few hours, especially if they include multiple exhibits or ranger programs.
- Turn in and get sworn in: 10 to 30 minutes, depending on crowds and staffing.
- Ranger program add-on: 30 to 60 minutes for a talk, walk, or campfire program.
Where to get the booklet
- Visitor centers and museums are the most reliable pickup spot.
- Entrance stations sometimes have them, especially in busy parks. If you can snag one at the gate, you just bought yourself time later.
- Online: some sites post PDF versions. Even when they do, you often still need to check in with a ranger for the badge.
- Fees: many are free; some charge a small amount to cover printing and the badge or patch. It varies by site, and sometimes the booklet is sold through the park store.
What families miss most often
- Visitor center hours can be shorter than you expect, especially in shoulder season.
- Swearing-in may be tied to staffing, meaning the “official” moment is easiest during daytime hours.
- Some activities require a specific exhibit (museum panel, historic room, short film). Do those before you hike away from the hub.
- Some booklets include QR codes or app-based prompts. If cell service is spotty, ask if there is an offline option.
Trail tip: Pick up the booklet first, even if you plan to hike immediately. Kids love having “missions” on the trail, and you avoid the late-day visitor center scramble.
Bonus desk stop: If your family collects National Park Passport cancellation stamps, this is the moment. Grab the stamp while you pick up the Junior Ranger booklet, then you are not backtracking later.
Parks to prioritize for Junior Ranger
Many sites do a great job, but a few consistently stand out for variety, kid-friendly interpretive staff, and the sheer ease of pairing programs with short hikes and scenic stops. Here are top picks to prioritize when Junior Ranger is a major goal of the trip.
Yosemite National Park (California)
Yosemite is a slam dunk because the valley is packed with short trails and iconic viewpoints that pair perfectly with booklet activities. Ranger walks and programs are frequent in peak season, and the visitor center area is easy to anchor your day around.
- Why it works: lots of “stop, look, answer” moments without long drives.
- Easy hikes to pair: Lower Yosemite Fall Trail, Mirror Lake (seasonal conditions vary), Cook’s Meadow loop.
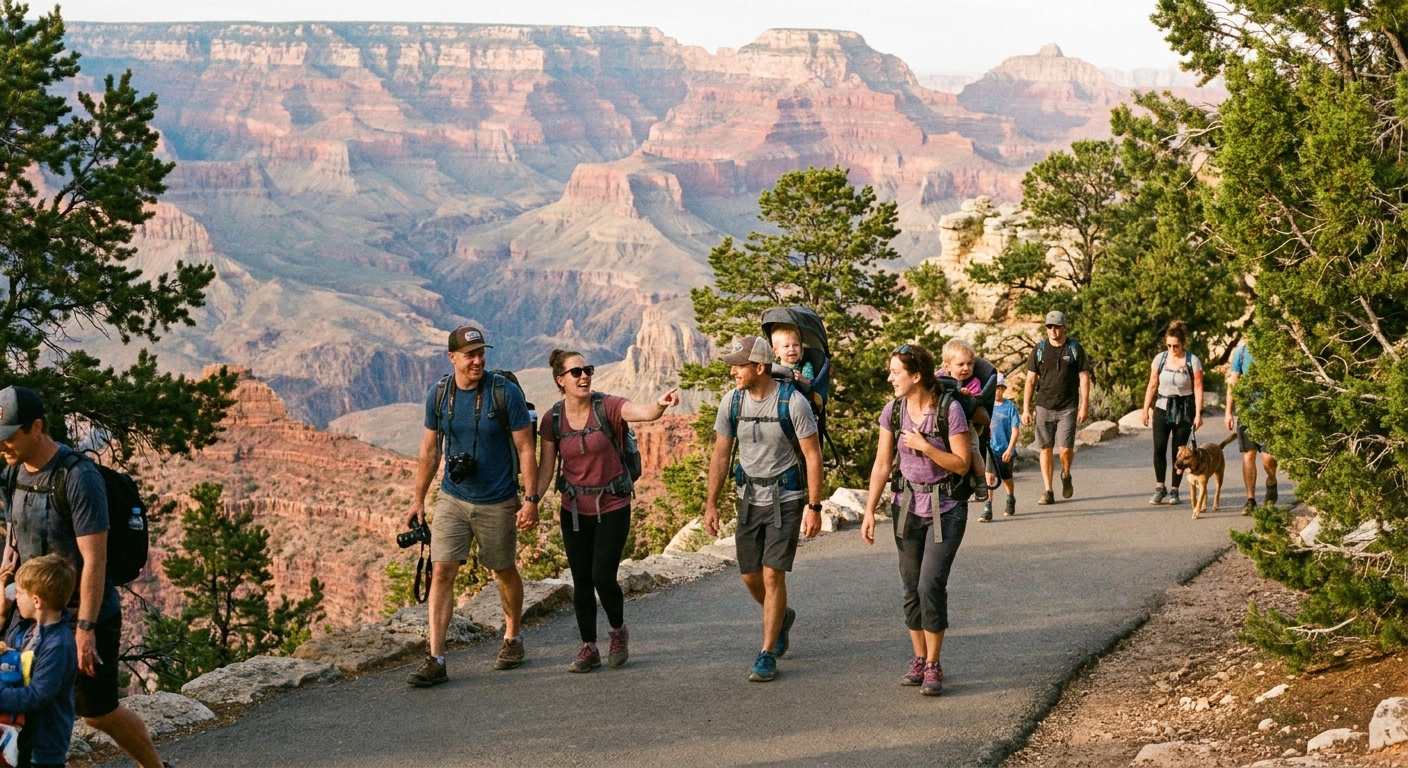
Grand Canyon National Park, South Rim (Arizona)
The South Rim is built for families who want a big-wow landscape with minimal logistical stress. The Rim Trail gives you choose-your-own-distance hiking with constant viewpoints, which makes booklet tasks feel like a game.
- Why it works: accessible trail segments, frequent ranger programs, strong visitor center infrastructure.
- Easy hikes to pair: Rim Trail segments, Trail of Time, short walks around overlooks.
Great Smoky Mountains National Park (Tennessee and North Carolina)
Smokies Junior Ranger materials tend to be strong on wildlife, human history, and ecosystems, and the park offers a ton of short nature trails and historic areas that naturally support the activities.
- Why it works: variety of topics, lots of family-friendly stops, many options even on rainy days.
- Easy hikes to pair: Laurel Falls Trail (check current conditions and closures, and expect crowds and parking pressure), Oconaluftee River Trail, Cades Cove walking options.
Yellowstone National Park (Wyoming, Montana, Idaho)
If your kids like “gross cool” science, Yellowstone is a wonderland. Hydrothermal features, wildlife watching, and boardwalk loops make Junior Ranger activities feel immediate and tangible.
- Why it works: geology and wildlife are visible, not abstract.
- Easy hikes to pair: boardwalk loops at major geyser basins, short hikes near viewpoints and waterfalls.
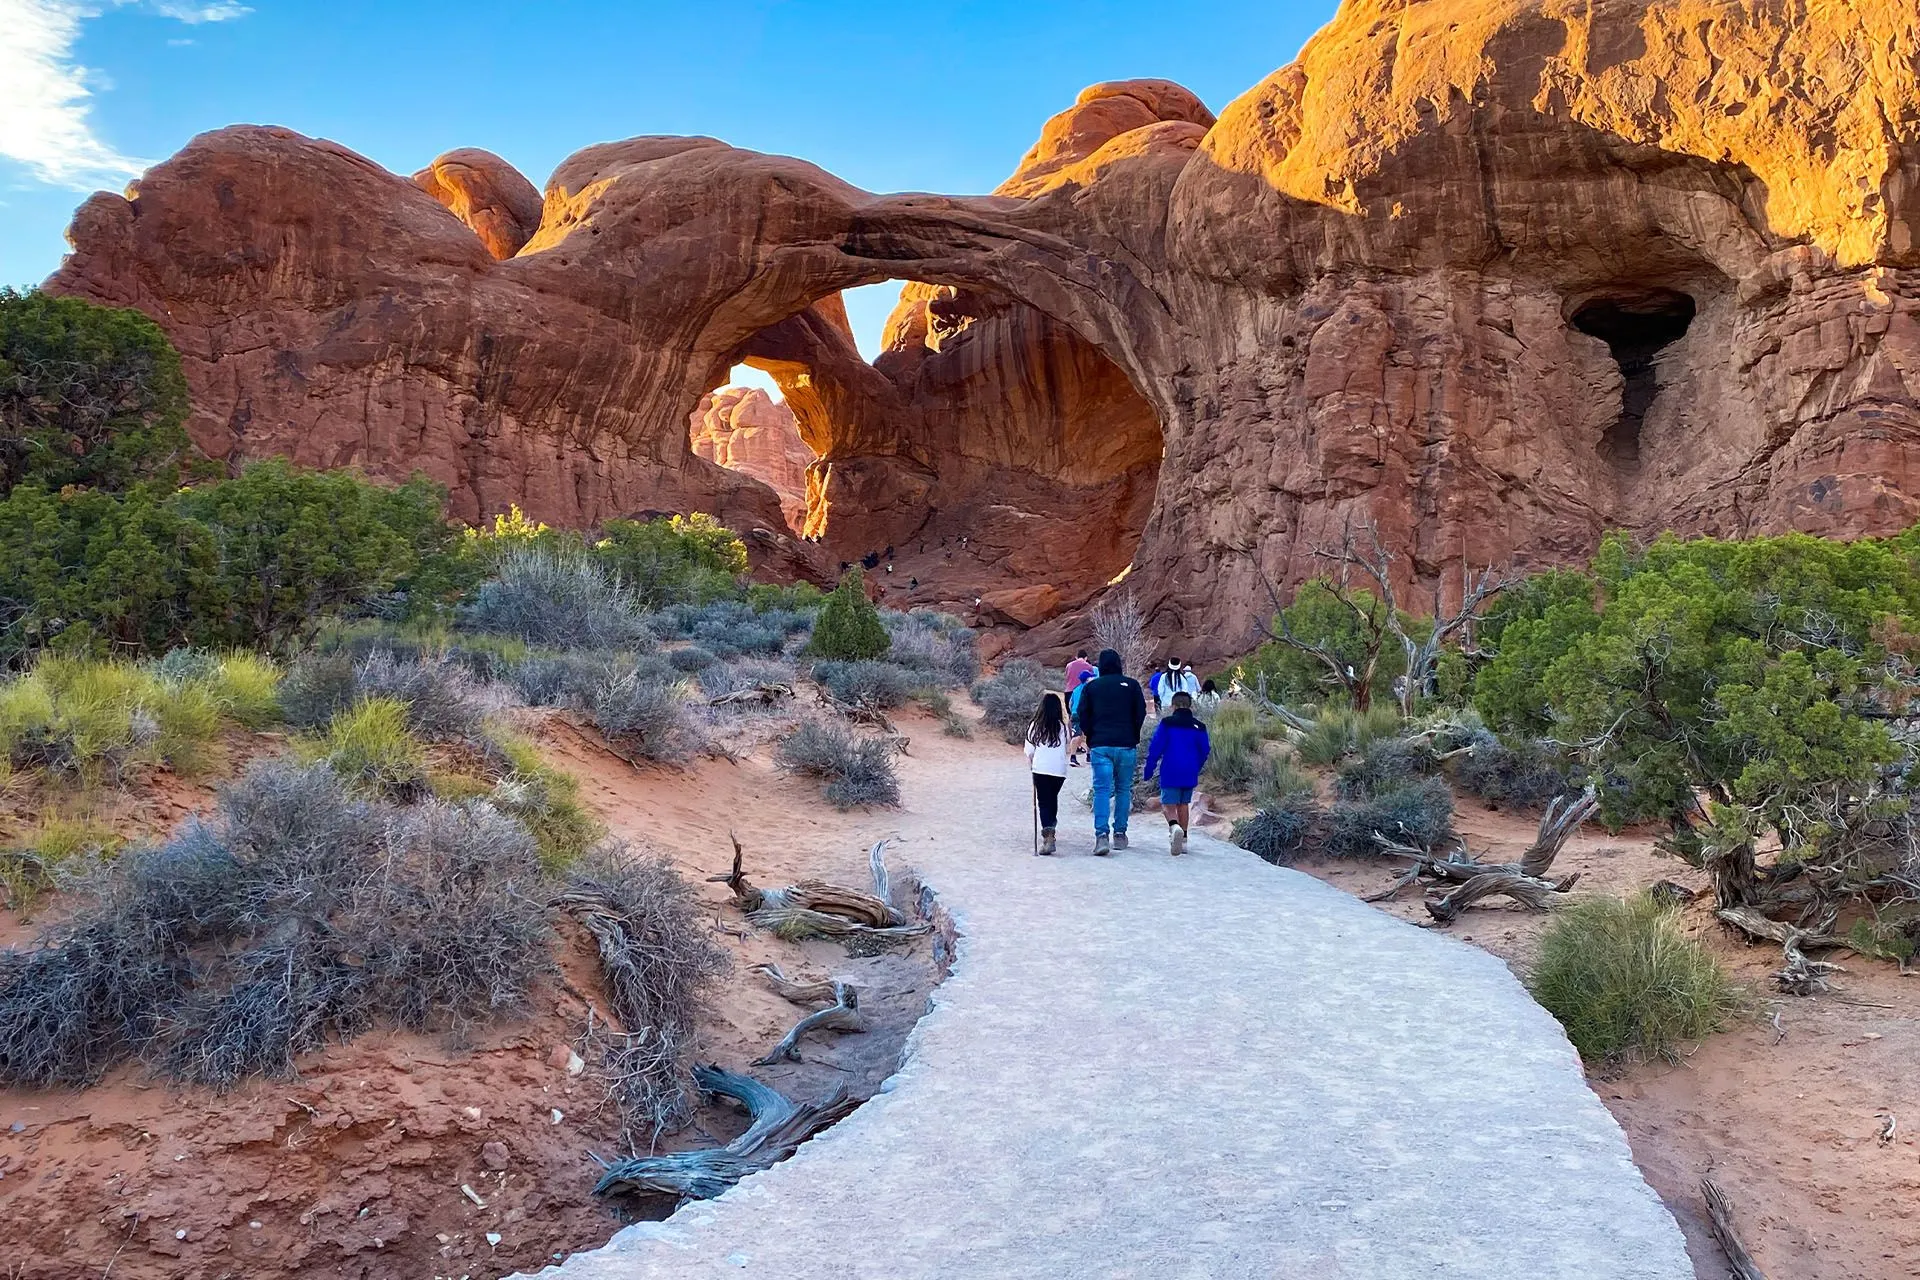
Arches National Park (Utah)
Arches is a fantastic choice for families because many of the signature sights come with relatively short hikes, and the landscape feels like a natural playground for observation-based activities.
- Why it works: big payoff per mile, lots of photo-worthy “we did that” moments.
- Easy hikes to pair: Balanced Rock loop, The Windows and Double Arch area, Sand Dune Arch.
Rocky Mountain National Park (Colorado)
As a Denver kid who grew up treating the Rockies like my backyard, I love RMNP for teaching mountain safety and alpine ecology in a way that feels empowering, not scary. Many family hikes are short but still feel like a real mountain outing. Just remember you are at altitude, so plan extra water, snack breaks, and a slightly shorter hike than you would do at sea level.
- Why it works: excellent ranger-led nature walks in summer, easy-to-access trailheads near visitor centers.
- Easy hikes to pair: Bear Lake area options, Alberta Falls, Sprague Lake loop.
How to combine it with a day hike
The trick is to treat Junior Ranger as the plan for your day, not a separate event. Your hike stays the center. The booklet and ranger program make the whole thing feel more focused and memorable.
The bookend method (best for day trips)
This is my go-to for families on a tight timeline.
- Bookend 1: start at the visitor center, grab the booklet, ask what is required, and knock out any exhibit-based tasks.
- Middle: do your hike with two or three planned “activity pauses” that double as snacks and water checks.
- Bookend 2: end back at the visitor center or ranger station for check-in and the badge.
The micro-program method (best for younger kids)
Some kids love a 45-minute ranger walk more than an extra mile on the trail. If your family is in that phase, build a shorter hike and use the ranger program as the highlight.
- Pick one ranger program, ideally 30 to 60 minutes.
- Pair it with a 1 to 3 mile hike that has frequent landmarks.
- Keep the booklet activities to the ones you can do outdoors, then finish any remaining pages over lunch.
The split-day method (best for weekends)
If you have two days, you will enjoy the program more by not cramming everything into one. Day 1: visitor center plus a short hike. Day 2: your longer family hike plus completion and swearing-in.
Bonus: splitting it reduces the chance that you miss badge pickup due to closing hours.
Pacing plans that work
Below are pacing templates you can adapt to almost any site. The key is to protect your highest-energy window for the hike, especially if you have kids who do best before the afternoon slump.
One-day plan: hike first
- 8:00 to 8:30 a.m. Arrive, quick restroom stop, pick up booklet if the station is open.
- 8:30 to 11:30 a.m. Main day hike. Plan two short stops to complete a couple of booklet prompts.
- 11:30 a.m. to 12:30 p.m. Picnic lunch at a scenic pullout or trailhead tables. Finish a few pages.
- 12:30 to 2:00 p.m. Visitor center exhibits or a short ranger talk if it fits.
- 2:00 to 3:00 p.m. Turn in booklet and get sworn in.
- 3:00 to 4:30 p.m. Optional: short nature trail, ice cream in the gateway town, or an easy viewpoint loop.
One-day plan: program first
- 9:00 to 10:00 a.m. Visitor center, booklet pickup, start exhibit-based pages.
- 10:00 to 11:00 a.m. Ranger walk or talk.
- 11:00 a.m. to 1:00 p.m. Short hike with frequent breaks. Let kids lead with the booklet questions.
- 1:00 to 2:00 p.m. Lunch plus finish remaining pages.
- 2:00 to 3:00 p.m. Badge and swearing-in.
Weekend plan: relaxed
- Day 1 afternoon: arrival, visitor center, booklet pickup, one short walk, early dinner in town.
- Day 2 morning: longer hike while legs are fresh.
- Day 2 afternoon: exhibits, turn-in, swearing-in, and a celebratory treat.
Pick the right hike
Not every “kid-friendly” trail pairs well with a program day. You want a route that gives you natural prompts for observation, safety lessons, and a sense of discovery.
Trail traits to look for
- Short and flexible: loops, out-and-backs, or trail networks where you can turn around early without disappointment.
- Frequent features: water, rock formations, historic structures, boardwalks, viewpoints.
- Safe stopping spots: wide shoulders, benches, or flat rocks where you can pull out the booklet without crowding the trail.
- Shade or water access: helpful for the “pause and write” moments.
Skip these pairings (unless your kids are dialed)
- Big mileage plus big elevation on the same day as a ranger program if your children are under 8.
- Permitted or timed-entry hikes where your schedule has to be exact.
- Narrow trails with exposure where stopping to write creates safety issues.
Make it fun, not homework
Junior Ranger works best when kids feel ownership. My favorite trick is to treat the booklet as a “field notebook” rather than a worksheet.
- Let kids choose the order of activities when possible.
- Use snack breaks as “research time” so it does not cut into hiking momentum.
- Bring one small pencil per kid. Pens stop working when wet, and sharing one pencil is a surprisingly consistent source of sibling drama.
- Take photos for later if the booklet asks about something you will forget by the time you sit down.
- Ask a ranger one question that your kid picks. It makes the interaction stick.
If you are doing carry-on only travel like me, this is the rare moment I will tell you to pack a tiny clipboard. It turns “writing on my knee” into “I am a scientist.”
What to ask at the visitor center
Walk up to the desk and ask these three questions. You will save yourself a lot of wandering.
- “Which activities are required for my child’s age?”
- “Do any tasks require an exhibit, film, or specific location?”
- “What time is the best window for swearing-in today?”
Then, if you are building a day hike around it: “Is there a short ranger walk that pairs well with a nearby trail?” Rangers love matching families with the right program.
If your schedule is tight: ask one more question. “If we miss the swearing-in window, what is the backup plan?” Some sites can do an informal pledge, have you come back later, or offer another option. It varies, but it is worth knowing up front.
Low-stress, leave-no-trace tips
Junior Ranger days can get surprisingly busy. A few habits keep the experience smoother for you and gentler on the site.
- Arrive early and park once if you can, using shuttles where available.
- Pack a trash bag and a small rag for sticky hands and inevitable snack debris.
- Stay on trails and boardwalks, especially in fragile desert and thermal areas. Build that message into the day as part of earning the badge.
- Wildlife rules still apply. Look, sketch, and photograph. Do not pick plants for ID, and keep a respectful distance from animals even if the booklet gets everyone excited.
Before you go
- Check visitor center hours for your exact date (they can change by season).
- Verify Junior Ranger availability (a few sites are seasonal or staffing-dependent).
- Confirm reservations and timed entry for the site, and for any shuttles or high-demand corridors.
- Plan for low connectivity if the booklet uses QR codes, apps, or videos.
Quick checklist: day-hike kit
- Booklet (or downloaded pages) plus a small zip bag in case of rain
- Pencils and a small sharpener
- Water, snacks, and an easy picnic lunch
- Sun protection and layers
- A small pair of binoculars or a simple magnifier (optional but magical)
- A plan for visitor center hours and your final badge pickup
Once you do it right the first time, Junior Ranger becomes the family tradition you build trips around. It is the rare program that makes kids more curious, parents more relaxed, and a simple day hike feel like a story you will retell all the way home.