Kelso Dunes Half-Day Sand Trek
There are dunes you visit like an attraction, with boardwalks, crowds, and a steady stream of people doing the same short loop. And then there are dunes you visit like a place. Kelso Dunes, tucked into Mojave National Preserve, falls firmly into the second camp. You can still have a clean, easy half-day adventure here, but it feels quieter and wilder, the kind of silence you notice in your chest.
Plan it right and you will get the best part of dunes hiking: soft ridgelines, wind-sculpted patterns, a big-sky horizon, and the satisfying burn of climbing sand, followed by the pure joy of running down. No ticket booths, no loudspeaker announcements, and no lines for the “best photo spot.” Just bring your own water, your own judgment, and a little respect for how quickly the Mojave can turn the dial from pleasant to punishing.

Why Kelso feels different
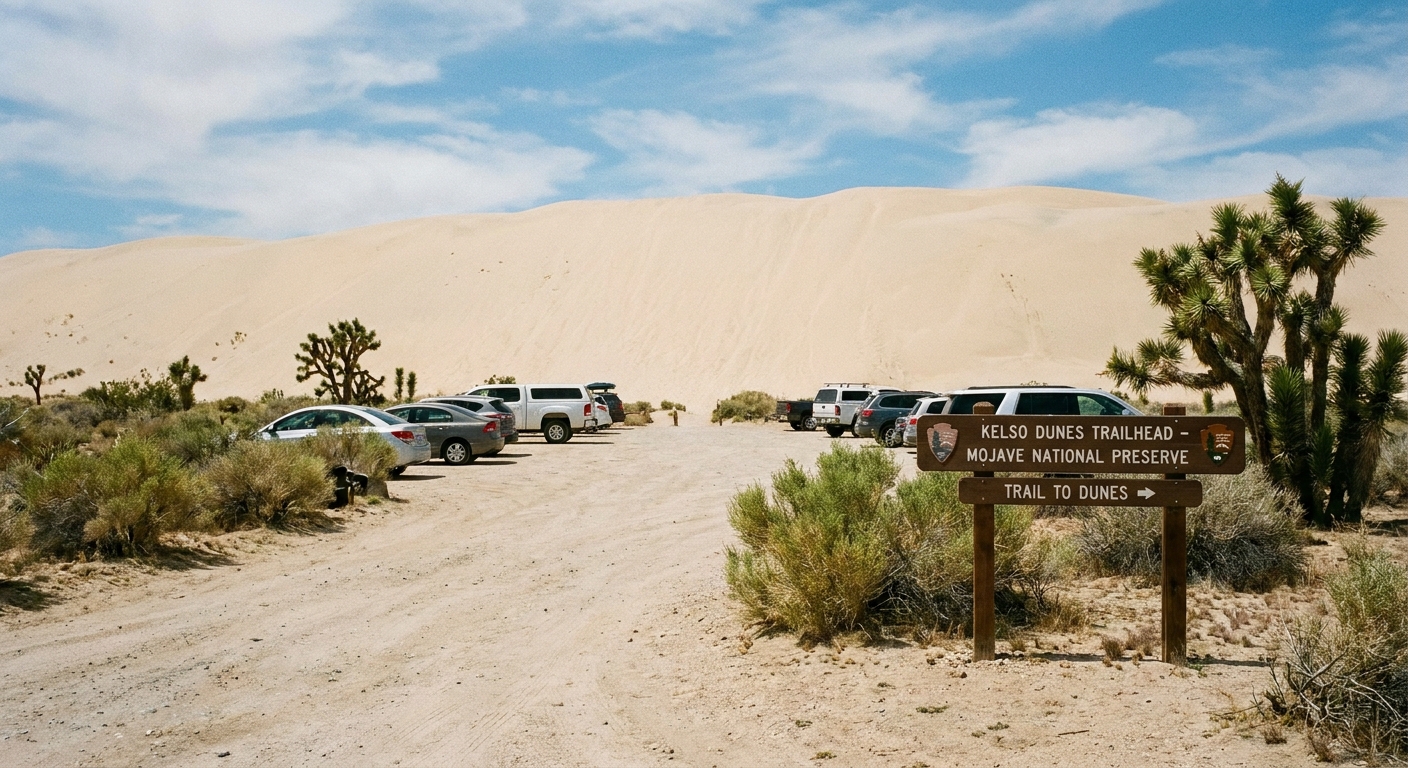
If you have been to higher-traffic dune parks, you know the vibe: parking lots fill early, footprints crisscross every slope, and you are rarely out of earshot of someone else’s playlist. Kelso is not empty, but it is spacious. The trail begins from a single main trailhead and quickly opens into a wide amphitheater of sand where people naturally spread out.
Kelso vs destination dunes
Kelso Dunes rewards patience and self-sufficiency, while many dune parks reward showing up early and following the crowd.
- Less infrastructure: No water, no concessions, and limited cell service. That is part of the magic, and part of the responsibility.
- More quiet: Sound gets swallowed by sand. On a calm morning it can feel like you stepped into a mute button.
- More choose-your-own: There is a general route to the highest dune, but you can wander ridgelines and pick your own line back.
Getting there and basics
Kelso Dunes sits off Kelbaker Road in Mojave National Preserve. It is a paved approach, but the preserve is big and services are far apart, so plan like you mean it.
- Fuel and food: Top off before you head deep into the preserve. The closest options are in the surrounding towns outside park boundaries, and the distances can feel longer than they look on a map.
- Road and closures: Check National Park Service alerts for Mojave National Preserve before you go, especially for Kelbaker Road conditions and any storm-related issues.
- Fees: Mojave National Preserve is generally fee-free for entrance, but confirm current NPS policy in case that changes.
When to go
Kelso is a shoulder-season dream. Late fall through early spring is typically the sweet spot for comfortable hiking. Summer can be outright dangerous if you are on the sand late morning through afternoon.
- Best window: Cooler months, plus early starts year-round.
- Heat reality: Air temperature is only part of it. Sand can run much hotter than the forecast, and there is basically no shade once you commit.
- Wind: Wind can turn a pleasant hike into a sandblaster. Bring sunglasses, and consider a light buff if you are sensitive.
Rule of thumb: If the forecast looks spicy, go at sunrise, go late, or skip it. There is no shame in choosing another part of the preserve for the day.
A simple half-day plan
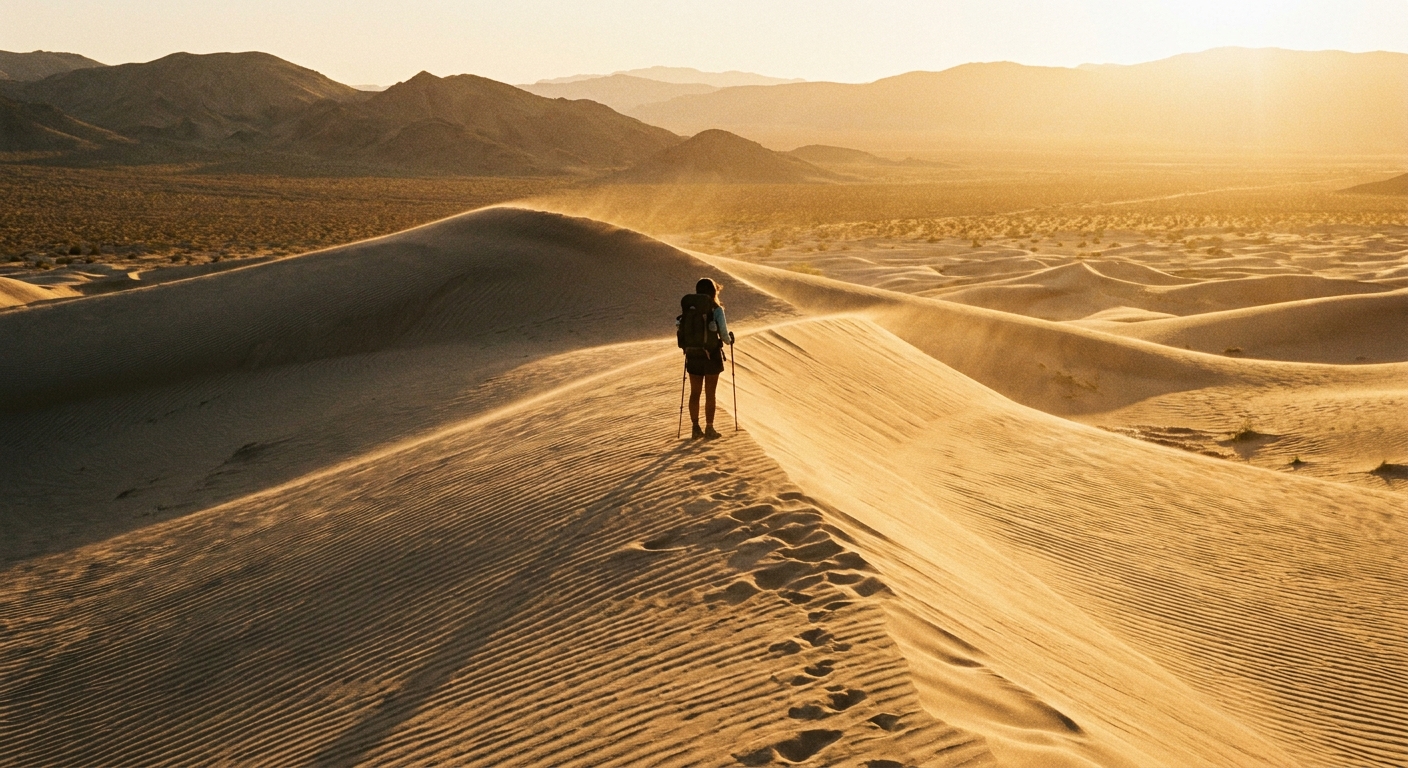
This is built for a true half-day, including the drive in, a solid climb, time on top, and an unhurried descent. Adjust for season and your heat tolerance. In summer, treat this like a very early morning mission or pass.
Fitness note: This climb is short on paper but can feel strenuous because every step in soft sand is a little bit of sabotage.
Option A: Sunrise to late morning
- Arrive: Around sunrise or shortly after. You will get firmer sand, lower temps, and fewer people.
- Climb: Follow the main use trail toward the tall central ridge. Take breaks every 5 to 10 minutes if you are not used to sand hiking.
- Summit hang: 20 to 40 minutes. Snack, hydrate, and enjoy the view across the preserve’s basin and ranges.
- Descent: Choose a ridgeline down. If you like controlled chaos, you can jog the fall line in short bursts, but keep distance from others and respect your ankles.
- Total time: 2 to 3.5 hours on sand, plus driving.
Option B: Late afternoon into dusk
- Arrive: 2 to 3 hours before sunset.
- Climb and roam: Aim to be near the high ridge for golden hour.
- Dusk descent: Sand cools fast, shadows hide footprints, and it is easy to angle off course. Bring a headlamp and do not rely on your phone screen.
- Total time: 2.5 to 4 hours.
Distance and gain note: People often quote about 3 to 4 miles round trip to the high point, with roughly 600 to 700 feet of gain, but dunes routes vary and the sand shifts. Out here, time and effort matter more than exact mileage.
Hear the booming sand
Kelso Dunes is famous for something rare: “booming” or “singing” sand. Under the right conditions, sliding down the steep lee face of the highest dune can trigger a low, rumbling resonance that sounds like the desert clearing its throat.
- How to try it: Find a steep, clean slope near the high dune and do a long, continuous slide or run-step descent. The sound tends to show up when the sand is very dry and uniform.
- Do it safely: Keep plenty of space between people, keep your eyes down-slope, and avoid sitting slides if you are worried about ankles or knees.
- Expectations: It does not happen every time. Wind, moisture, and recent conditions can all change the odds.
Footwear strategy
Let’s talk about the question everyone asks in the parking lot: “Is this a barefoot hike?” Sometimes yes. Sometimes absolutely not. The sand here can go from pleasantly cool to toe-scorching depending on time of day, wind, and season.
When barefoot works
- Early morning: The sand is often cool enough for barefoot walking, especially on firmer lower slopes.
- After sunset: Sand cools rapidly and feels amazing underfoot.
- Short stretches: Many people hike in shoes and go barefoot near the top for comfort.
When shoes are non-negotiable
- Late morning through afternoon in warm months: Sand can be hot enough to burn skin quickly.
- Windy days: Blowing sand stings and can abrade your feet.
- If you have sensitive feet: Tiny twigs, pebbles, and hot patches are more common than you think.
The strategy I actually use
Trail runners or light hikers for the approach and most of the climb, plus thin socks to reduce sand rub. Then I decide at the top. If the sand is cool and clean, I go barefoot for a while and stash shoes in my pack. If it is warm, shoes stay on.
Pro tip: Gaiters help, but if you are going carry-on only like me, the simple hack is taller socks plus snug laces. You will still get sand, just less of it.
Wayfinding without stress
Kelso Dunes is not a signed loop trail. Navigation is mostly “head toward the big dune,” then “head back to where the car is.” That sounds simple until the light changes, footprints drift over, and every slope starts to look the same.
On the way up
- Lock in your start: Before you leave the trailhead, turn around and visually memorize the parking area and surrounding vegetation pattern at the dune edge.
- Follow ridgelines: They are easier to walk and give you a consistent reference line.
- Note the mountains: Pick one or two distinct peaks on the horizon and keep track of how they shift as you angle across the sand.
On the way down
- Backtrack your story: Remember your route as a sequence. Example: “I crossed the flat, climbed the left ridge, aimed at the tallest crest.”
- Avoid deep bowls: It is easy to descend into a pretty hollow and then have to re-climb a steep wall to regain direction.
- Save your battery: If you use GPS, screenshot your position at the trailhead and keep your phone in airplane mode.
If the wind is actively erasing footprints, treat the dunes like a small backcountry outing: stay together, keep a consistent bearing, and do not wait until it is dark to start heading back.
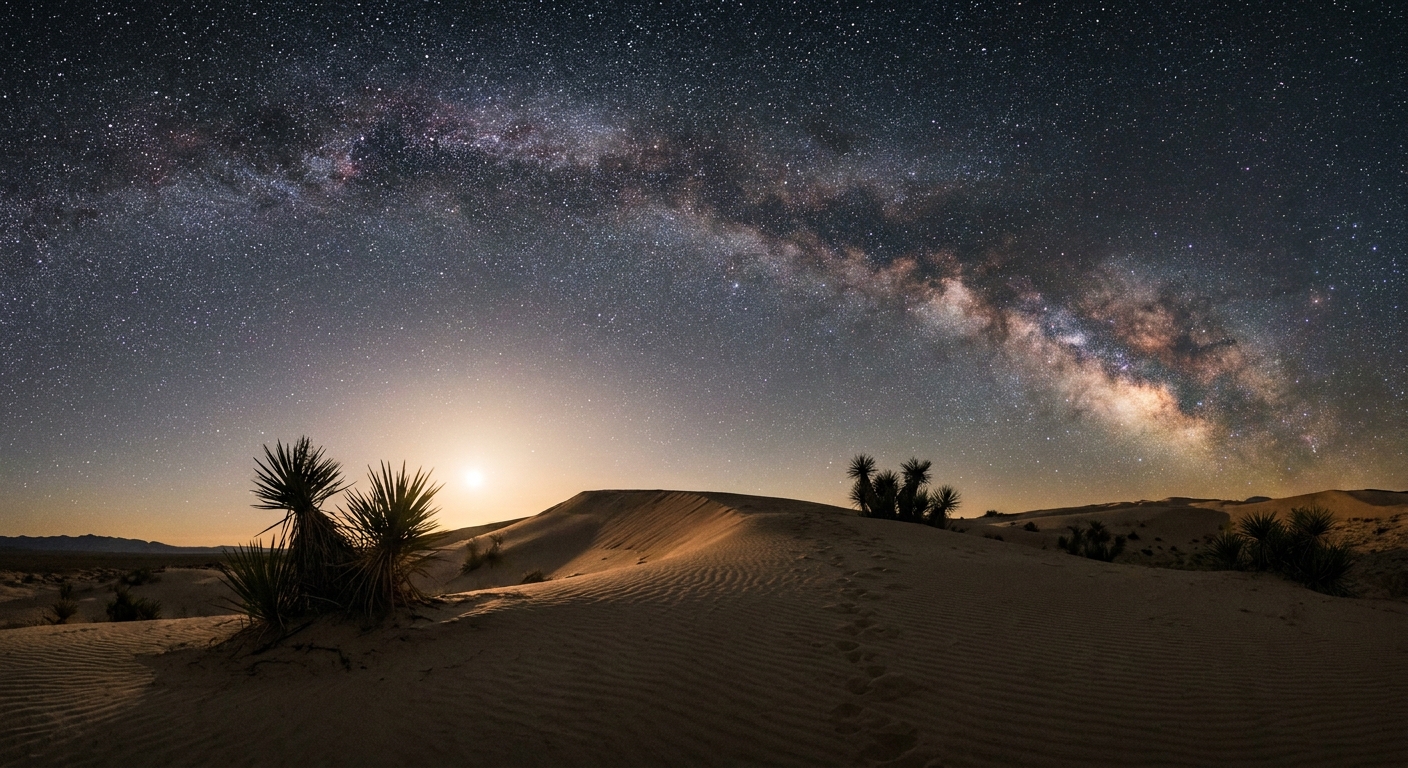
Night-sky etiquette
Mojave National Preserve is famous for dark skies. Kelso Dunes is one of those places where you can sit quietly and watch the stars show up in layers. If you plan to stay for dusk or full night, a few small habits make the experience better for everyone.
Do this
- Use a red light: A headlamp with red mode protects night vision. If you do not have one, dim your light and point it at the ground.
- Keep voices low: Sound carries in surprising ways at night, even on sand.
- Give photographers space: If someone is doing long exposures, your headlamp can wash out their shot from far away.
- Pack out everything: Even “biodegradable” snacks attract animals and do not belong in the dunes.
Please skip this
- Bright white lights sweeping the horizon: It ruins dark adaptation instantly.
- Drones: In National Park Service sites, drone launching, landing, and operation is generally prohibited unless explicitly allowed. Check Mojave National Preserve’s current rules before you go.
- Climbing right next to other groups: The dunes are wide. Spread out and let everyone have their own slice of quiet.
Services and what to expect
Mojave National Preserve is gorgeous and huge, and it operates differently than a tightly developed national park. The tradeoff for quiet is that you must bring what you need.
What to count on
- Restrooms: There are usually vault toilets at or near the trailhead area, but facilities can be closed or serviced intermittently. It is smart to check current NPS updates and still bring your own backup plan.
- Road access: Kelbaker Road is the main approach. Conditions can change seasonally, so check alerts before you drive deep into the preserve.
What not to count on
- Reliable cell service: Assume you will not have it.
- Water: Bring plenty. For a half-day dune hike, many people are comfortable with 2 to 3 liters per person in warm weather, more if you run hot or plan to linger.
- Food or gas nearby: Fuel up before you enter the preserve and carry snacks. The drive time between services can be deceptive.
Carry-on only packing mindset, desert edition: You do not need much, but you do need the right things: water, salty snacks, sun protection, a headlamp, and a basic first-aid kit.
Rattlesnake awareness
Rattlesnakes live in the Mojave, and seeing one is not a sign you did anything wrong. It is just part of desert reality. The good news is that most issues are avoidable with a little attention, especially near the dune margins where vegetation and shade give snakes better cover than open sand.
Where to be most alert
- At the base: Near shrubs, small wash edges, and any debris where a snake could rest.
- On cooler mornings: Snakes may bask near warmer surfaces.
- In transition zones: Where sand meets rock or plants.
Smart habits
- Watch your step and hands: Especially if you sit down near vegetation or scramble a short sandy bank.
- Do not step over what you cannot see: Step on top of logs or small ledges, then down, so you can scan the landing zone.
- Give space: If you see a snake, stop, back up, and go wide. Do not try to move it along.
- Keep dogs close: If you hike with a dog, keep them leashed and away from brushy edges.
Once you are higher on the open dune faces, the environment is less appealing for snakes, but you still want to stay alert when you return to the base.
Comfort and safety checklist
This is the quick list I run through before I step onto the sand.
- Water: 2 to 3 liters per person for a half-day in warm conditions.
- Electrolytes: Tablets or a salty snack. Sand hiking is sneakily sweaty.
- Sun protection: Hat, sunglasses, and sunscreen you will actually reapply.
- Wind protection: Sunglasses are your friend, and a light face covering can help on gusty days.
- Footwear plan: Closed-toe shoes for hot sand, plus socks. Optional: sandals for post-hike comfort.
- Layers: Evenings can drop fast, especially in shoulder seasons.
- Headlamp: If there is any chance you will finish after sunset.
- Navigation backup: Download offline maps, and do not rely on live service.
- Leave No Trace: Pack out all trash and avoid trampling vegetated edges.
How to keep it quiet
The easiest way to do Kelso right is to treat it less like a theme park stop and more like a small, shared sanctuary.
- Arrive earlier than you think: Quiet is a timing strategy.
- Spread out: If you can see another group, you can usually walk 2 minutes and find your own ridge.
- Let the dunes set the pace: Sand hiking is slow. Take breaks, look around, and enjoy the fact that you are not rushing between attractions.
If you only have half a day in Mojave National Preserve, Kelso Dunes is one of the most satisfying ways to spend it. You will leave with sand in your shoes, a calm kind of tiredness, and the feeling that you found a desert secret hiding in plain sight.