Offline Maps, GPS, and SOS for Hikers
Maya Lin
Maya Lin is a travel journalist and outdoor enthusiast who believes the best trips combine rugged adventures with urban comforts. After spending six years backpacking across four continents, she founded Trail & Town Guide to help fellow travelers navigate both hidden mountain passes and bustling city neighborhoods with confidence.
I love a good trailhead latte as much as I love a good ridgeline, but both require the same thing: a plan. On popular routes, it is easy to assume your phone, a blue dot, and a few screenshots will get you through. Then the battery tanks, the app crashes, or the canyon walls turn your “GPS accuracy” into a polite suggestion.
This is my layered backup plan for navigation and emergencies. It is designed to complement real topo literacy, not replace it. Think of it like packing a rain shell even if the forecast is sunny: you may not need it, but you will be glad it is there.
The three-layer backup plan
When you are tired, cold, or turned around, simple beats clever. I build everything around three layers, each one able to carry you if the other fails.
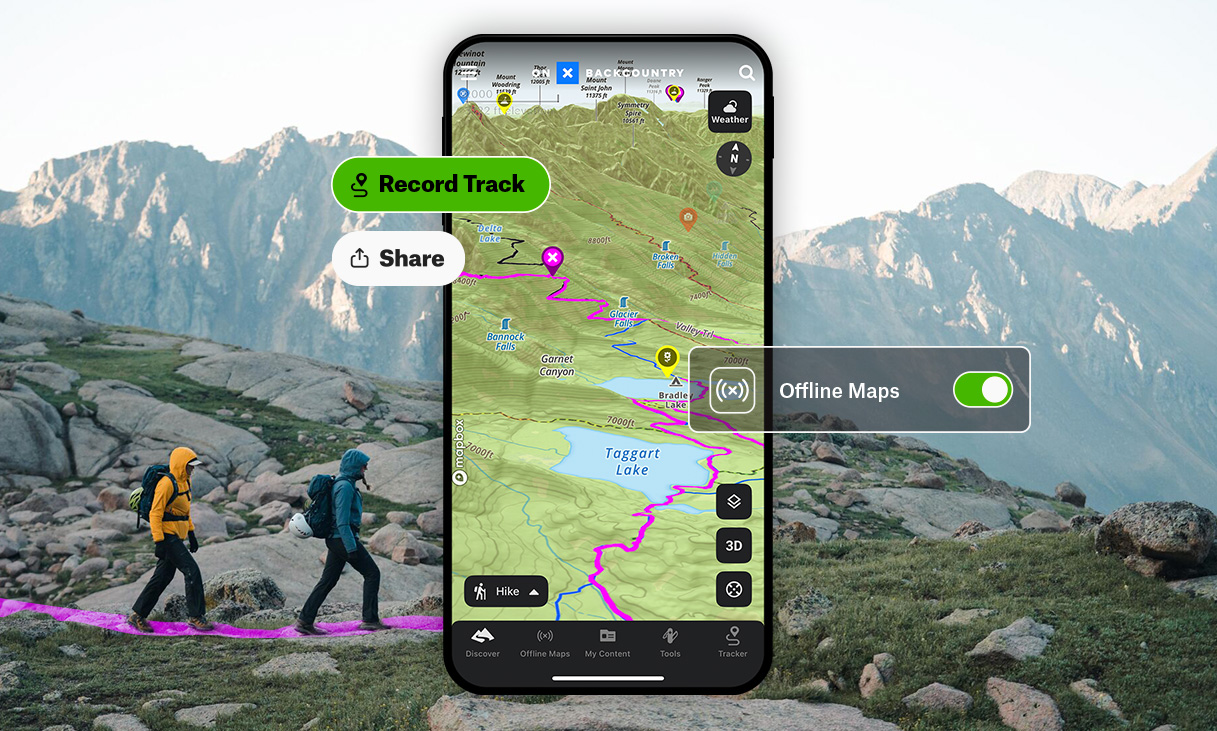
- Layer 1: Offline maps on your phone. Fast, detailed, and still very usable in bad weather with the right gloves and a decent case.
- Layer 2: A dedicated GPS device or watch. Better battery and can have better satellite performance in steep terrain or trees, mostly thanks to antennas and multi-band support on some models.
- Layer 3: Emergency SOS. A way to message or call for help when there is no cell service.
And yes, there is an “always layer”: telling someone your plan and carrying paper map and compass on bigger days. The best tech still cannot fix a trip no one knows you are on.
Offline map apps worth trusting
Offline maps are only as good as what you downloaded and how quickly you can pull up what you need. Below is a practical comparison of the apps I see most hikers using, plus what each one is best at.
Gaia GPS
Best for: Topo detail, layering options, and route planning on serious backcountry trips.
- Why hikers like it: You can stack map sources, add slope shading in many regions, and save big areas for offline use.
- Watch for: More features than you need if you only hike a few times a year. It pays to set up your layers at home.
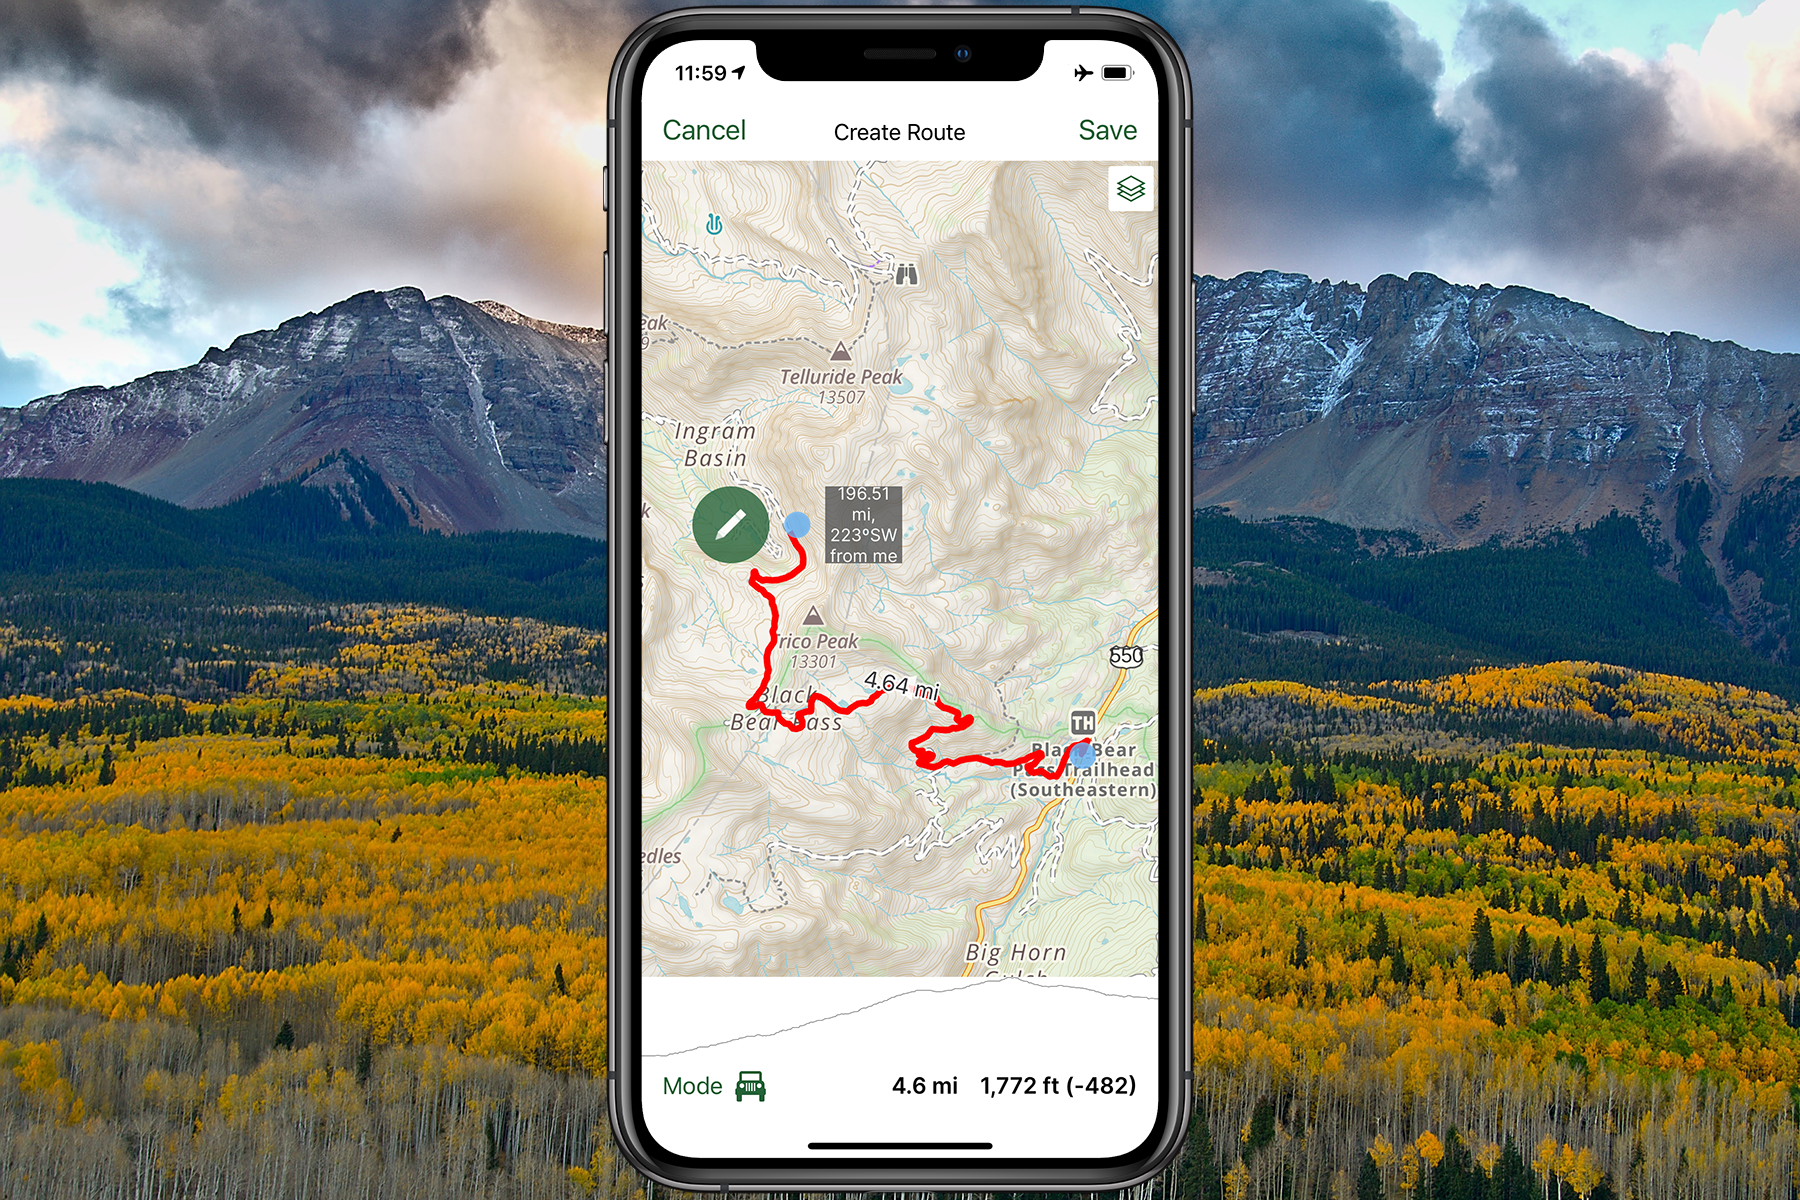
CalTopo
Best for: Serious planning, clean topo tools, and the kind of map work that overlaps with how many experienced backcountry folks and SAR teams think.
- Why hikers like it: Excellent route building and analysis tools, strong map choices, and a planning-first mindset that rewards a little learning.
- Watch for: The power is real, but so is the setup. Spend ten minutes at home learning your layers and offline downloads, and you will feel like a wizard later.
AllTrails
Best for: Popular trails, straightforward route discovery, and a simple offline experience.
- Why hikers like it: It is the easiest on-ramp for most people and has a massive trail library.
- Watch for: User-uploaded tracks can vary in quality. Treat it as “a good guess” and cross-check on bigger objectives.
OnX Backcountry
Best for: Property boundaries, public land context, and a clean interface.
- Why hikers like it: Land ownership visibility can be huge in mixed-use areas.
- Watch for: Make sure the regions and layers you rely on are downloaded before leaving Wi-Fi.
Google Maps and Apple Maps (as a bonus layer)
Best for: Getting to the trailhead, town logistics, and quick offline basemaps.
- Why hikers like it: Familiar interface and great for urban-to-trail transitions.
- Watch for: These are not hiking-first topo tools. Use them for access, not for nuanced navigation.
My take: If you are regularly in remote terrain, Gaia GPS or CalTopo plus a separate SOS option is a strong combo. If you want minimal setup, AllTrails can be plenty, as long as you treat it as one layer and not the whole plan.
Downloaded layers
Offline maps fail for one boring reason: people download too little, or download the wrong thing. Think in terms of coverage, detail, and redundancy.
Coverage
- Save a buffer around your track. I aim for at least a few miles on all sides, more in complex terrain.
- Download the approach roads and nearby towns too. If plans change, your “exit strategy” should not depend on a signal.
Detail
- Topo layer: Your core reference for terrain and landforms.
- Satellite imagery: Great for confirming clearings, talus fields, burn scars, and trail visibility.
- Trail overlays: Helpful, but verify. Trails move, reroutes happen, and crowdsourced data can lag behind reality.
Redundancy
I like having a topo and a satellite layer offline. If one is confusing in the moment, the other often makes the terrain click instantly.
Quick download checklist
- Route area saved offline with a generous buffer
- Topo plus one additional basemap saved
- Phone set to keep the app available offline (no “optimize storage” surprises)
- Pin key points: trailhead, water sources, junctions, bailout routes, car, and emergency exit points
- Screenshot critical info: permits, shuttle times, gate codes, and weather
Phone GPS accuracy
Your phone’s GNSS receiver can find satellites without cell service. What cell and Wi-Fi help with is speed, especially that first lock (assisted GPS). If you start cold, deep in a canyon, and in airplane mode, it can take longer to settle in. That is normal.
Why the blue dot drifts
- Steep canyons and dense trees: Satellite visibility drops, multipath reflections increase.
- Weather and wet foliage: This can slightly degrade signal quality, but the impact varies a lot.
- Low power mode behavior: Some phones reduce background activity that can make tracking feel laggy.
- App settings: If the app is not allowed to use location “always,” your track recording can cut out when the screen sleeps.
Simple upgrades
- Give it a minute: At the trailhead, let your phone settle on a location before you start recording.
- Keep the phone warm: Cold batteries sag. An inner pocket is a real navigation tool in winter.
- Confirm with terrain: Use obvious features and junctions to sanity-check what the dot is telling you.
Battery strategy
In my experience, hikers do not “run out of navigation” because GPS is power-hungry. They run out because everything is running at once: photos, video, messaging, bright screen, and background apps. Here is the approach that keeps my phone usable from trail to town.
On-trail settings
- Screen brightness: Drop it as low as you can tolerate.
- Airplane mode (or just kill the cellular radio): In no-service areas, your phone burns battery searching. Airplane mode usually stops that. On most phones, GPS still works in airplane mode, but it is worth confirming on your device before you rely on it.
- Track recording with intention: Do not record all day by default. Record when it serves a purpose.
- Turn off background refresh for non-essentials: Social apps do not need to be awake in the backcountry.
- Use your map like a compass check, not a TV show: Quick verify, screen off.
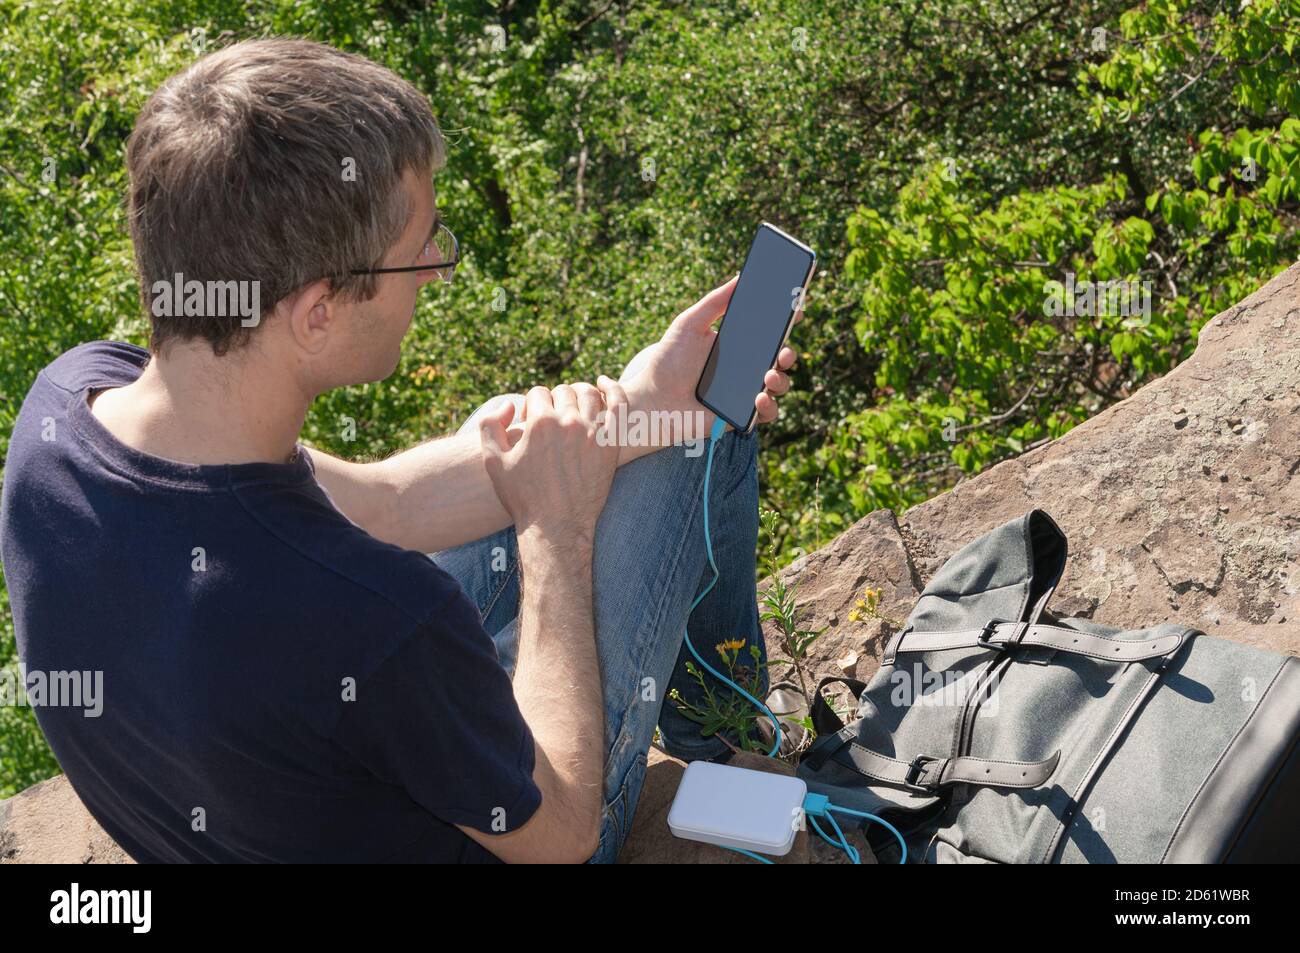
Power banks and cables
- A small power bank is often enough for day hikes, especially in cold conditions.
- Bring a quality cable that supports your phone’s fast charging, and test it before you leave.
- Store the bank and phone together in cold weather so the bank can deliver power efficiently.
- In wet conditions, charge inside a waterproof pocket or bag. A soaked cable at 6 p.m. is a plot twist you do not need.
Battery reality check
If you are heading out for a long day or multi-day trip and your phone battery health is poor, plan around it. Older batteries drop fast in cold air, even when the percentage looks fine at breakfast.
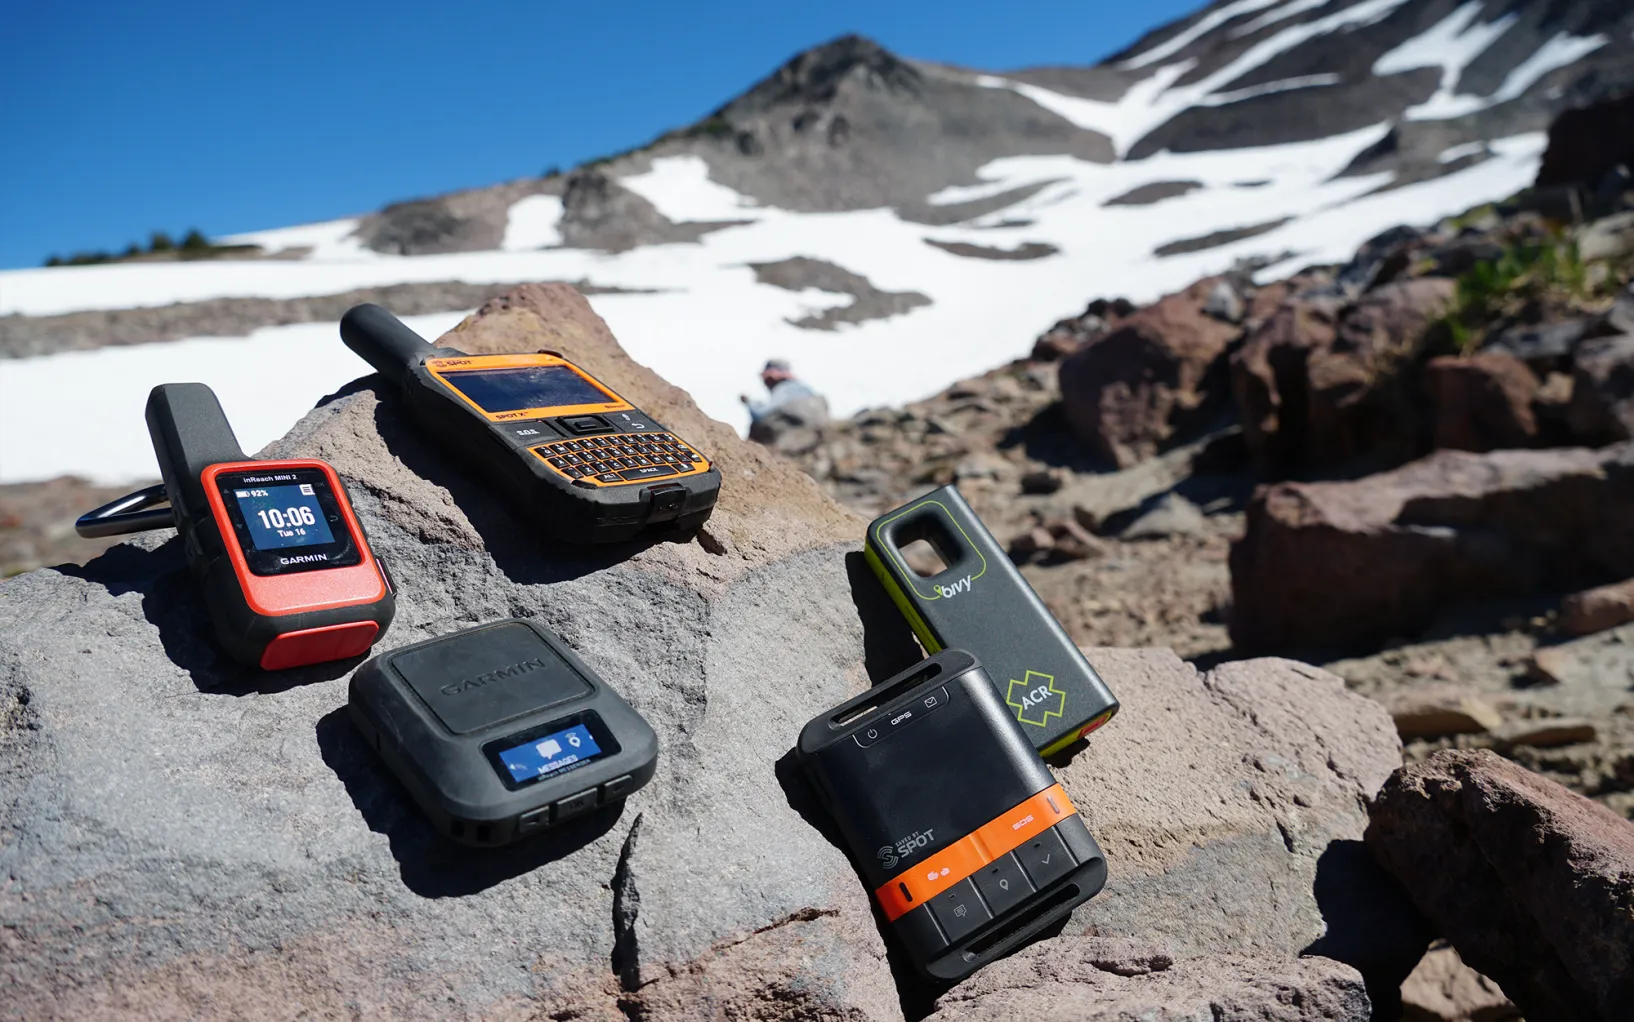
GPS devices and watches
I am firmly pro-phone for most hikes, but I also think dedicated devices earn their place on longer, colder, or more remote objectives.
Why they help
- Battery life: Often dramatically better than a phone when tracking all day.
- Durability: Built for rain, drops, and glove use.
- Separation of roles: Your phone can stay off and warm while the GPS handles tracking.
What to look for
- Multi-band or multi-constellation support: Can help in challenging terrain, depending on the model.
- Easy waypoint management: You want to mark a junction or water source quickly.
- Readable screen: Bright sun and snow glare reveal weak screens fast.
GPS watch
A GPS watch is great for recording a track and keeping basic orientation without pulling your phone out constantly. It is not a replacement for a full map, but it can save battery and reduce “phone dependency” on straightforward routes.
SOS options
There is navigation, and then there is getting help when navigation goes sideways. SOS is not just for dramatic rescues. It is for bad falls, allergic reactions, heat illness, and the kind of “we can’t safely walk out” moment that happens to competent people on normal days.
Satellite messenger basics
Dedicated satellite communicators generally offer:
- SOS to a monitoring center with location coordinates
- Two-way messaging so you can explain the problem (and answer questions)
- Check-in messages to family or a trusted contact
Popular satellite SOS options
- Garmin inReach series: Two-way messaging and SOS with robust ecosystem. Often the default choice for long backcountry trips.
- Some newer satellite messengers: Vary by network and plan structure. Focus on coverage and message reliability, not just device price.
- Personal Locator Beacons (PLBs): Generally “SOS only” with no texting, but they are a very strong distress option when properly registered and used with a clear view of the sky. No two-way confirmation, so you need to assume the message may take time, and you still need to manage the scene.
PLB registration
If you carry a PLB, register it with the appropriate national authority so rescuers can link the beacon ID to you. In the US, that is NOAA. This is not paperwork for fun. It is part of making the tool work the way you think it works.
Phone-based satellite SOS
Some smartphones can send emergency messages via satellite in certain regions. It is a promising layer, but I still treat it as a backup to a dedicated device for remote trips because coverage, battery, and feature sets vary by model and location.
Also, phone satellite SOS often requires you to physically point the phone toward satellites, guided by the on-screen instructions. Under thick canopy or in narrow drainages, that can be frustrating compared to a dedicated SOS device with an antenna designed for the job. If it is your only SOS option, test the feature before you leave home and understand what it can and cannot do.
What matters more than the brand
- Coverage where you hike: Not just “country coverage,” but the actual regions you travel in.
- Two-way communication: It reduces confusion and can prevent unnecessary escalation.
- Sky view and patience: Satellite messaging can be intermittent. Give it a clear view of the sky and time to send.
- Battery and cold performance: If you only need it when conditions are worst, it must work when conditions are worst.
- Subscription and activation: Know your plan. Surprise fees are annoying at home and irrelevant in an emergency, but lapsed service can be catastrophic.
Paper map basics
On bigger days, I still like having a paper map and compass in the pack. Not because I am anti-tech, but because paper does not care about battery, cold, or cracked screens.
- Orient the map: Turn it so the terrain matches what you see. This one habit prevents a lot of confusion.
- Read contours: Learn what a ridge, drainage, saddle, and cliff band look like on the map.
- Use handrails and backstops: Follow obvious features (ridges, rivers, roads) and know what feature should stop you if you go too far.
- Pick attack points: Navigate to big, easy targets (a lake, a pass, a trail junction), then make smaller moves from there.
Even if you never shoot a perfect bearing, a paper map builds situational awareness. That awareness is the real safety tool.
My go-to setup
If you want a starting point, here is how I match tools to the day.
Easy day hike near town
- Phone with offline maps downloaded
- Airplane mode in no-service areas
- Small power bank if it is cold or you expect a long day
Long day or shoulder season
- Phone offline maps plus a power bank
- Optional GPS watch for continuous tracking
- Consider a satellite messenger if you will be out of cell range for hours
- A small headlamp, because “navigation issues” love to become “after dark issues”
Remote, multi-day, or solo trips
- Phone offline maps plus a dedicated GPS or watch as secondary navigation
- Satellite messenger or PLB as non-negotiable
- Paper map as a low-tech fail-safe
- Clear trip plan shared with a trusted person
SOS etiquette
SOS is for when you need rescue assistance and self-evacuation is not safe. If you carry an SOS device, carry the mindset to use it responsibly.
- First, stabilize the situation: Shelter, warmth, bleeding control, hydration, and a clear assessment.
- Move only if safer: Sometimes stepping into a more open area improves satellite visibility, but do not worsen injuries or exposure.
- Send clear info: Who is injured, what happened, what symptoms you see, what supplies you have, and whether you can move.
- Give it sky: If you can, place the device where it has a clear view upward and let it work. Messaging may take time.
- Conserve power: Keep the device accessible and on as recommended, but avoid unnecessary phone drain.
- Stay put when instructed: Wandering makes it harder to find you.
- Do not use SOS for inconvenience: Late to dinner, tired, or mildly lost with a clear trail back is not the moment. If you are in real danger, press it. If you just need a snack and a deep breath, start there.
My rule: if I would be relieved to see a rescue team show up, I should not feel embarrassed about sending SOS. Pride is not a wilderness skill.
Pre-trip ritual
Right before leaving Wi-Fi, I run this quick check. It is small, but it prevents most avoidable tech failures.
- Open the map app and confirm the offline area loads with the phone in airplane mode.
- Drop a pin on the trailhead and on your intended turnaround point.
- Confirm your phone has enough storage and your battery is above what the day requires.
- Message your contact with your plan and expected check-in time.
- If carrying satellite SOS, send a test check-in and confirm it goes through.
Then I go do the fun part: hike, notice things, earn my dinner, and still have enough battery to find the best coffee in town afterward.