Safe Stream and River Crossings for Day Hikers
Maya Lin
Maya Lin is a travel journalist and outdoor enthusiast who believes the best trips combine rugged adventures with urban comforts. After spending six years backpacking across four continents, she founded Trail & Town Guide to help fellow travelers navigate both hidden mountain passes and bustling city neighborhoods with confidence.
Some of my favorite day hikes have one small detail in common: a line on the map labeled “creek.” Sometimes that line is a shin-deep stroll. Sometimes it is a cold, fast-moving problem you cannot muscle through, no matter how strong or “almost there” you feel.
Stream and river crossings are dangerous when moving water can knock you off balance, trap your feet between rocks, or push you downstream into deeper channels, strainers (downed trees), or waterfalls. The risk spikes when you are tired, solo, wearing trail runners with slick soles, or carrying a pack that turns into an anchor the second you go in.

This page is here for the moment you stop at the bank and think: Is this smart today? We will walk through how to read current and depth, how to scout a safer ford, how to cross with poles or partners, what to do if you fall, and the retreat rules I use when the water is sending clear “not today” signals.
When crossings are most dangerous
Water does not need to be deep to be hazardous. Moving water applies force to your legs, and uneven streambeds steal your footing. Here are the biggest red flags.
High-risk conditions
- Fast current that forms tongues, standing waves, and sharp flow lines around obstacles, or that moves foam and debris downstream quickly.
- Water at or above knee height for you is often a tipping point, especially if the current is more than gentle. Risk depends on current strength, the roughness of the bottom, and your size and stability.
- Murky, silty, or foamy water where you cannot see the bottom. If you cannot read the footing, you are guessing.
- Steep banks or a landing zone that is boulder-choked, slick, or undercut.
- Strainers (log jams, branches, brush) downstream. If you fall, strainers can pin you underwater.
- Cold water that can numb legs quickly, making you clumsy at the exact moment you need precision.
- Multiple crossings back-to-back. Even if each one is manageable, cumulative cold and fatigue change the math.
Terrain hazards
- Rock-hopped “easy” crossings with algae-slick stones. A lot of injuries happen in these mundane, slippery moments, not in dramatic whitewater.
- Glacial or snowmelt streams that braid. They look forgiving, but the channels can be deceptively swift and icy.
- Canyon corridors where water funnels. A creek that is tame in open forest can become pushy where the walls narrow.
Read the water
Before you even look for the “best spot,” take 60 seconds to read what the stream is doing. You are trying to answer three questions: How fast is it moving? How deep is it? What will my feet land on?
Judge current
- Watch floating debris (leaves, foam, tiny sticks). If it rockets downstream, that is not a casual crossing.
- Look for texture. Smooth, glassy water can mean depth, especially near the outside of bends. Choppy ripples can mean shallows, but also submerged boulders that trip you.
- Read the V. A downstream-pointing V (the V points the way the water is flowing) often marks a tongue or deeper channel between obstacles. An upstream-pointing V can signal a rock or obstruction you may not see.
- Listen. A loud, constant roar usually indicates volume and turbulence, not a trickle you can tiptoe through.
Estimate depth without stepping in
- Read shoreline clues: wet lines on rocks, grass bent by recent higher flow, or debris caught in branches can show the creek has risen recently.
- Use a pole as a probe from the bank if you can reach a likely crossing line.
- Notice color changes. Darker water often indicates depth, especially where the bottom drops off abruptly.
Assess the bottom
Footing matters as much as depth. A shin-deep stream over bowling-ball rocks can be harder than a knee-deep crossing over firm gravel.
- Best: firm gravel, sand, or small cobbles that do not roll.
- Tricky: round river stones that spin, algae-coated rock, loose talus, or mud that sucks at your shoes.
- Dangerous: holes, ledges, undercut banks, or a bottom you cannot see.
Scout a safer ford
The safest crossing is often not where the trail meets the water. Give yourself permission to wander up or downstream to find a better line. This is where you turn a “maybe” into a calm, controlled crossing.
What a good ford looks like
- Wider, shallower section: the flow is spread out, usually reducing depth and speed.
- Straight channel: avoid the outside of bends where water tends to be deeper and faster.
- Even bottom: look for gravel bars or consistent cobble rather than boulder piles.
- Clear entry and exit: you want stable banks and space to regroup on the far side.
- No hazards downstream: if you slipped, you would wash into a calm runout, not logs, rapids, or a drop.
What to avoid
- Narrow pinch points where water accelerates.
- Waterfall lips, slots, and ledges upstream or downstream. Even if the crossing itself looks manageable, never commit above a consequence you cannot survive.
- Log crossings unless you have real balance confidence and dry traction. Wet logs are slip-and-fall machines.
- Rock-hopping across slick boulders if a fall would mean a hard impact or a dunk in strong current.
If scouting reveals that every option is deep, fast, or badly positioned above hazards, treat that as the information it is. The creek is giving you your answer.
Prep before you step in
Most mistakes happen in the 30 seconds before the crossing, when people rush, keep their pack strapped tight, or try to “just hop” without committing to a stable technique.
Unbuckle your pack
Unclip your hip belt and sternum strap before entering moving water. If you fall, you want to be able to shrug out of your pack quickly rather than getting pulled down by it.
Secure the small stuff
- Stow loose items: bottles, phone, sunglasses, microspikes, anything that can pop out.
- Waterproof what matters: use a pack liner or dry bag for extra layers, keys, and electronics.
- Roll sleeves and loosen tight pants cuffs so they do not catch current.
Shoes on
Keep your hiking shoes on for traction and toe protection. Bare feet are vulnerable to sharp rocks, and sandals can slip off. If you carry dedicated water shoes, great, but do not swap into something less stable just because it is “nice to have dry socks.”
Fit matters here. Keep laces secure enough that you will not lose a shoe, but consider loosening slightly if your shoes turn into water balloons. Plan for the aftermath too: carry dry socks, and deal with hot spots early to avoid blisters.
Poles ready
Trekking poles are your third and fourth legs, but do not trap your hands. Many hikers prefer to keep hands free of pole straps in swift water so they can let go if a pole wedges between rocks.
If you fall
It happens fast, even to careful hikers. The goal is to get out of the current and avoid getting pinned.
- Let go of what you need to. Ditch poles. If your pack is dragging you down, shrug it off since your hip belt and sternum strap are already unbuckled.
- Get on your back, feet up if you are being swept. Keep your feet pointed downstream and slightly up so you can fend off rocks, not stand up and trap a foot.
- Angle to shore. Use a backstroke and a diagonal ferry angle to work toward the nearest calm edge or eddy.
- Do not stand until you are in shallow, slow water where you can see and trust your footing.
Once you are out, treat cold seriously. Layer up, swap socks if you can, and keep moving until you are warm again.
Solo technique
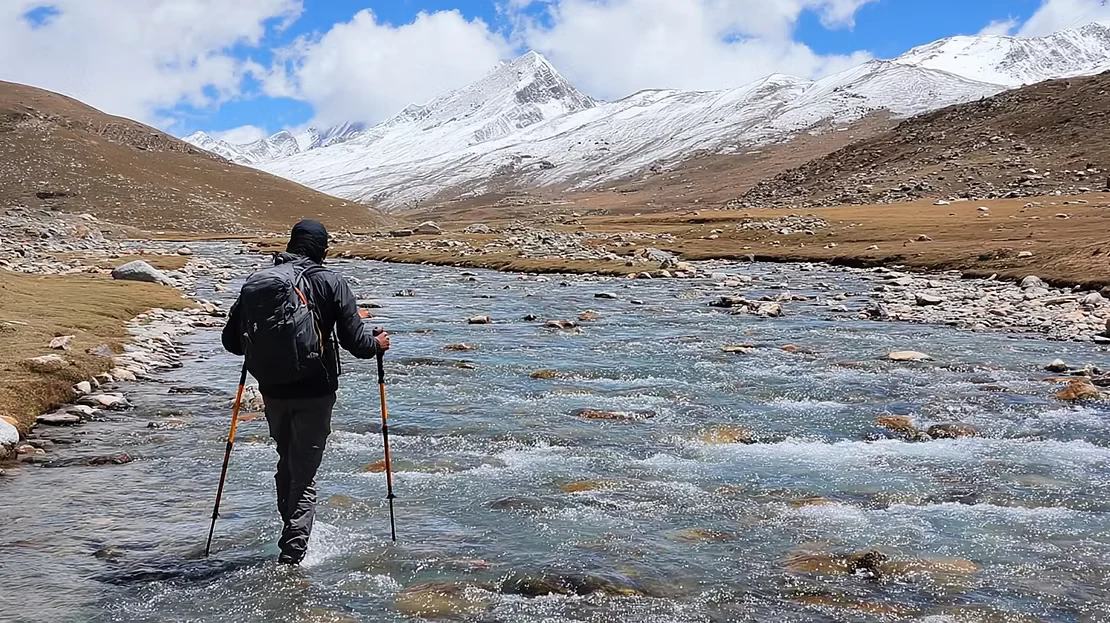
If you are crossing alone, your goal is controlled, deliberate movement. Think “shuffle,” not “stride.”
Pole technique
- Face slightly upstream so the current hits your shins, not the side of your knee.
- Plant both poles firmly upstream of you, creating a stable triangle with your feet.
- Move one point at a time: pole, foot, foot. Keep two points anchored while the third moves.
- Short steps and feel for the bottom before committing weight.
- Stay calm if you wobble: pause, widen stance, reset poles, then continue.
Body position
- Lean slightly into the current to counter the push.
- Keep knees soft to absorb shifting rocks.
- Look where you will place your feet, but also glance downstream to maintain awareness.
A simple reality check: if you cannot stand still near the bank for 30 seconds without bracing hard, the main flow is probably not where you want to be.
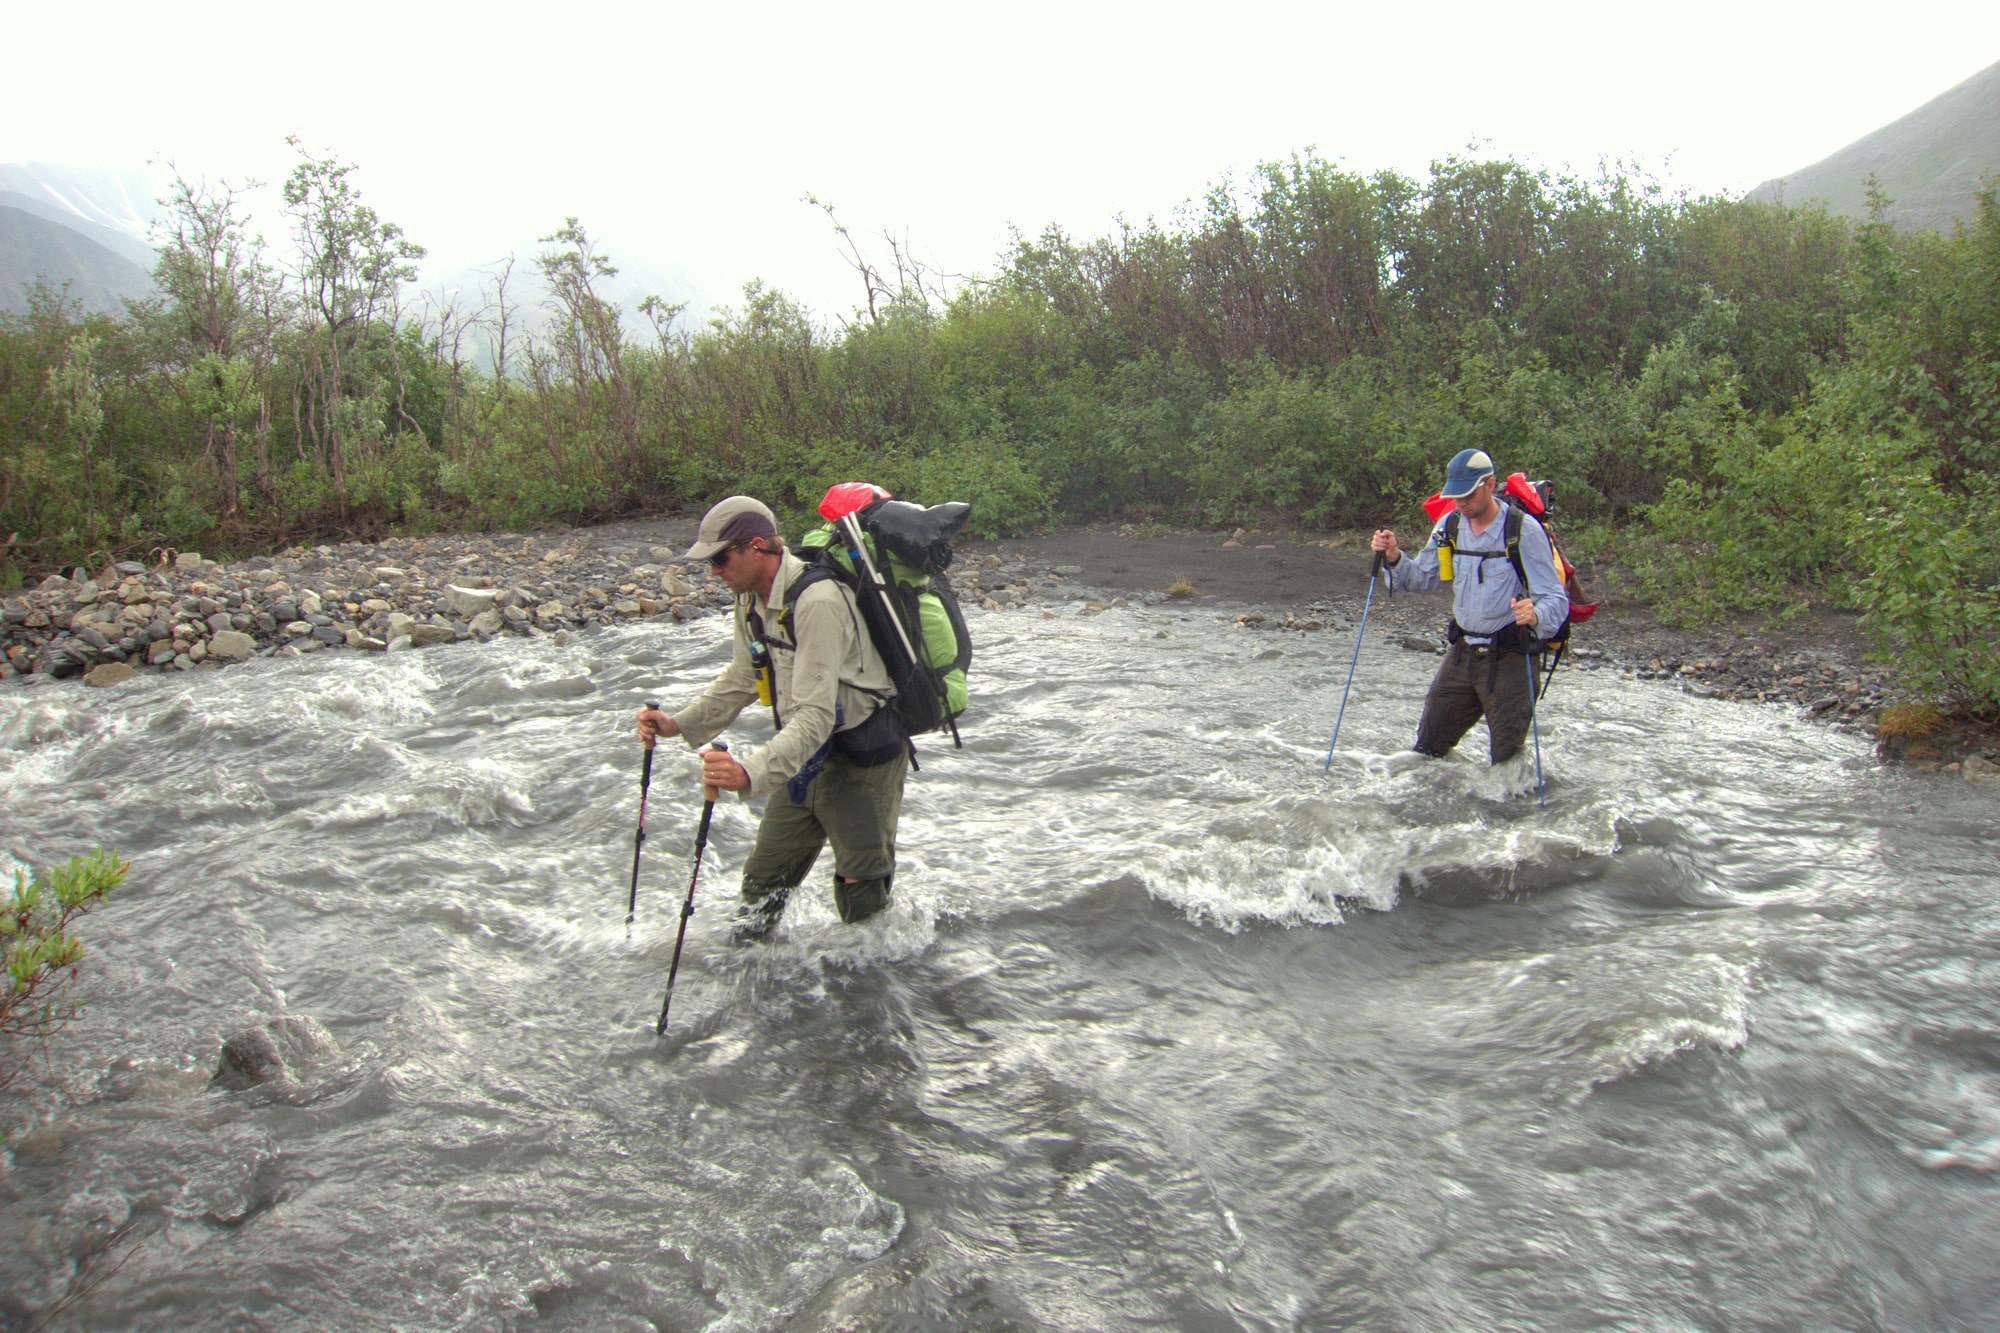
Partner crossings
Crossing with another person can add stability, but only if you communicate and use a method you both understand. If one person is nervous or much smaller, be extra conservative about the decision to cross at all.
Side-by-side support
In mild current and shallow water, two hikers can cross near each other, slightly staggered, each using poles, moving slowly and staying within arm’s reach if someone needs to steady themselves.
Mutual support (2 or 3)
- Link up by holding forearms or shoulders. If you use pack straps, do it only if they are solid, easy to grip, and do not twist someone’s load unexpectedly.
- Strongest person upstream to take more of the force.
- Move in sync: agree on a cadence like “step” so no one moves unexpectedly.
- Do not rush the exit: many falls happen right at the far bank when people stand tall too soon.
What not to do
- Do not hold hands in strong current. If one person falls, it can pull the other in.
- Do not clip packs together or tether people with rope unless you have training. Improvised tethers can create entanglement risks.
Retreat rules
The best skill in river safety is the ability to say “no.” Turning back is not failure. It is good judgment with a long trail life ahead of it.
Hard stops
- You cannot see the bottom and cannot probe a safe line.
- The current makes it hard to stand even near the bank.
- Water is at or above your knees and moving fast enough that you need to brace to stay upright.
- You see strainers, drops, or rapids downstream of your potential crossing.
- The entry or exit is sketchy: steep mud, undercut bank, slick slab rock.
- It is late in the day and a fall would mean hypothermia risk or a long, wet hike out.
- You feel pressured by a schedule, a group, or “it is probably fine.” Pressure is not a safety plan.
If you are debating it for more than a couple minutes, that is often your answer. A safe crossing usually feels boring.
Plan your turnaround
Before you leave the trailhead, pick a personal rule that makes decision-making easier on the bank. Examples: “No solo crossings above mid-shin in fast water,” or “If I cannot see the bottom, I do not step in.”
After rain or snowmelt
This is the part most day hikers underestimate: creeks do not rise on a schedule that matches your itinerary.
After storms
- Water rises fast, especially in steep drainages and burn scars where the ground cannot absorb rainfall.
- Visibility drops as sediment turns the water opaque.
- Footing shifts: rocks roll, gravel bars rearrange, and familiar stepping stones vanish.
During spring snowmelt
- Peak flow often hits later in the day as temperatures rise and melt accelerates, but timing varies with basin size, aspect, and cloud cover. A morning crossing can be easier than the return.
- Water is colder, which speeds up fatigue and numbness.
If there has been heavy rain in the last 24 to 48 hours or you are hiking during warm spring afternoons, build in extra margin. Choose routes with bridges, or plan an out-and-back that does not commit you to a questionable return crossing.
Where this comes up
Town Wander covers places where trail culture meets easy access, which often means popular creek corridors that look mellow right up until they are not. Without repeating hike roundups, here are common situations in well-loved parks and gateway areas where day hikers regularly face decisions at the water’s edge.
Sierra Nevada and Yosemite
Early season snowmelt can swell creeks in forested valleys and granite canyons. Even near heavily trafficked routes, do not assume “popular” equals “safe today.” Treat unbridged creek crossings as conditions-dependent, especially in late spring and early summer.
Colorado Front Range
Afternoon thunderstorms and fast runoff can turn clear creeks into pushy brown flows. In canyons, water accelerates through narrow sections, and slick rock ramps can make exits surprisingly hard.
Pacific Northwest valleys
Rain-on-snow events and shoulder-season storms can spike flows quickly. Look for crossings where downed logs create strainers, particularly in dense forest corridors.
Smokies and Appalachians
Frequent rain means frequent high water. Some routes rely on rock-hops that become legitimately hazardous when algae slicks the stones and water covers the gaps between them.
Wherever you are, the playbook is the same: read the water, scout for a better ford, and be willing to turn around when the creek is making the decisions for you.
Crossing checklist
Use this quick list on the bank. If you hit multiple “no” answers, take the win and reroute.
Before you cross
- Can I see the bottom and identify stable footing?
- Is there a wider, shallower ford nearby with a clean exit?
- Is the water below knee height for me at the chosen line, or clearly gentle enough to stand without bracing?
- Is the current slow enough that I can stand still for 30 seconds near the bank without fighting for balance?
- Is there a safe runout downstream with no logs, drops, slots, or pin spots?
- Have I unbuckled hip belt and sternum strap and secured loose gear?
- Do I have two solid points of support (trekking poles or sturdy stick)?
- Am I thinking about the return crossing and how flow might change later?
If you are unsure
- Wait 10 minutes and reassess. Nerves sometimes settle, but water rarely lies.
- Look for a bridge, a different trail segment, or an out-and-back that stays on your side.
- Turn back early, while you are still warm, dry, and have daylight buffer.
One last note
There is a reason I am stubborn about this topic. The best day hikes are the ones that end with tired legs and a hot drink, not a rescue call. When a crossing feels questionable, the most experienced move is often the least dramatic one: you pivot, you grab a coffee in town, and you come back when the creek wants to cooperate.