Iron Goat Trail to the Wellington Townsite

Maya Lin
Maya Lin is a travel journalist and outdoor enthusiast who believes the best trips combine rugged adventures with urban comforts. After spending six years backpacking across four continents, she founded Trail & Town Guide to help fellow travelers navigate both hidden mountain passes and bustling city neighborhoods with confidence.
If you have ever pulled into Stevens Pass on a busy weekend, stared at the steep lake hikes, and thought, not today, I have a favorite alternative: the Iron Goat Trail to the Wellington townsite. It is a mellow walk with big payoffs, minus the lung burn. You get mossy forest, river-valley views far below, dramatic railroad history, and the kind of quiet that feels rare this close to the pass.
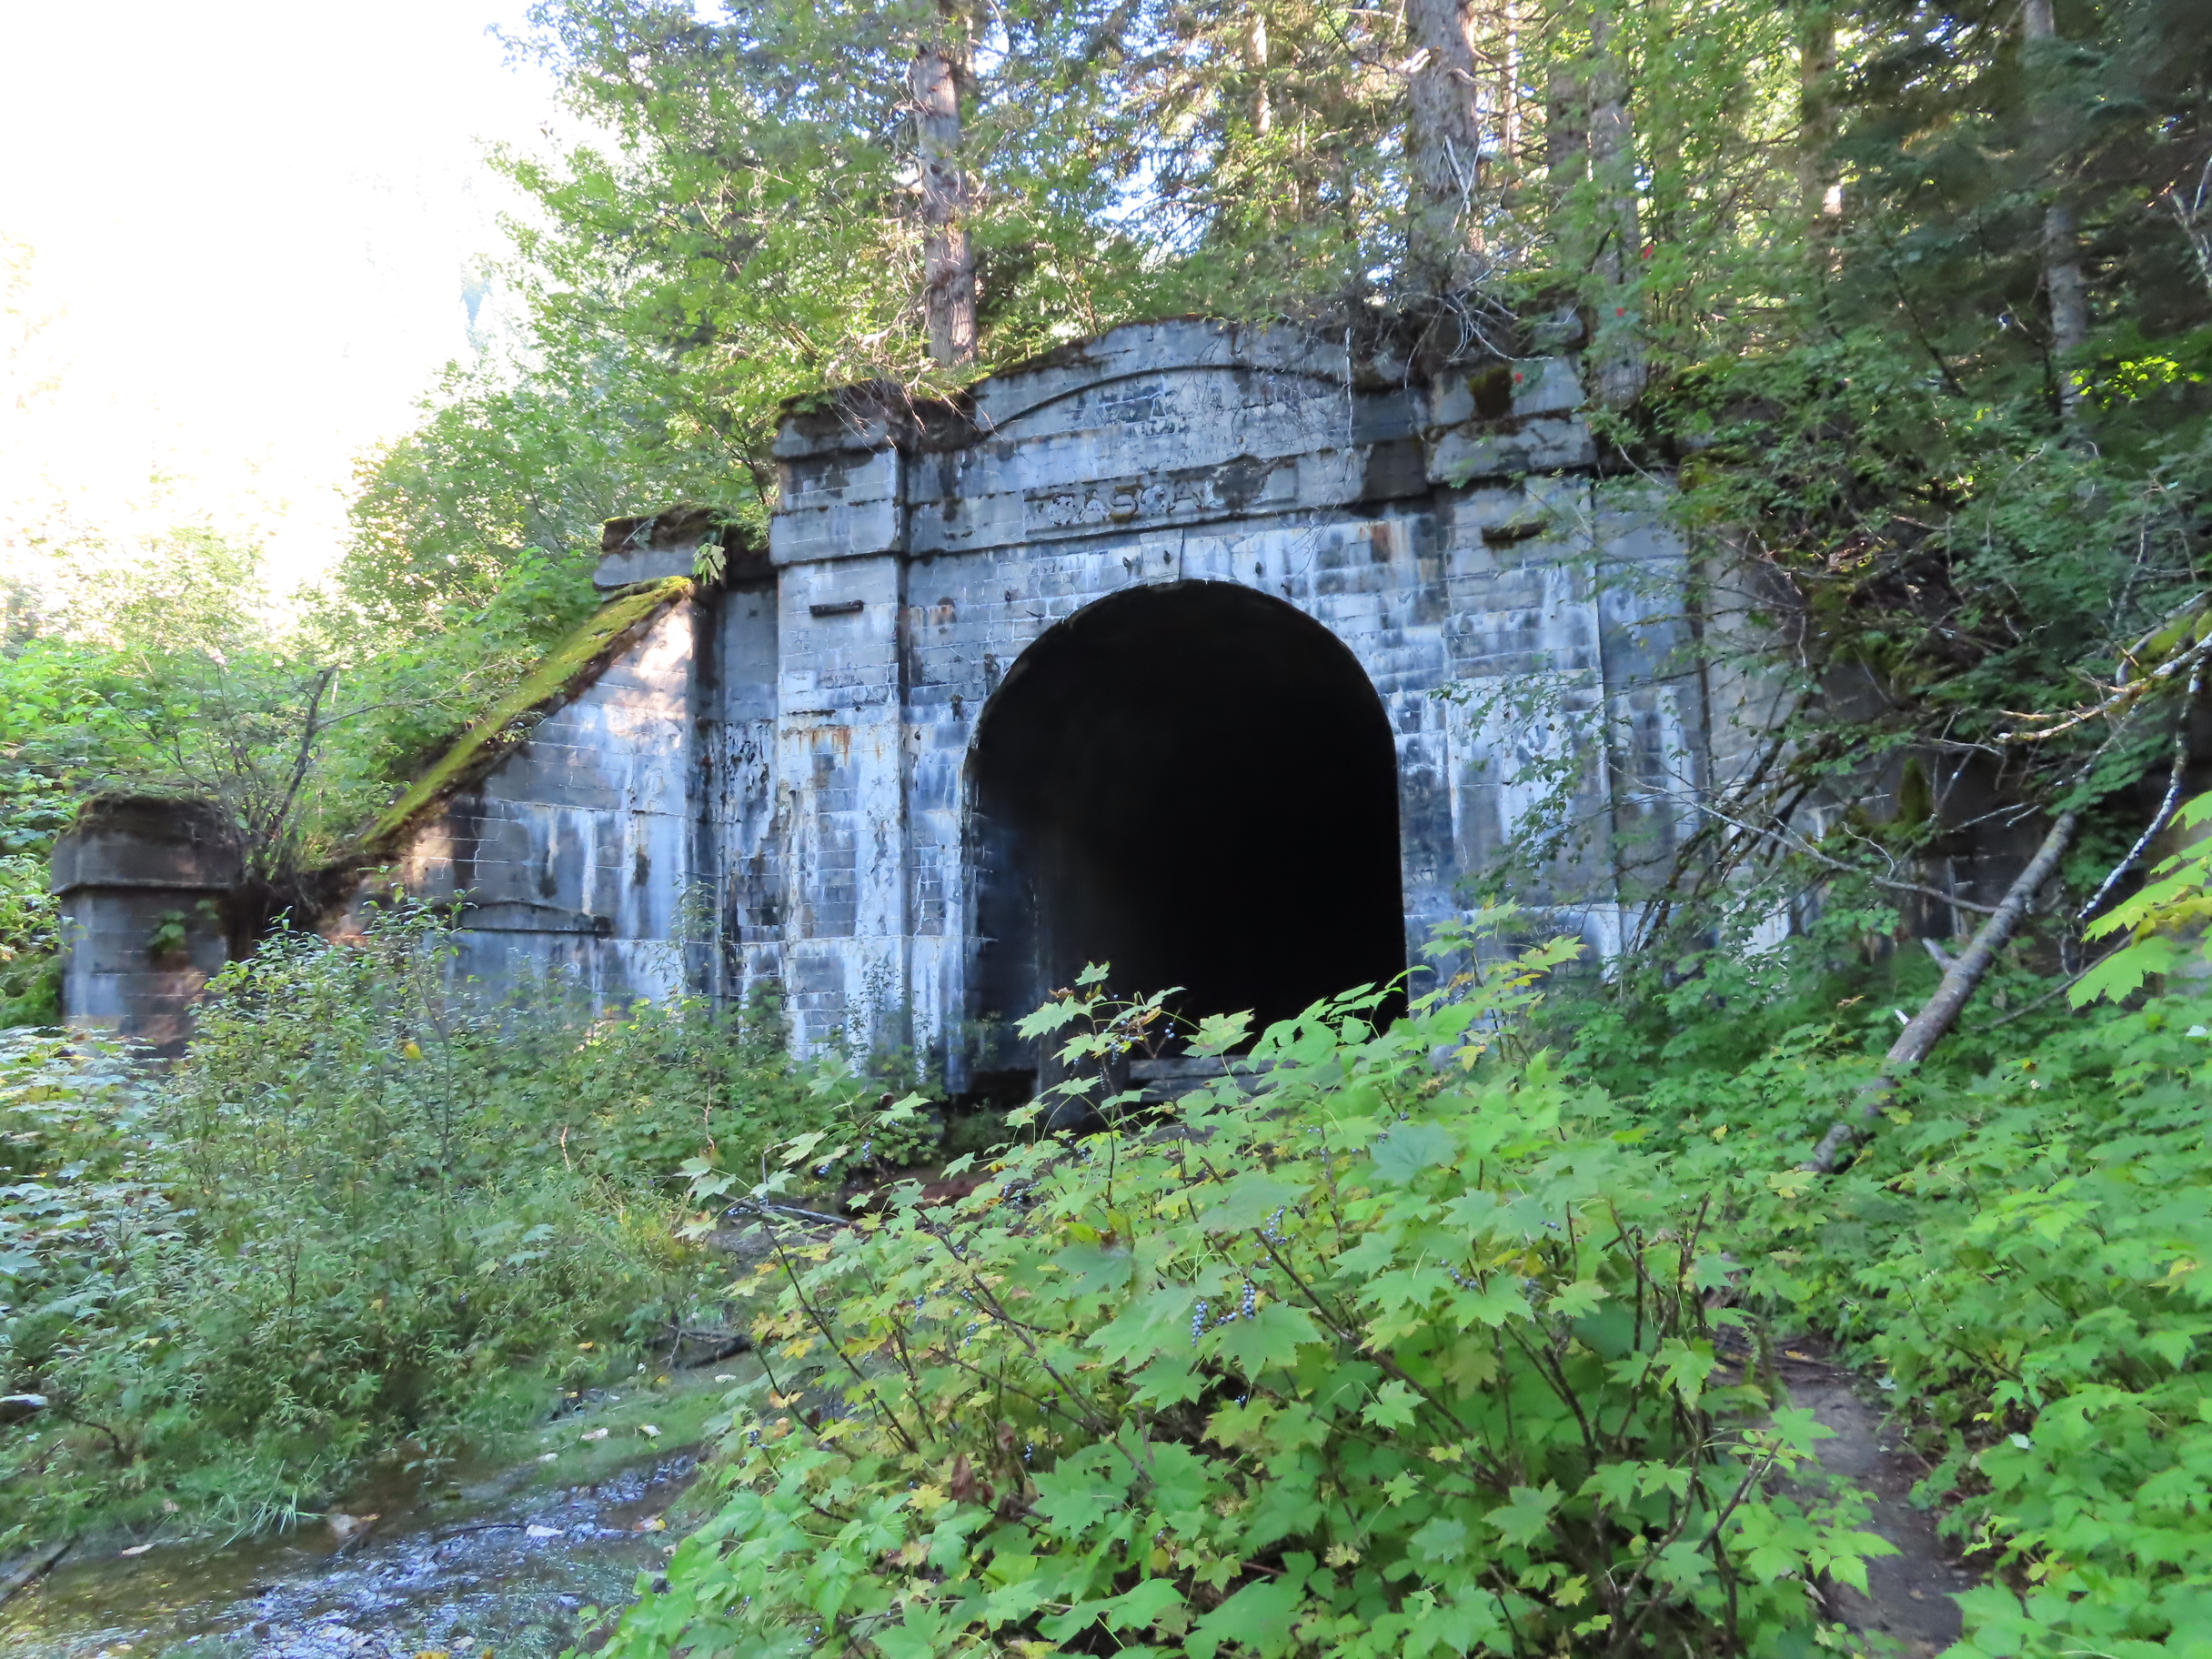
This route follows the old Great Northern Railway grade above the tumbling Tye River valley. It is not an alpine lake hike, and that is the point. When a steep Stevens Pass day feels like the wrong plan, this trail lets you get outside, learn something, and still have energy left for coffee afterward.
Quick trail facts
- Trail: Iron Goat Trail to the Wellington townsite (old Great Northern grade)
- Location: US-2 corridor near Stevens Pass, Central Cascades
- Type: Out-and-back with optional short spurs to viewpoints and interpretive stops
- Difficulty: Easy to moderate, mostly gentle grade
- Best for: History lovers, families, anyone rehabbing a knee, visitors easing back into hiking, and hikers who want a low-effort outing near Stevens Pass
- Season: Three-season for most hikers. Snow, ice, and blowdowns can linger well into spring depending on the year. In winter, assume winter conditions and treat this as serious mountain travel.
Drive time: From Seattle, plan roughly 1 hour 45 minutes to 2 hours 30 minutes each way depending on traffic and road conditions. From Leavenworth, plan roughly 35 to 55 minutes.
Cell service: Often spotty along US-2 and on trail. Download an offline map before you leave home.
Surface: Expect an old-railroad-grade style tread, generally wide and fairly even. Still, plan for damp dirt, muddy patches, needles, small rocks, and seasonal blowdown debris.
Mileage: Because there are multiple access points, spur viewpoints, and a townsite you naturally wander, mileage is a range rather than a single perfect number. For most first-timers doing the classic out-and-back from the signed Iron Goat Trailhead to the Wellington interpretive area, plan roughly 5 to 7 miles round trip. Starting closer to the interpretive site, turning around early, or skipping spurs can shorten it. Adding viewpoints and meandering through the signed townsite area can push you toward the high end.
Typical time: Most people treat this as a half-day outing. If you actually read the panels and linger, that is the best version of this hike.
Restrooms: Facilities are limited and not reliable. Plan to be self-sufficient and do not build your day around finding an open toilet at the trailhead or interpretive site.
Passes and fees: This is a ticket-sensitive corridor, and requirements can differ between pullouts that are only minutes apart. The sign posted at the exact spot where you park is the only rule that counts. In this general area you may see Northwest Forest Pass language at some trailheads and Discover Pass language at some state-managed lots, but do not assume which one applies. Requirements can change, so do not rely on old trip reports. Read the sign at your exact pullout and match your permit to it.
Land manager: The trail itself is commonly associated with the Mount Baker–Snoqualmie National Forest, but the practical reality for visitors is simpler: parking rules vary by lot. Plan with current USFS and WTA information, then follow what is posted at the exact lot or kiosk where you park.
If you want this to be definitive for your day, do a quick, current check before you drive out using the Washington Trails Association listing and the relevant USFS district page, then still confirm at the kiosk.
Trailheads
There are a couple of common ways people access the Iron Goat Trail system. Both work. The best one for you depends on what you want most: simplest logistics, or a shorter, signage-heavy history stroll.
Iron Goat Trailhead
If you want the cleanest, easiest show-up-and-hike experience, use the signed Iron Goat Trailhead along US-2 near Stevens Pass. This is the most intuitive starting point for first-timers and puts you into the old grade vibe fast.
- Why I like it: Clear signage, gentle grade almost immediately, and it is easy to stick to the main line.
- Best for: Families, mixed-ability groups, visitors who do not want to fuss with navigation.
- Parking note: This corridor can feel busy on summer weekends. If the main lot is full, do not invent a shoulder spot. Keep driving and look for a legal, signed pullout, or pivot to a different nearby walk.
Wellington pullout
For consistency, I am going to call this the Wellington Interpretive Site because that is the name you will often see at the kiosk and on visitor-facing materials. On maps, you may also see Wellington Townsite or similar variations. In the field, focus on the interpretive signage rather than chasing the perfect pin.
- Why choose it: You are quickly into the heart of the history, and the interpretive experience feels more concentrated.
- Best for: Repeat visitors, slower-paced walkers, and anyone showing up specifically for Wellington.
My personal take: For your first visit, start at the Iron Goat Trailhead and do the classic out-and-back to the townsite. Then come back and start at the interpretive site when you feel like a more history-first day.
The walk to Wellington
One reason I recommend Iron Goat so often is that it delivers steady interest without demanding constant effort. The grade is wide enough in many places to feel comfortable, with footing that is usually kinder than steep, rooty singletrack. You move through deep green forest, with frequent reminders that this trail used to be an industrial lifeline through the Cascades.
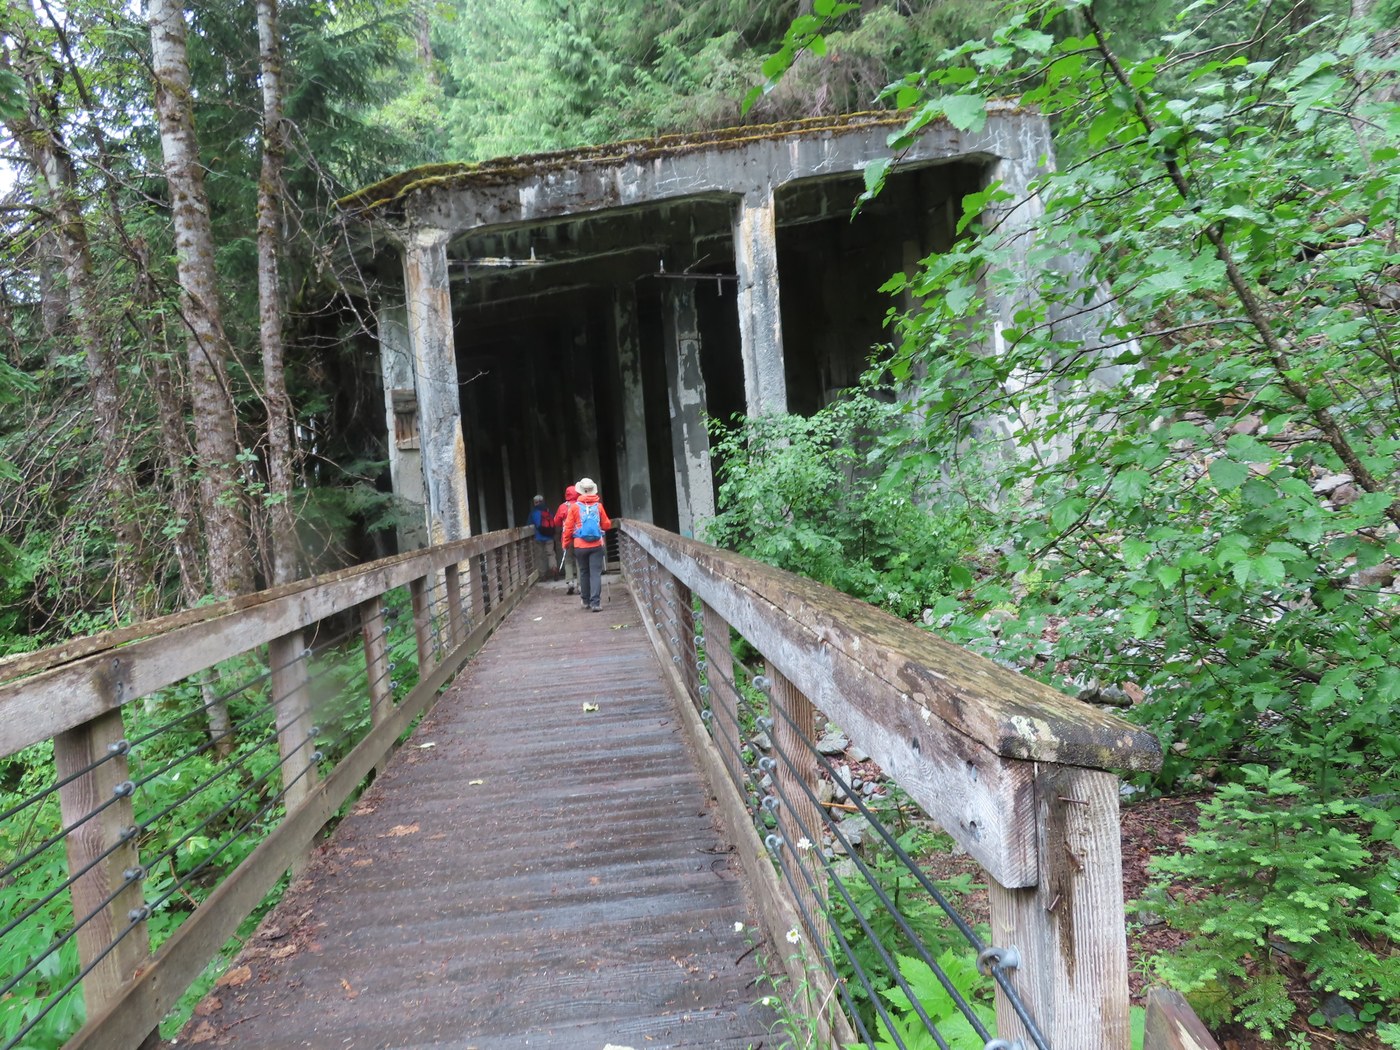
What you will notice
- The rail-grade feel: Long, gently curving tread that looks engineered because it was.
- Cut slopes and embankments: As you walk, you can literally see where the grade was carved and built up to hold a train line steady across steep terrain.
- Railroad remnants: The clearest remnant is the grade itself, benched into the hillside and holding a steady line. In a few spots you may notice rockwork, old drainage shaping, or hand-stacked stone. Do not count on big artifacts.
- Interpretive panels you actually stop for: You will pass multiple panels on winter railroad operations, snow sheds and snowslide defenses, and the hard reality of keeping trains moving through avalanche terrain.
- A few stop-and-look openings: The Tye River valley sits far below in spots, and those glimpses are a quiet kind of dramatic.
Why Wellington matters
Wellington was once a railroad community tied to the Great Northern’s push through the mountains. The story here is inseparable from winter, snow, and the risk of moving people and freight through avalanche terrain.
Most of all, it is tied to the 1910 Wellington avalanche, which is widely described on-site and in regional history as among the deadliest avalanche disasters in U.S. history. The signs and markers are not just trivia. They exist because people lived, worked, and traveled through a place where the mountains can make decisions quickly.
Go slow through the townsite area. It is one of those spots where patience pays off, because the details are the whole point.
Avalanche markers
The most memorable trail feature on Iron Goat is not a summit or a lake. It is the avalanche markers and the way they make the landscape feel suddenly legible. You are walking through a corridor that was historically exposed to avalanche paths, and the Wellington-focused section includes interpretive context that helps you understand how serious that risk is.
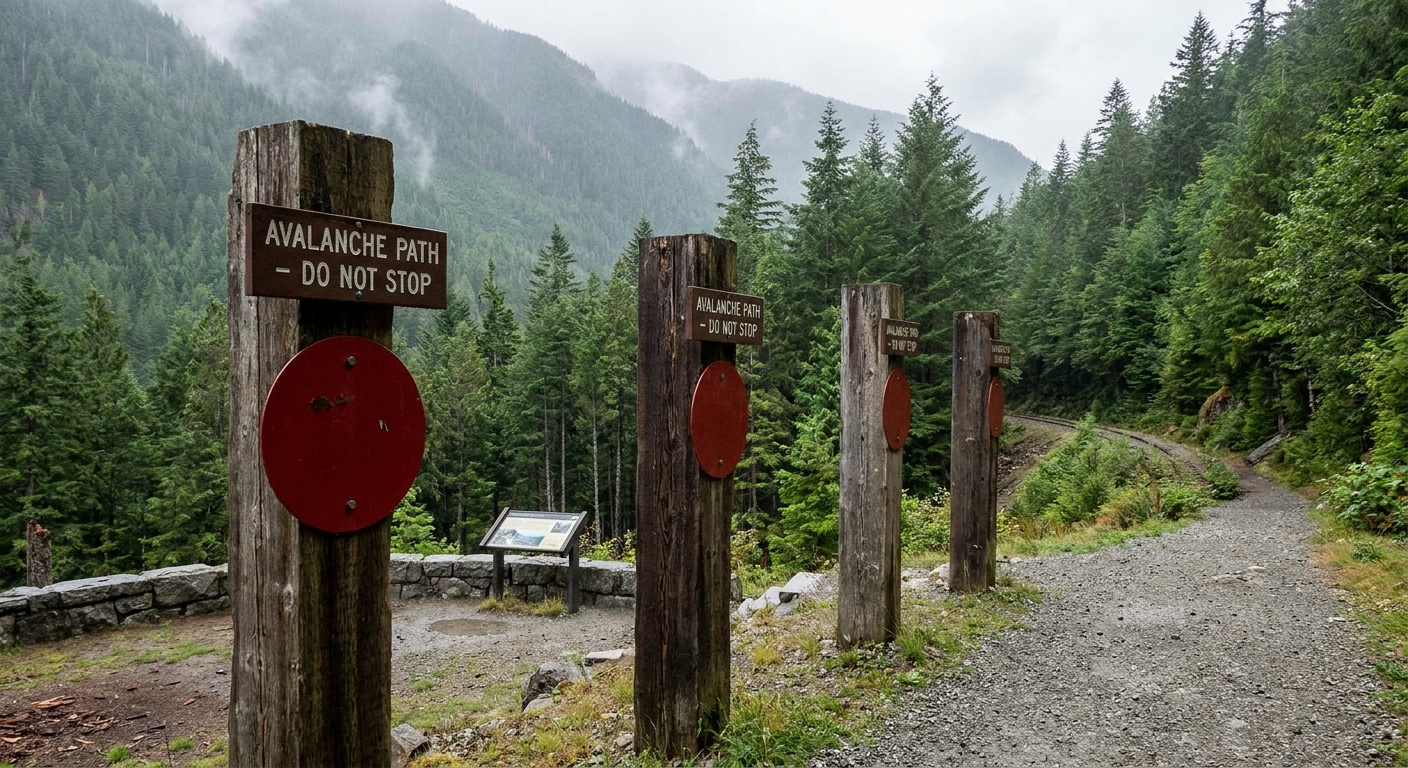
- Where you will see them: The most reliable concentration is typically around the Wellington Interpretive Site kiosk and the townsite area. If you hike from the Iron Goat Trailhead all the way to Wellington, you are very likely to end up in the main interpretive cluster, but signage and exact placements can change over time.
- What the markers do: They point out avalanche paths and help you visualize where slides run and why the railroad fought for safer passage.
- How to notice them: Slow down in signed sections and look up at the slope shapes and the openings that cut through the forest. This is a look-up-and-read hike, not a rush hike.
- Winter warning: Do not assume easy trail equals no hazard. Parts of this corridor sit below or pass through avalanche runouts. In winter and during spring thaw cycles, choose this outing only if you have the right avalanche awareness and are prepared to turn around.
- One actionable step: Check the NWAC avalanche forecast for the Stevens Pass zone before you go if there is snow on the ground, recent storms, warming, or any hint of slide conditions.
I find the markers especially meaningful on gray days, when clouds sit low on the slopes. The trail feels like a museum you can walk through, but the exhibits are real mountains.
Iron Goat vs Skyline Lake
It is easy to lump everything near Stevens Pass into one mental category, but Iron Goat and Skyline Lake are fundamentally different days.
How they differ
- Grade and effort: Iron Goat follows an old rail grade, so the climb is modest. Skyline Lake is a shorter hike with a steeper, more sustained climb.
- Experience: Iron Goat is about history, forest atmosphere, and interpretive stops. Skyline Lake is about earning a basin and getting that classic alpine-lake payoff.
- Crowd pattern: Both can be popular, but the vibe differs. Iron Goat hikers tend to spread out and linger. Skyline Lake groups often move in bursts toward the same single destination.
- Who it suits: Iron Goat fits mixed ability groups and lower-impact days. Skyline Lake fits hikers who want a workout and a high-elevation reward.
If you are traveling with someone who does not love steep climbs, if you are easing back into hiking, or if you simply want to keep the day gentle, Iron Goat is the better call.
Who it is for
I think of Iron Goat as the smart Stevens Pass plan for a lot of real-life situations.
- When a steep lake day is the wrong plan: You are short on time, feeling jet lagged, dealing with sore knees, traveling with kids or grandparents, or you just want a low-key day.
- Families: Kid-friendly for school-age kids who can walk steadily and who like a story hike with signs. For toddlers and short legs, plan shorter, start from the Wellington Interpretive Site pullout, and make it more about wandering and reading than making it to a destination.
- History-forward hikers: If you love learning the story of a place while you walk through it, this trail delivers.
- Rainy-day optimists: The forest cover makes drizzle feel cozy instead of punishing.
- Carry-on only travelers building range: If your footwear is city sneaker with good tread, Iron Goat is forgiving compared to steeper, rockier objectives.
That said, if you are chasing big alpine scenery and do not mind a climb, you may find Iron Goat more subtle. It is not trying to be epic. It is trying to be meaningful.
When to go
My favorite times are the shoulder seasons, when the forest is extra green and the crowds back off. Late spring into early summer can still have snow or blowdowns, so check recent reports. Fall can be ideal when the air turns crisp and you can read the panels without sweating, but shorter daylight makes it a start earlier than you think kind of outing.
In winter, treat it like winter travel. The grade is gentle, but the terrain above it is still avalanche terrain.
What to bring
- Footwear: Trail runners or hiking shoes are ideal. Expect damp patches, and expect icy spots in shoulder season.
- Layers: US-2 weather changes fast. Pack a rain shell even if the forecast looks decent.
- Water and snacks: Enough for a half-day stroll. This is a great thermos-and-pastry hike if you want to keep it cozy.
- Navigation: The main route is generally straightforward, but an offline map helps if you start exploring spur paths.
- Insects: In warmer months, bring repellent. The forest can be buggy.
Dogs and access
Dogs: Dogs are commonly allowed on leash on trails in this corridor, but posted rules can vary by access point and season. Keep your dog leashed near other hikers and around interpretive areas, and follow what the trailhead sign says.
Strollers and wheels: The grade is gentle, but the surface is still a forest trail with uneven spots and seasonal debris. I would not count on it being wheelchair-accessible, and a stroller will depend on wheels, patience, and current conditions.
Conditions and updates
This is a mountain corridor that deals with winter damage. Blowdowns, small washouts, and lingering snow can change the experience year to year. Before you drive out, check recent trip reports and current conditions for the Iron Goat Trail and the Wellington area, especially in spring and after major windstorms.
Trail etiquette
This corridor holds history and sensitive terrain. A few small choices make a big difference.
- Stay on the established tread: Especially near interpretive areas and any remnants of the old grade.
- Leave historic things where they are: Do not move artifacts or pry at old timbers or structures, even if it looks like just a scrap.
- Pack out everything: Including orange peels and coffee cups. Yes, even the compostable ones.
- Keep voices low near other groups: The trail’s charm is the quiet, and sound travels in the forest.
- Respect signs and barriers: They exist to protect both visitors and the site.
After the hike
My Trail and Town philosophy is simple: earn your comfort. Iron Goat is the perfect earn because it is gentle, which means you can still fully enjoy the town part afterward.
On my best days here, I do the Wellington walk at an unhurried pace, then point the car west toward Skykomish or east toward Leavenworth for something warm to drink. The contrast is the whole magic: old railroad grade in the damp forest, then a cafe chair and a hot cup with fog on the windows.
FAQ
Is Iron Goat the same as Skyline Lake?
No. They are separate outings with different character and effort. Iron Goat is a gentle railroad-grade walk focused on history and the Wellington townsite. Skyline Lake is a steeper climb to a lake basin near the ski area.
How long does it take to reach Wellington?
Most people do it as a half-day outing. Your exact time depends on where you start, your pace, and how long you spend reading the interpretive signs and exploring short spurs. Budget extra time for the history because that is the point.
Is it good if I do not want a big climb?
Yes. This is one of the best near-Stevens Pass options when you want something scenic and meaningful without a steep ascent.
Are there avalanche hazards?
Yes. The corridor is historically avalanche-prone, which is why you will see avalanche markers and interpretive information tied to the 1910 Wellington avalanche. In winter and during spring thaw cycles, conditions can be serious and parts of the route can be exposed to avalanche runouts. Check the NWAC forecast for the Stevens Pass zone and choose a true lowland walk away from avalanche terrain during active avalanche periods if you are unsure.
Do I need a parking pass?
Sometimes. Requirements can differ between nearby lots and pullouts even when they access the same trail system. You may see Northwest Forest Pass rules at some USFS trailheads and Discover Pass rules at some state-managed lots, but do not assume. The safest approach is to read the sign at the lot where you park and follow it exactly. If you are unsure, do not gamble. Choose an access point where the posted requirement is clear to you.