Bisti Badlands and De-Na-Zin Wilderness: First-Timer Route and Navigation
Bisti Badlands and the De-Na-Zin Wilderness feel like New Mexico put a sci-fi movie set out to bake under a huge sky. The catch is that this place is almost entirely trail-free. That is the magic and the hazard. If it is your first visit, you want a route that is simple to follow, flexible if you get turned around, and realistic about heat, sand, and daylight.
This guide gives you a sensible walking loop concept from the main Bisti access, how to set waypoints that actually help, what road access is like in real life, and why night photography demands extra caution here. It also clarifies the difference between the popular Bisti side most people mean and the separate De-Na-Zin access on the east side.

What this place is (and why navigation is the main event)
The Bisti De-Na-Zin Wilderness is a Bureau of Land Management (BLM) wilderness area in northwestern New Mexico (Farmington Field Office). “Bisti Badlands” is the common name hikers and photographers use for the most visited badlands zone and access points on the west side of the wilderness. In other words, people say “Bisti” the way people say “the Narrows,” even when the official land unit name is longer.
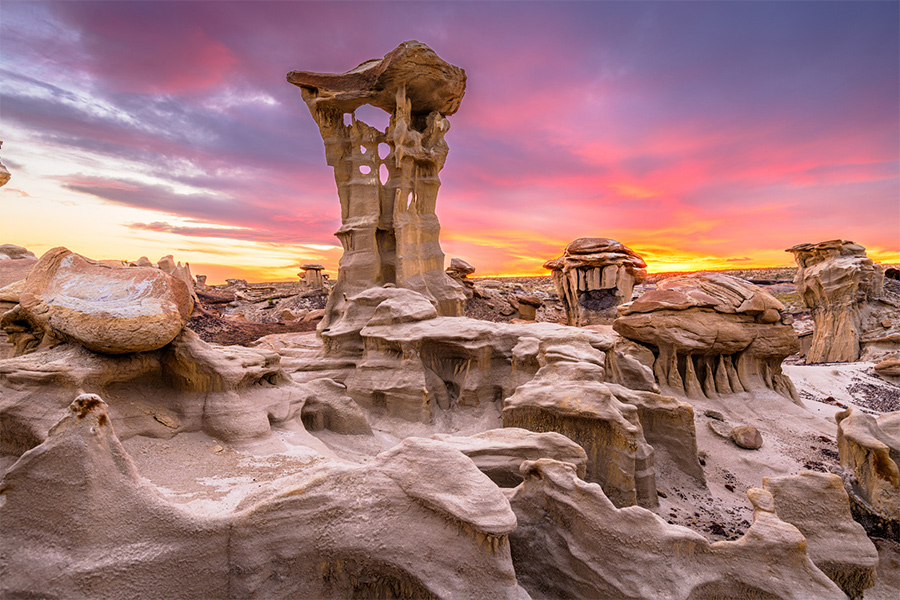
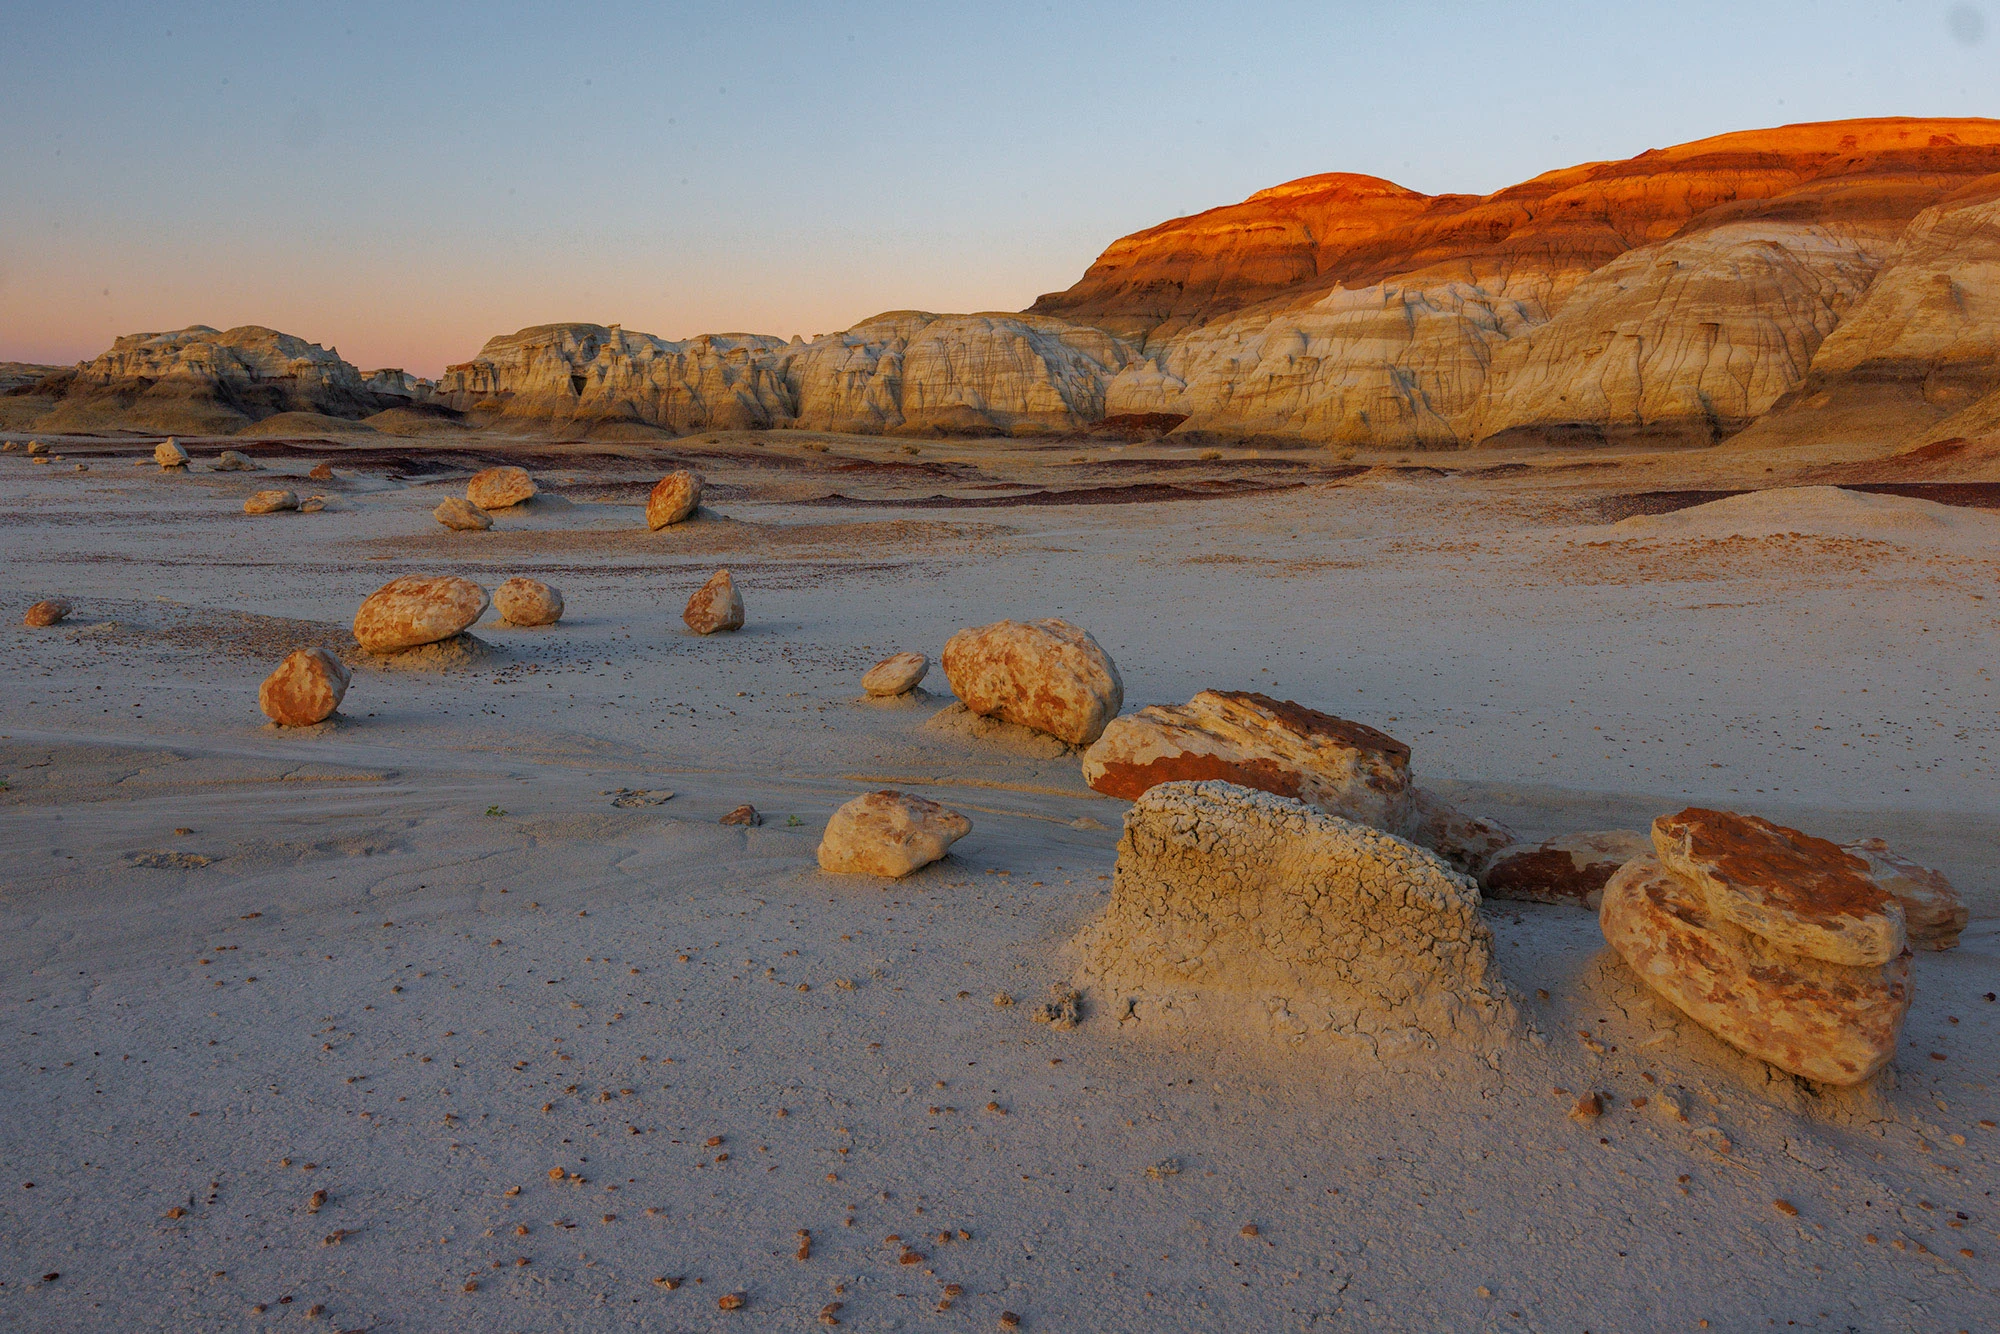
The landscape is a mix of soft bentonite clay, sandy washes, low ridgelines, and whimsical sandstone features that look like they were poured, not carved.
There are typically no maintained trails and often no reliable cairns. After rain, the clay can turn slick and sticky. After wind, your footprints disappear. If you can navigate competently in a wide-open area without trail markers, you will love it. If you depend on painted blazes, treat this as a skills day, not a casual stroll.
Permits and fees
- Day use: Generally no permit and no entrance fee for standard daytime hiking, but regulations can change. Confirm current rules with the BLM Farmington Field Office before you go.
- Commercial work: Workshops, guided trips, and commercial filming or photography may require authorization. Check current BLM permit guidance (including any wilderness-specific restrictions) if you are working commercially.
- Overnight: Overnight backcountry use is often allowed under wilderness rules, but details matter. Verify current camping expectations (including fire restrictions, group size limits, and waste rules) with BLM before you commit to an overnight plan.
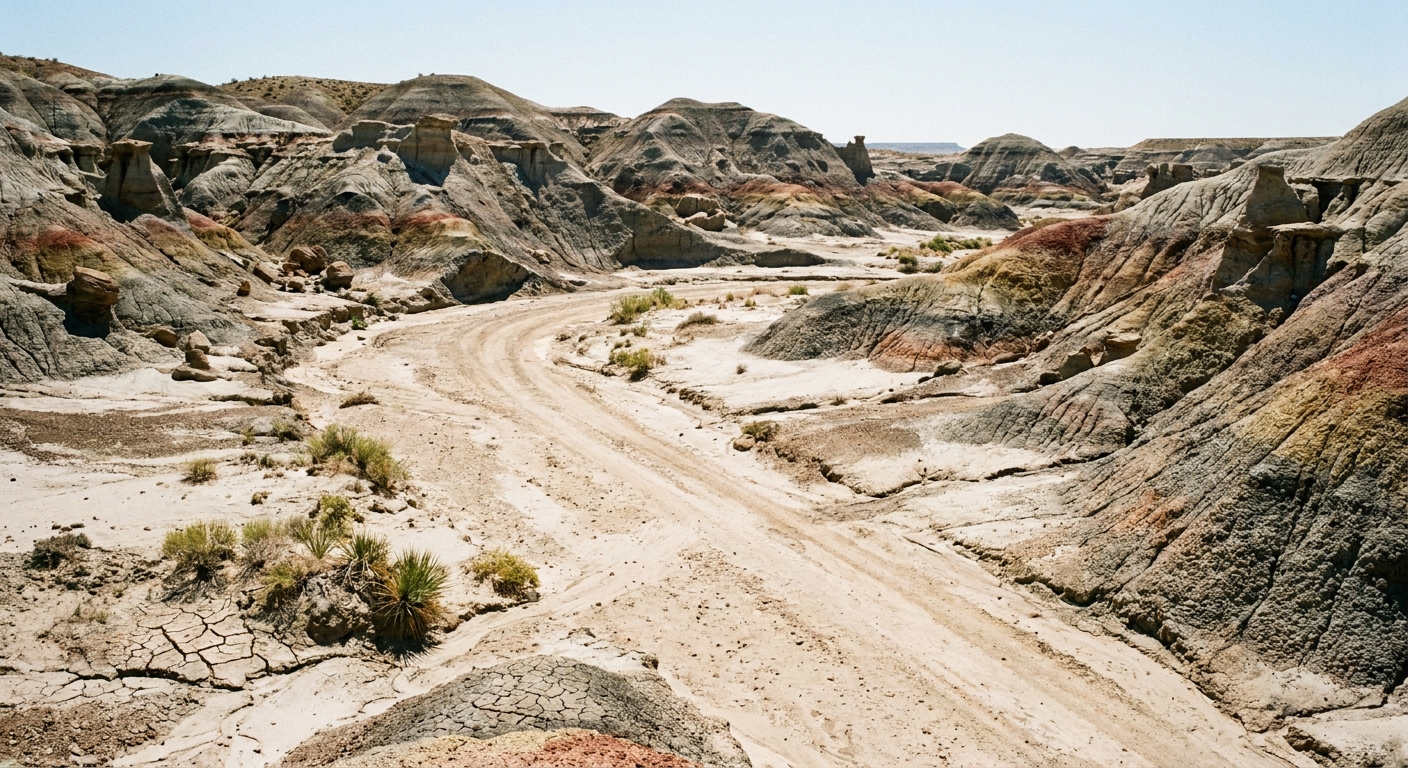
Getting there (roads that actually matter)
Most first-timers use the main western Bisti access (often labeled “Bisti Main” or similar in mapping apps). The common approach is:
- NM Highway 371 as the paved spine.
- Then onto the graded dirt access road commonly labeled Road 7297 leading to the main Bisti parking area.
Since mapping apps sometimes route people onto random back roads, naming the highway and the dirt road is not just trivia. It is a way to sanity-check your directions before you lose cell service.
De-Na-Zin note: De-Na-Zin is often discussed in the same breath as Bisti, but it has a separate eastern access, commonly reached via County Road 7500. This guide focuses on the main western Bisti side and its “wanderable loop” concept. If you start from the De-Na-Zin side, treat it as a different trip with a different navigation plan.
Road access nuance (the part people gloss over)
Conditions vary wildly with weather and maintenance. Here is the practical reality:
- After rain: Dirt roads in this region can become greasy, rutted, or temporarily impassable. Do not assume you can power through in a sedan.
- Cell service: Often weak to nonexistent. If your car gets stuck, you may be in a long, quiet problem.
- Parking areas: Expect simple pull-offs, not staffed lots. Leave valuables out of sight, and do not block road access for others.
- Navigation to the trailhead: Download offline maps before you leave paved roads. Cross-check that your route uses Hwy 371 and Road 7297 for the main western access you intend.
My rule: if you have had rain in the last 24 to 48 hours, or rain is forecast during your visit, treat the road and the clay as part of your safety plan. Sometimes the safest decision is to go get a coffee in Farmington and come back tomorrow.
A first-timer route that stays forgiving
Instead of promising a perfect hit list of named formations, this route focuses on what you actually need on your first visit: a simple loop idea anchored to obvious terrain cues and your own waypoints. You can extend it if you feel confident, or shorten it if heat, wind, or navigation stress creeps in.
Route concept: Washes and ridges loop
Type: informal loop using washes and low ridges
Best for: first visit, daylight hours, people who want a clear way to get back
Distance: roughly 3 to 6 miles total, depending on how much you wander
Time: 2 to 4.5 hours for most first-timers, with photo stops
How to walk it
- Start with an easy-exit mindset. From the main parking area, walk out on the broad, open flats and identify the most obvious low ridge line or wash direction you can remember without a screen. Take a photo looking back toward the parking area, then another photo of the horizon in the direction you plan to go.
- Follow a primary wash outbound. Pick one main wash as your handrail. Walk gently up it, staying aware that washes branch. When a branch looks tempting, you can explore it, but do not commit without marking your location first.
- Climb a low ridge for orientation. Every so often, step up onto a nearby ridge or knoll. The goal is not altitude, it is a 360-degree reset. You want to keep a mental model of where the parking area is relative to the major wash.
- Turn your walk into a loop using a ridge return. When you feel like you have gone far enough, angle up out of the wash onto a ridge that broadly parallels your outbound track. Use the ridge to travel back while keeping the wash in sight on one side. Eventually drop back down toward the flats leading to the trailhead area.
- Finish on the flats, not through a maze. The last mile is where people get sloppy. Aim to re-enter the open flats with a clear line back to the parking area, rather than cutting through tight gullies or confusing mini-drainages.
This route works because it gives you a simple structure: one obvious spine (a wash) outbound, and a different but visible structure (a ridge line) back. You still get hoodoos, textured clay, and weird little alcoves, but you are less likely to wander in circles.
Waypoints and GPS hygiene
The most common Bisti mistake is relying on a single pin titled “Bisti Badlands” and then wandering until the battery dies. Instead, treat navigation like a small system with redundancy.
Before you leave town
- Download offline maps in at least one app (Gaia GPS, onX Backcountry, AllTrails offline, Google Maps offline). Two apps is better if you already use them.
- Save the parking pin and verify it matches the access point you plan to use (main western Bisti off Hwy 371 and Road 7297, or the De-Na-Zin side via County Road 7500).
- Charge fully and bring an external battery. Cold nights and hot days both punish phone batteries.
- Switch your phone to low-power habits: airplane mode plus location services on, screen brightness down, and close background apps.
Waypoint strategy that works in trail-free terrain
Create waypoints like breadcrumbs, but only at decision points.
- Waypoint 1: Parking. Name it something unmissable like “CAR BISTI.”
- Waypoint 2: Wash entry. The spot where you commit to your outbound handrail.
- Waypoint 3: Turn point. Not “cool hoodoo,” but “TURN BACK RIDGE” at the place you decide to start your return arc.
- Optional safety waypoint: If you drop into a complex drainage, mark “EXIT TO FLATS” where you climbed in. That is your emergency reverse button.
Example waypoint list (simple on purpose)
CAR BISTI → WASH ENTRY → TURN BACK RIDGE → EXIT TO FLATS → CAR BISTI
Track recording: yes, but do not follow a noodly line
Recording a track can save the day, especially if wind wipes prints. But do not let a squiggly line override your eyes. In Bisti, your outbound route might include playful zigzags between formations. Your return can be cleaner. Use the track as a reference, not a leash.
Paper backup and compass
If you are comfortable, carry a simple compass and a printed map or at least a downloaded PDF. Wilderness navigation is rarely about one tool. It is about having options when one fails.
If your phone died right now, could you still walk back? Ask that once an hour. It changes how you move.
Heat, hydration, and ground conditions
Bisti can feel deceptively easy because the elevation changes are modest. The effort comes from sun exposure, sand, and the mental load of navigation.
Heat realities
- No shade. Your “shade break” might be the shadow of a small formation that moves every five minutes.
- Reflective surfaces. Light-colored clay reflects heat upward. You can feel cooked from above and below.
- Wind is not always relief. It can be hot and drying, and it can erase visual clues and footprints.
Hydration and electrolytes
For most people, this is a carry more than you think hike. In hot, exposed conditions, some hikers may need up to about 1 liter per hour, but your needs vary by body size, temperature, pace, sun, and acclimation. If you are unsure, err on the side of extra water and a shorter loop.
- Bring electrolytes (tablets or powder). Water alone can leave you feeling weak and headachy.
- Start hydrated. Chugging at the trailhead is not the same as being hydrated.
- Know your red flags: dizziness, nausea, chills, confusion, or stopping sweating. If you see these, stop, cool down, and start moving toward the trailhead early, not later.
Footing after rain
Wet bentonite clay can turn into the texture of peanut butter and cling to your shoes until each step weighs a ton. It also destroys traction. If the ground looks wet, you may need to postpone your hike, even if the sky is blue now.
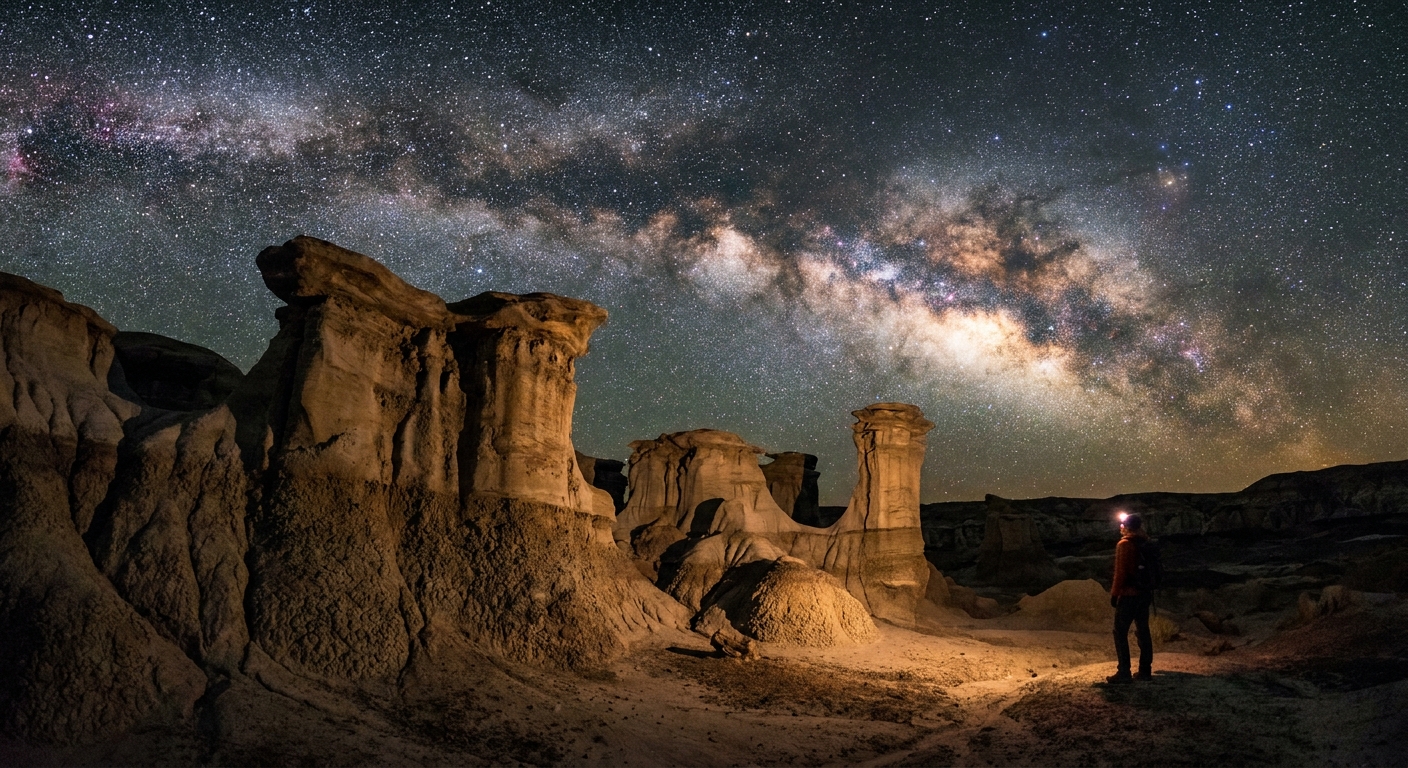
Night photography: extra caution matters
Bisti is famous for night skies, and it earns the hype. But the same trail-free openness that feels playful in daylight becomes riskier in the dark. Night photography adds three things: reduced navigation confidence, longer time outdoors, and a higher chance you will drift away from your intended line while staring at the sky.
What changes after dark
- Features flatten. Ridges and drainages that were obvious at 5 pm can vanish at 10 pm.
- Your cool spot becomes a trap. It is easy to descend into a drainage for foreground composition, then struggle to find the easiest way back out.
- Temperature swings. Hot days can turn into cold nights fast. Wind chills can be real.
- Storm risk is harder to read. During monsoon season, lightning can be a serious hazard even when the terrain feels mellow.
Night safety checklist
- Go in daylight first. Scout your route and foregrounds before sunset. Mark waypoints while you can see.
- Use a real headlamp plus a backup light. Bring extra batteries.
- Stay closer than you think. For a first night, keep your shooting area within a conservative radius of your parking waypoint so your return is simple.
- Tell someone your plan. Include your expected return time and the exact access point.
- Consider a satellite messenger. With unreliable cell service, a small SOS-capable device can be a big upgrade for solo hikers and night shooters.
- Do not rely on car headlights for orientation. Terrain can block the glow, and you may not see it from drainages.
If you are solo and it is your first visit, my honest recommendation is to do your first night attempt only after you have walked the area in daylight and you feel calm about the return route. Bisti rewards patience, not bravado.
Leave No Trace
These formations look tough, but the crust and clay can be surprisingly delicate. Wilderness rules also exist to keep the experience wild for the next person.
- Do not build cairns. They multiply quickly and create false trails that confuse others.
- Pack out everything. Including food scraps. The desert is not a compost bin.
- Step on durable surfaces. Favor washes, rock, and already-disturbed ground. Avoid climbing on fragile formations.
- Soil crust: If you see biological soil crust (where present), do not crush it. It recovers slowly.
- Human waste: Follow current BLM guidance. In many desert settings, packing out waste is the most responsible choice. If burying is allowed, do it properly and well away from washes.
Quick planning notes
Best seasons and times
- Best: spring and fall for manageable temperatures and longer comfortable walking windows.
- Summer: start at sunrise, go shorter, and take heat seriously.
- Winter: crisp light and fewer people, but pack layers and be ready for sudden weather.
What to pack
- 2 to 4+ liters of water per person depending on season and plan
- Electrolytes and salty snacks
- Sun protection: hat, sunglasses, sunscreen, lightweight long sleeves
- Offline maps, battery pack, and a headlamp even for daytime
- Sturdy shoes that handle sand and sticky clay
- Small first aid kit and blister care
- Optional but smart: satellite messenger for solo hikers and night photographers
Extra hazards to keep in mind
- Monsoon storms: Flash flooding can affect washes, and lightning is a real threat.
- Wildlife: Watch where you put hands and feet. Rattlesnakes are part of the desert deal.
- Pets: If you bring a dog, plan water and heat management for them too. The ground can be hot and the exposure is constant.
When to turn around
Turn around early if you lose confidence in your position, if a storm builds, if wind is sandblasting your eyes, or if your water plan stops making sense. The coolest features are not worth an avoidable rescue.