Emerald Lake Trail: Shuttle, Ice, and Bear Lake Logistics
Emerald Lake is one of Rocky Mountain National Park’s biggest hits for a reason. In just a few miles, you get that classic Bear Lake Corridor payoff: pine and spruce forest, a tidy lakeside stroll, and a final reveal that looks like someone dialed the “alpine postcard” setting to maximum.
The catch is not the hiking. It is the logistics. Between shuttle season, timed entry rules, ice lingering in the shade, and parking that fills before some people’s coffee kicks in, Emerald Lake can feel harder to start than it is to finish.
This guide is built to get you on the trail with minimal drama: how to choose parking vs shuttle, what traction you actually need, when crowds spike, and how Emerald fits into a half-day Bear Lake Corridor greatest-hits plan.

Emerald Lake Trail at a glance
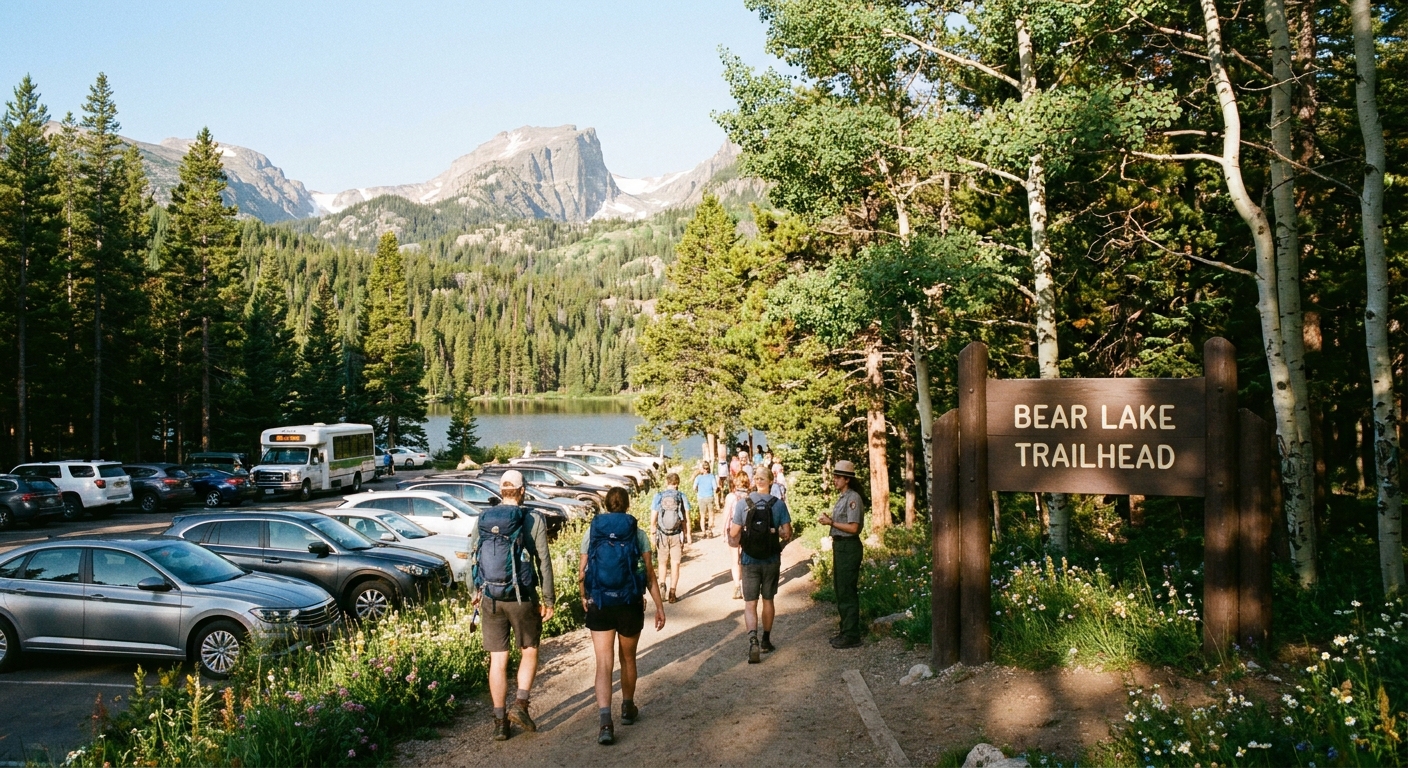
- Trailhead: Bear Lake Trailhead (Bear Lake Corridor)
- Route style: Out and back
- Distance: About 3.2 miles round trip (commonly listed in the 3.1 to 3.4 range)
- Elevation gain: Roughly 650 to 750 feet (varies slightly by source and tracking)
- Elevation: Bear Lake Trailhead is about 9,475 feet; Emerald Lake is a little over 10,100 feet
- Difficulty: Moderate, mostly smooth trail with steady climbing
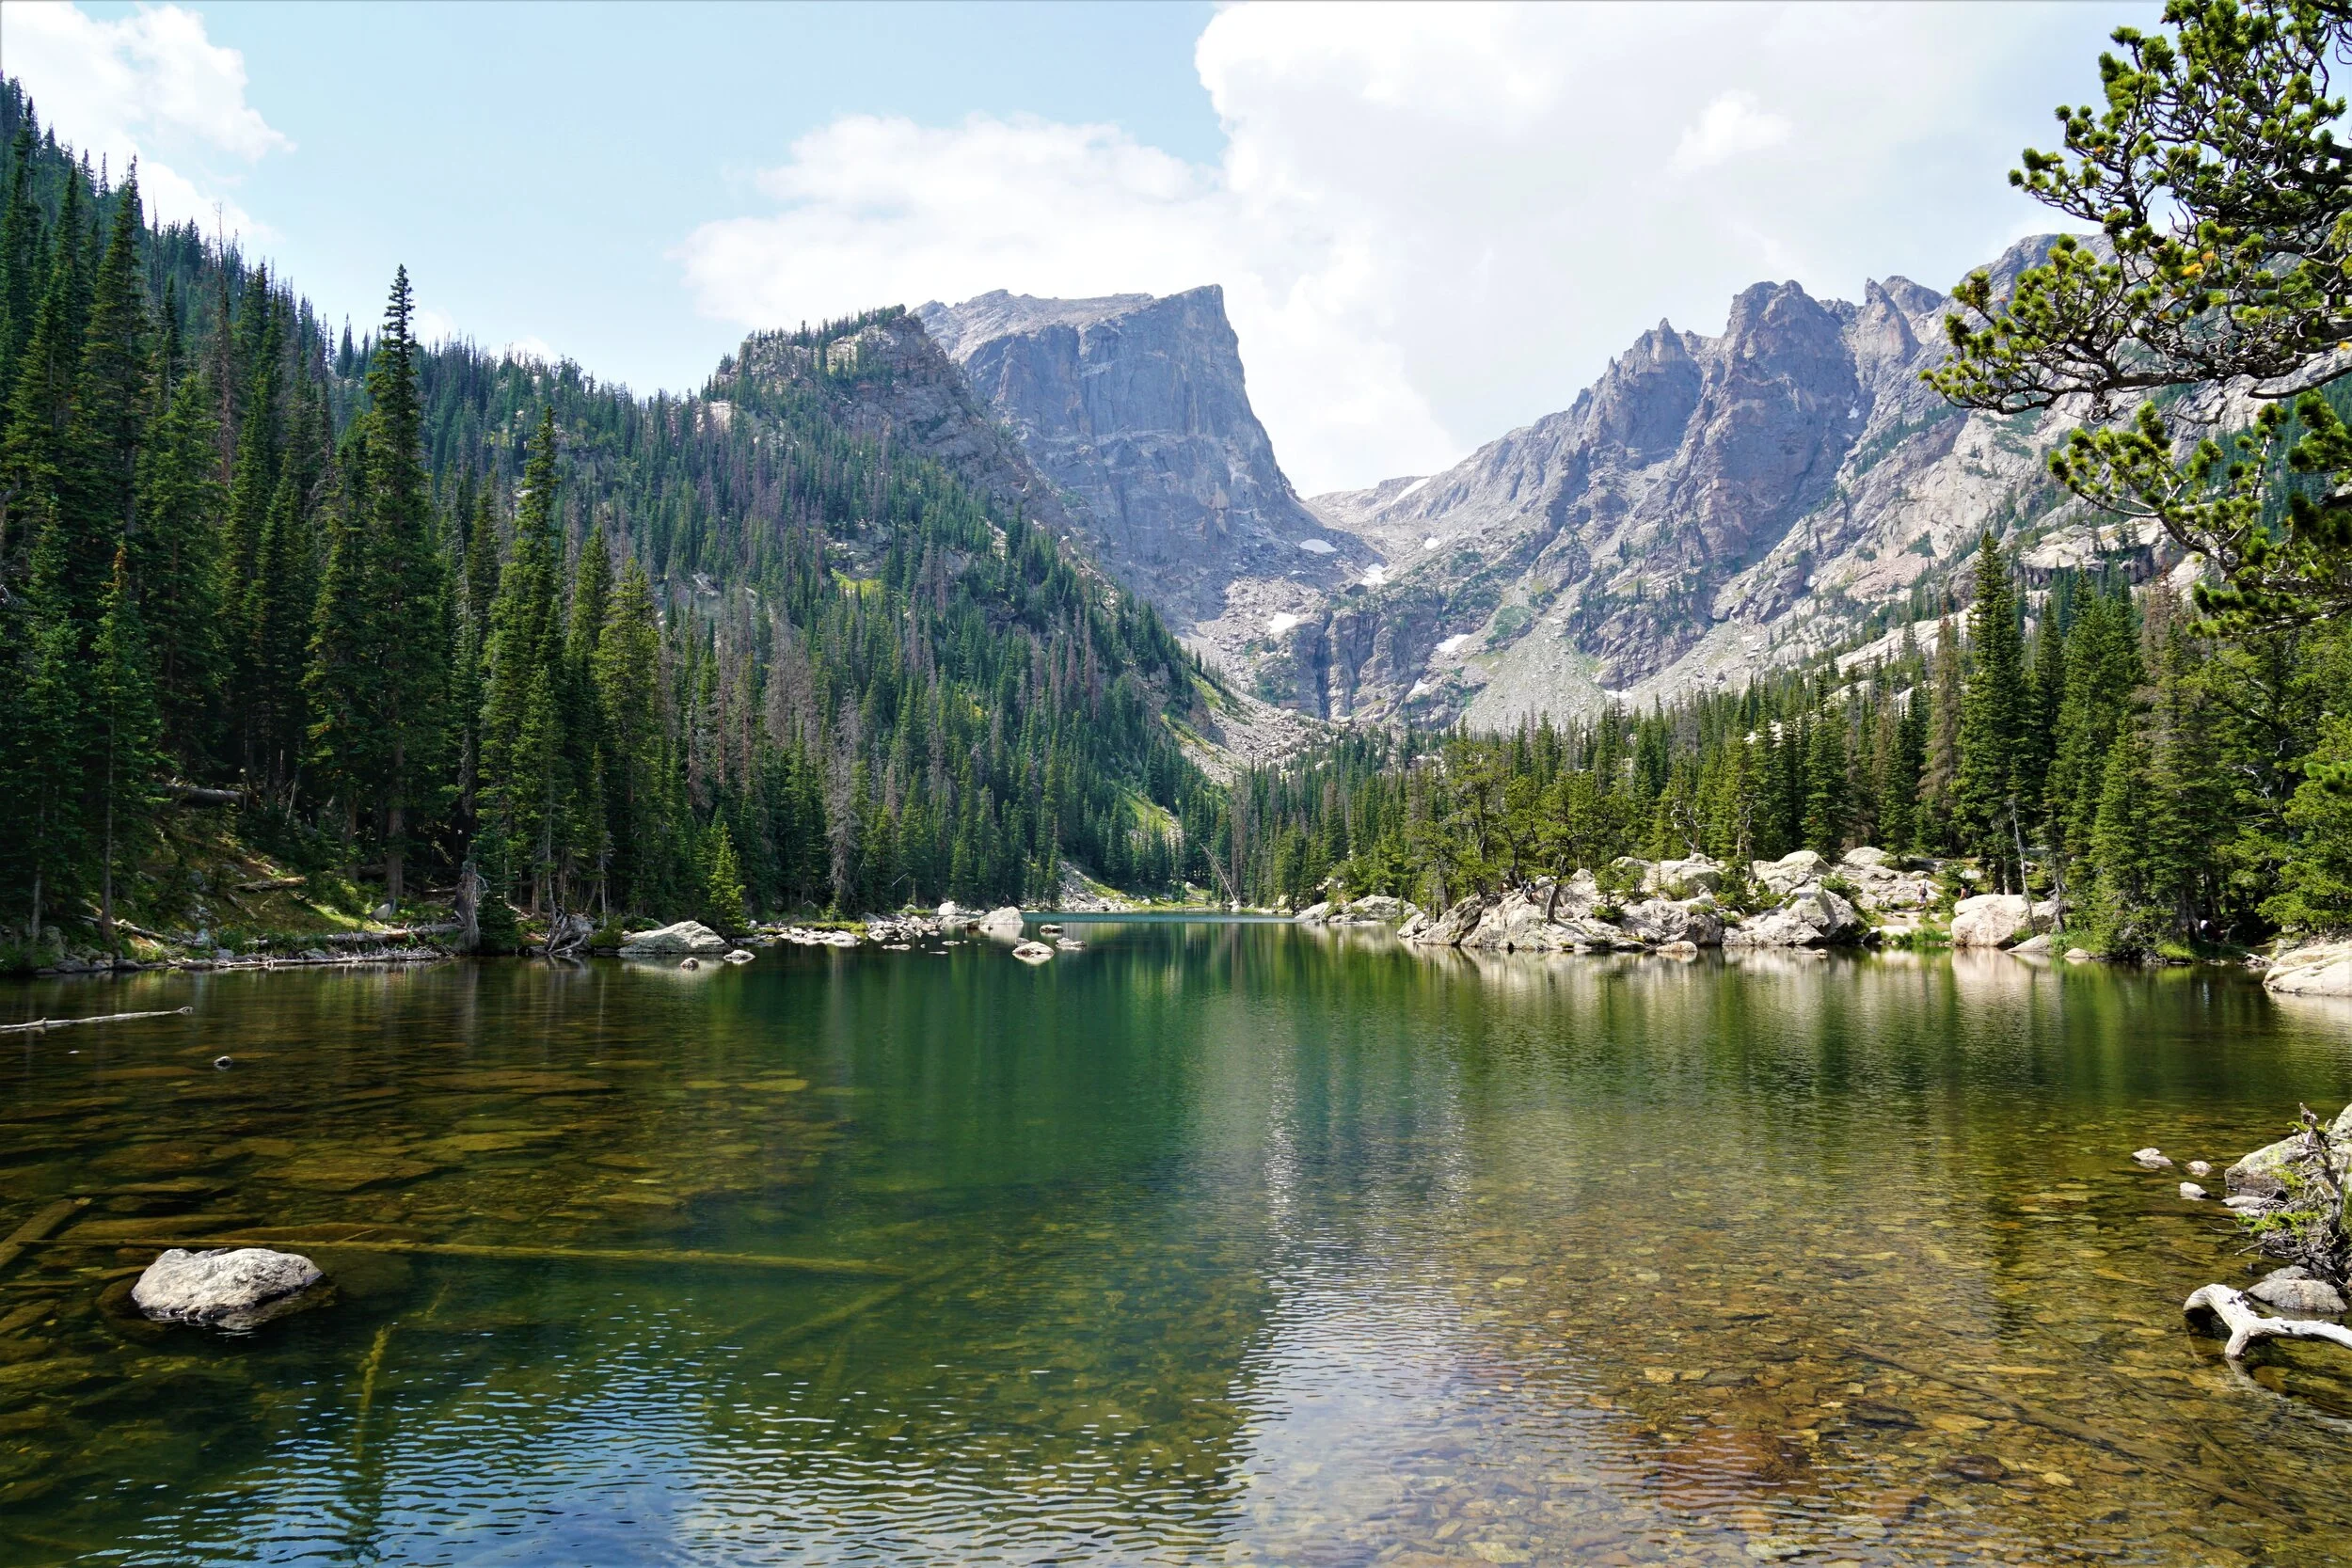
- Highlights: Nymph Lake, Dream Lake, Emerald Lake, big views toward Hallett Peak and Flattop Mountain
- Bathrooms: Typically at Bear Lake Trailhead. Do not expect restrooms at the lakes.
Expect a well-built, heavily traveled path. It is a great choice for visitors who want a “real” mountain hike without committing to an all-day summit. It is also a great choice for first-timers who want to learn how Rocky’s high-country weather and trail conditions can change by the hour.
Know before you go
- You still need a park entrance pass or fee. Timed entry (when in effect) is separate from your RMNP entrance fee or annual pass.
- Timed entry rules change. Always confirm the current setup for general park access vs Bear Lake Corridor access.
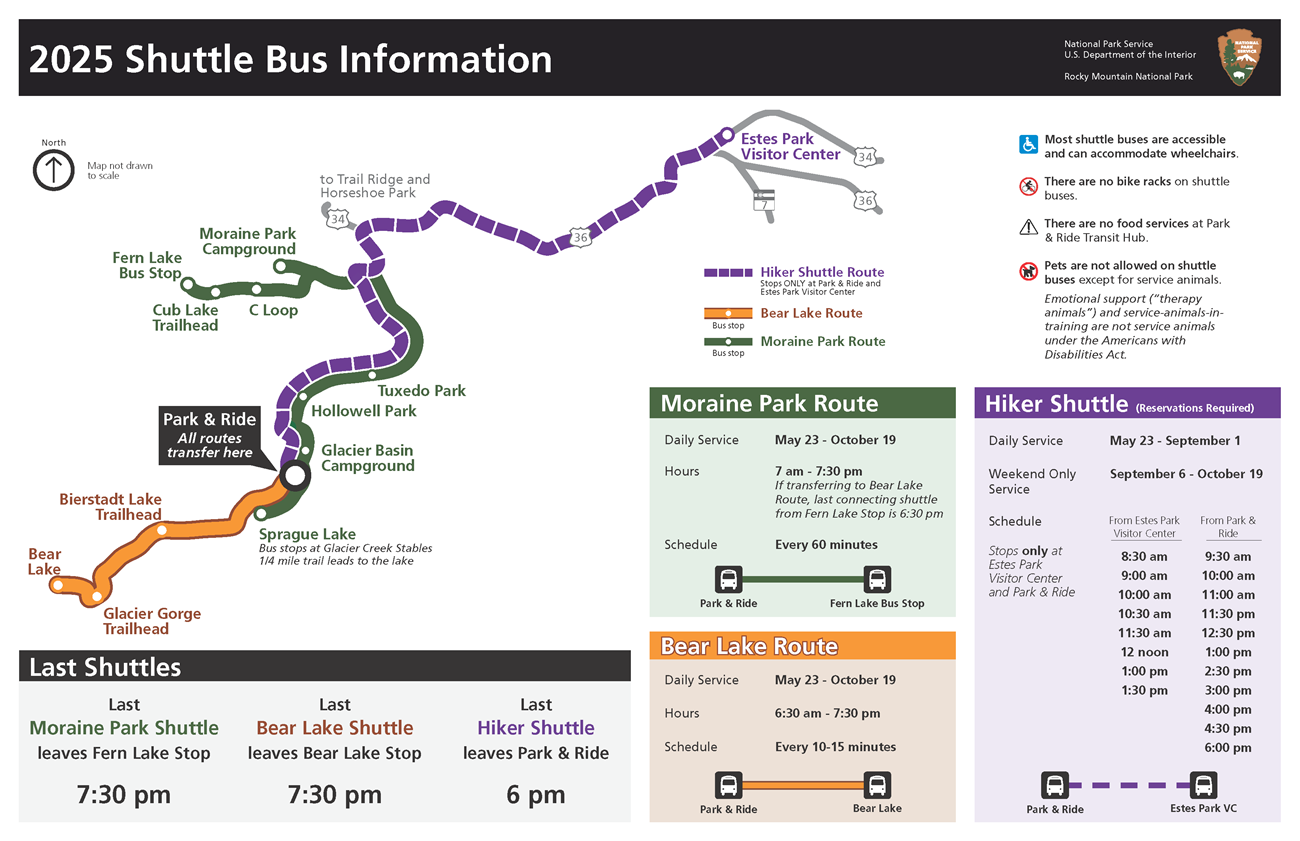
- Shuttle season dates vary. Verify where to park, which stop serves Bear Lake, and first and last shuttle times.
- Start early if you can. It solves 80 percent of the Bear Lake stress in one move.
Timed entry and what it means for Emerald
Rocky Mountain National Park often uses a timed entry reservation system during the busiest months. The details vary by year and season, so treat this as the strategy, not the fine print.
The practical takeaway
- Check the park’s current timed entry rules before you drive up. Rules can differ for general park access vs access that includes the Bear Lake Corridor.
- Remember: timed entry is not your entrance pass. You typically need both a reservation (when required) and a valid park entrance fee or pass.
- If you have a Bear Lake Corridor reservation, it makes the early morning experience dramatically easier.
- The shuttle sometimes helps, but it is not a guaranteed loophole. In some years, riding the shuttle to Bear Lake during timed-entry hours still required a Bear Lake Corridor reservation. Check the current rule for your dates.
My rule of thumb: if Emerald Lake is your must-do, plan around it first. Restaurants in Estes Park have backup options. Bear Lake parking does not.
Parking vs shuttle: how to choose
For Emerald Lake, your decision is really about stress tolerance and start time.
Option 1: Drive and park at Bear Lake Trailhead
This is the most direct and the most competitive option.
- Best for: Sunrise starts, shoulder season weekdays, travelers who want flexibility to hop between trailheads
- Downside: The Bear Lake lot fills early on summer and fall weekends, often very early
- Backup: If Bear Lake is full, you may be directed to other corridor lots or to use the shuttle system depending on operations
What I do: If I am aiming for a calm Emerald Lake experience, I arrive early enough that the parking part is boring. Boring is the goal.
Option 2: Use the park shuttle (when running)
The shuttle is built for this exact corridor. It is not fancy, but it is effective when parking is chaos.
- Best for: Mid-morning starts, busy summer days, anyone who hates circling lots
- Downside: You lose a bit of spontaneity and you should expect lines at peak times
- Pro tip: Build in extra time on both ends so you are not rushing the last shuttle back
Shuttle operations and routes can change year to year. Before your trip, confirm where you park for the shuttle, which stop serves Bear Lake, and approximate first and last shuttle times. Also confirm whether a Bear Lake Corridor reservation is required to ride to Bear Lake during your time window.
Option 3: Park lower and connect trails
If you snag parking at a lower corridor trailhead like Glacier Gorge or another nearby lot when Bear Lake is full, you can sometimes stitch together connector trails to reach the same general lake zone. This can be a great move for experienced hikers who enjoy route options, but it is not a simple shortcut. It adds mileage, can be confusing the first time, and it may not bypass access restrictions depending on current operations.
When ice sticks around (and when you need microspikes)
The Bear Lake Corridor sits high enough that winter habits linger. Even when Estes Park feels like spring, sections of the Emerald Lake Trail can stay icy where the trail is shaded, packed down, and refreezes overnight.
Microspikes vs boots: the honest answer
- Microspikes: Your best friend when the trail is hard-packed snow or slick ice. They make you faster, safer, and less stressed.
- Hiking boots: Great for dry trail, mud, and slush. Not enough on their own for firm ice.
- Trekking poles: Helpful year round, especially when the surface is uneven or you are stepping around icy patches.
Seasonal pattern to expect
- Late fall through early spring: Traction is often essential. Expect snowpack and ice.
- Spring shoulder season: The classic “dry in the sun, ice in the shade” setup. Bring spikes even if the first half mile looks fine.
- Early summer: Usually mostly dry, but snowfields can linger near Emerald in big snow years.
- After early storms in fall: A dusting can turn into a skating rink after foot traffic packs it down.
My packing philosophy for Emerald in shoulder seasons: microspikes live in the daypack. If I do not use them, no big deal. If I need them and do not have them, the hike becomes a slow-motion lesson in regret.
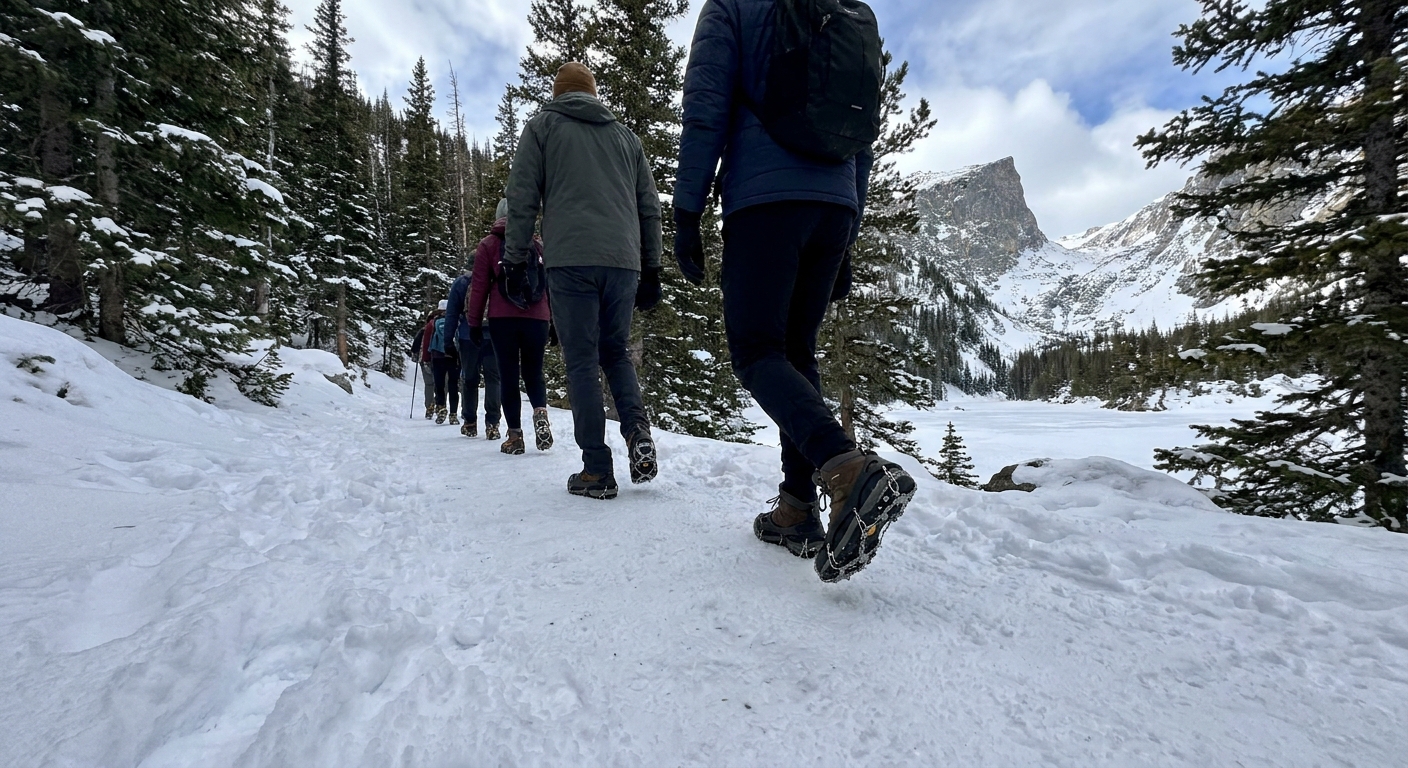
Quick safety note: afternoon melt can turn into evening refreeze. If you start late, you may hike up on slush and hike down on ice.
Crowds by time of day
Emerald Lake is popular because it is accessible, stunning, and a natural progression from Bear Lake. You can absolutely still have a peaceful experience, but timing is everything.
Early morning (best)
- Quieter trails and easier parking
- Calmer lake surfaces for reflections
- Cooler temperatures for the climb
Late morning to early afternoon (busiest)
- Heaviest foot traffic on the Nymph and Dream Lake sections
- More passing and stopping, especially on narrow spots
- Longer waits for shuttle lines during peak season
Late afternoon (often improves)
- Crowds can thin as day-trippers head out
- Watch the weather closely, especially in summer when storms can build
- Keep an eye on shuttle timing if you are relying on it
If you want Emerald Lake to feel like a mountain experience rather than a moving scenic overlook, aim for the earliest start you can realistically pull off.
Bear Lake cluster: a half-day plan
This is the secret to loving the Bear Lake Corridor: treat it like a cluster, not a single destination. Emerald is the headline, but Nymph and Dream are not just “on the way.” They are legitimately beautiful stops and perfect pacing points.
The classic plan (most people)
- Start at Bear Lake Trailhead and follow signs toward Nymph Lake and Dream Lake.
- Nymph Lake: Quick early reward and a nice warm-up stop.
- Dream Lake: Longer pause spot. Great for photos and a snack.
- Emerald Lake: Take your time, wander to different shoreline angles, and find a rock to sit on.
- Return the same way to Bear Lake.
If you have extra energy
You can make this half-day feel bigger without making it complicated:
- Add the Bear Lake loop: A short, easy stroll right at the trailhead area that is great for sunrise or softer evening light.
- Pair with a second corridor hike: If you have time and legs, consider another nearby trail after a break. Just remember that parking and shuttle timing can make “just one more hike” feel like two.
Time estimate: Many hikers finish the out-and-back to Emerald in 2 to 3 hours with stops. Add time for photos, crowds, icy footing, and shuttle waits.
Trail notes
The climb is steady but approachable. The busiest pinch points are typically between the first junctions and Dream Lake, where the trail funnels lots of people into a relatively narrow corridor.
- Footing: Packed dirt and rock in summer. Snow and ice are common in colder months.
- Navigation: Very straightforward, with clear signage
- Cell service: Spotty, do not count on it
- Altitude: You start near 9,500 feet and finish above 10,100 feet. Drink water early, keep your pace conversational, and do not be surprised if you feel a little more winded than you would at home.
If you are visiting from lower elevation, this is a great hike to practice the Colorado method: go slower than you think you need to, and you will actually go farther.
Weather note: summer afternoons can bring fast thunderstorms. If you hear thunder, turn around. The mountains do not negotiate.
Wildlife and Leave No Trace
Yes, you are in bear country. You are also in a very busy area, which means wildlife tends to keep its distance, but sightings happen.
Smart corridor habits
- No dogs on trails: Pets are not allowed on RMNP trails, including the Bear Lake Corridor. (They are allowed in a few specific areas like certain roads and campgrounds, but do not count on bringing a dog on this hike.)
- Carry snacks securely: Keep food in your pack, not open in your hands for long stretches.
- Do not feed anything: Not chipmunks, not birds, not “just a tiny piece.”
- Give wildlife space: Use your zoom lens, not your feet.
- Stay on trail: The lakeside areas are fragile and get loved to death quickly.
- Pack out everything: Including peels, crumbs, and tissues.
Sustainable travel here is not complicated. It is just consistent: fewer shortcuts, less noise, and no trace left behind for the next person trying to fall in love with Emerald Lake.
What to pack
This is a short hike, but it is still Rocky. Conditions can flip fast.
- Water: At least 1 liter per person, more if it is hot or you are not acclimated
- Layers: A light insulating layer and a rain shell in summer
- Sun protection: Hat, sunglasses, sunscreen. High elevation sun is not polite.
- Traction: Microspikes in shoulder season and winter
- Poles: Optional, but very helpful on snow, ice, or if you have sensitive knees
- Snacks: Something you actually want to eat at altitude
If you are hiking in summer, start earlier than you think you need to. If you are hiking in winter or spring, pack traction even if the trailhead looks dry.
Quick itinerary
- Arrive early or commit to the shuttle and add buffer time.
- Bring microspikes if there is any chance of ice, especially in spring and fall.
- Hike to Emerald via Nymph and Dream, and plan for real stops.
- Turn around if weather builds. Peaks love to make their own plans.
- Finish with a town reward in Estes Park: coffee, a warm meal, and that satisfied “I actually did it right” feeling.
Emerald Lake is popular, yes. But with the right timing and a little traction insurance, it still delivers the quiet, high-country beauty you came for.