Zion Canyon Overlook Trail
Canyon Overlook is the Zion hike I recommend when you want a blockbuster view without committing to a half day mission. It is short, it is stunning, and it is the most logistically tricky “easy” hike in the park because parking is a competitive sport. If you plan the approach like a local and hike it with calm, cliff-smart etiquette, it can be one of the best 60 to 90 minutes you will spend in Zion.

Quick facts
- Distance: about 1.0 mile round trip (sources vary slightly)
- Time: 30 to 60 minutes moving time, 60 to 90 minutes with photos and crowd waits
- Elevation: about 150 to 200 feet of gain (often listed around 160 to 200)
- Trail type: out and back
- Difficulty: easy to moderate, mainly because of footing and exposure near edges
- Location: East side of Zion Mount Carmel Tunnel on UT-9
- Restrooms: a vault toilet is usually available at the main Canyon Overlook parking lot just outside the tunnel (lines happen and supplies can run out)
Good to know: Canyon Overlook is outside the Zion Canyon Scenic Drive shuttle zone. You can usually drive to it year round, but UT-9 can back up near the tunnel and winter storms can cause temporary closures or traction requirements. Check current conditions if weather is in play.
Where to park near the tunnel
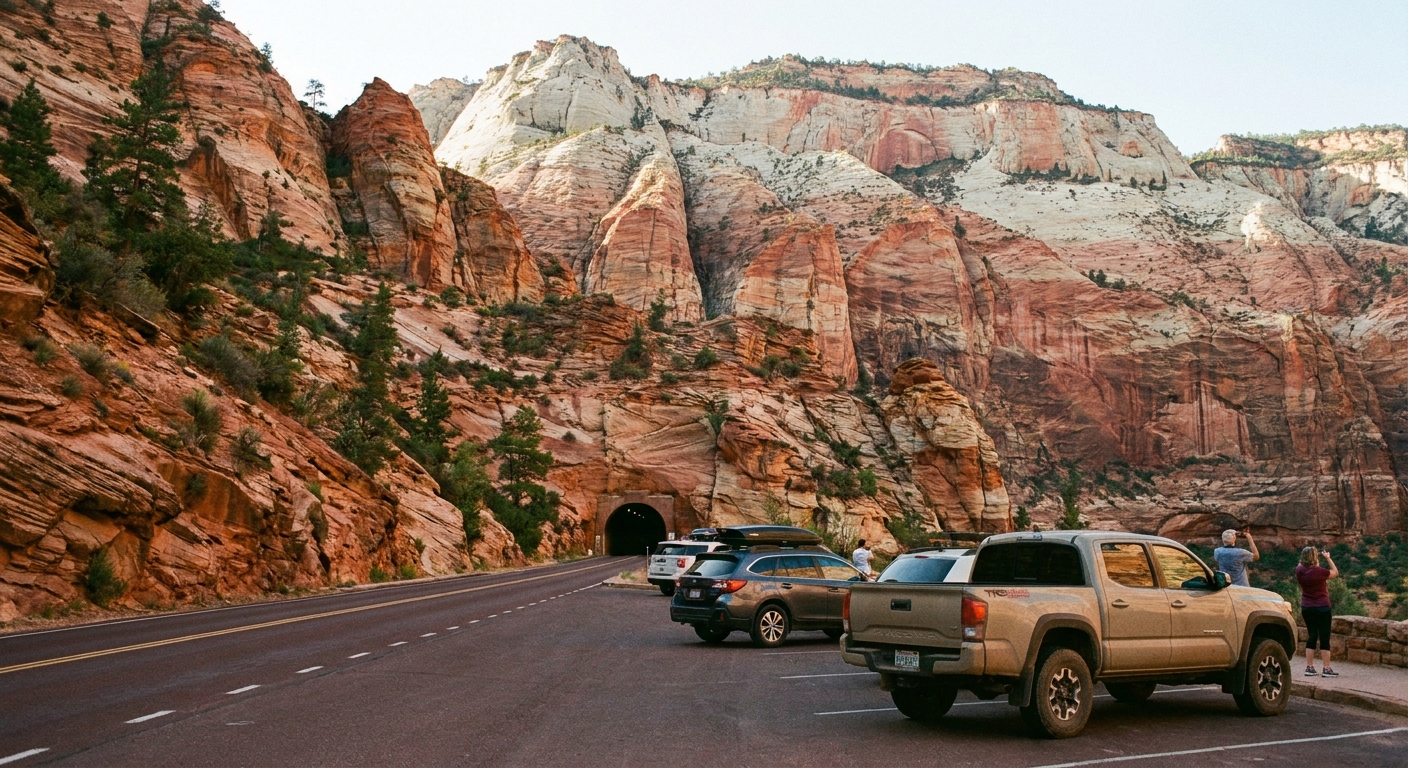
The trailhead is immediately after you exit the Zion Mount Carmel Tunnel heading eastbound (coming from Springdale and the main canyon). Parking is the whole game here.
Primary parking: Canyon Overlook lot (east side)
This is a small signed pullout on the right shortly after the tunnel. It fills very early, often by mid-morning in peak season. If you see an open spot, take it. Circling back is stressful and can be risky on UT-9.
Overflow option: pullouts farther east
Continue east on UT-9 and you will find a few legal pullouts. These can work, but you must be honest about what is safe and legal. Zion enforces parking rules, and ticketing or towing is possible.
- Only park where the shoulder is clearly signed or wide enough and your entire vehicle is off the travel lane.
- Do not park in no-parking zones near blind curves, tunnel approaches, or narrow shoulders.
- Expect a longer walk along the road if you park farther out. Keep kids close and use the roadside walking time as your “focus moment” before the fun part.
Coming from the east (Kanab side)
If you are driving westbound toward the tunnel, you will pass the trailhead pullout on your left before entering the tunnel. Turning around is limited. The safest plan is to continue to a designated area where you can legally turn around, then approach again eastbound. This is one reason I prefer doing Canyon Overlook as your first stop of the day if you are staying in Springdale.
Finding the trailhead
Look for the signed “Canyon Overlook Trail” pullout on the right, immediately after the east tunnel exit. If you hit the next switchbacks heading toward Checkerboard Mesa, you have gone too far.
Fees and tunnel notes
Entrance: Access via UT-9 through Zion requires a Zion National Park entrance pass or fee. If you are coming from the east and entering the park corridor, you still need to be fee-ready.
Tunnel restrictions: Oversize vehicles and trailers have restrictions in the Zion Mount Carmel Tunnel and may require special procedures or may not be allowed at certain times. If you are in an RV, towing, or driving something wide or tall, check the current Zion tunnel rules before you commit.
Best times to beat the crowds
This trail is popular because it is short, accessible, and delivers a signature Zion view. The only reliable crowd strategy is timing.
- Best overall: sunrise and the first 60 to 90 minutes after. Parking is easiest, temperatures are cooler, and the canyon glows.
- Also good: late afternoon into early evening, especially in shoulder seasons. You will still share the viewpoint, but turnover is steady.
- Most crowded: roughly 9:30 am to 3:30 pm. This is when families, tour itineraries, and “quick hike” planners all arrive.
Seasonal note: In summer, heat plus tunnel traffic can make midday feel more intense than the distance suggests. In winter, icy patches can appear in shaded sections. If there is snow or ice, traction devices can be the difference between a relaxed stroll and a tense shuffle.
What the trail is actually like
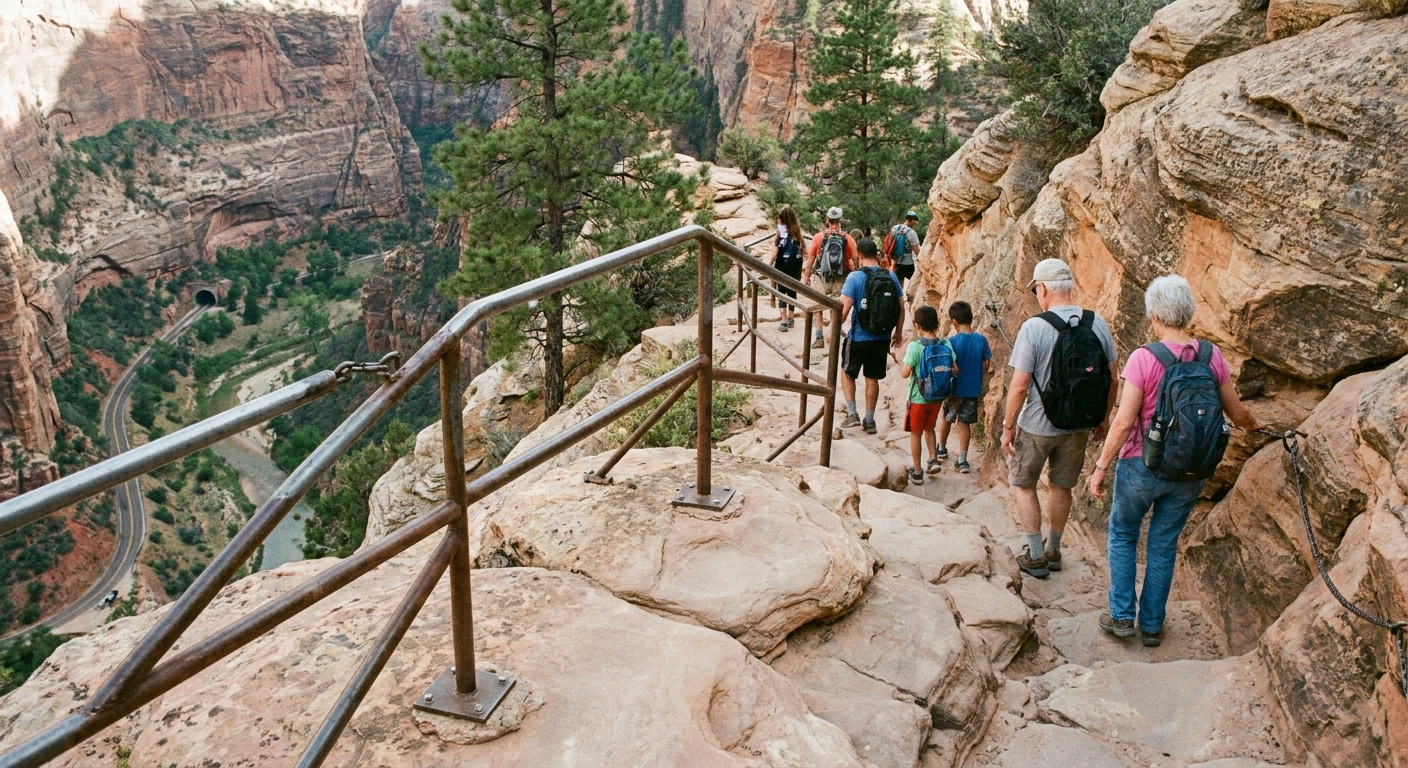
Canyon Overlook is not a groomed park path the whole way. It starts with a short climb, then moves along a mix of packed dirt, slickrock, and stone steps. You will pass a shallow overhang and a few narrow sections with drop-offs. Some areas have railings, but not everywhere you might wish they did.
The most memorable little feature is the short wooden plank bridge or boardwalk section that hugs the cliffside. It is quick, photogenic, and a good reminder to slow down and keep your footing.
Key features
- Rock steps and uneven footing that can trip little hikers or anyone distracted by the view
- Short exposed stretches where the trail is narrow and you want to let faster groups pass calmly
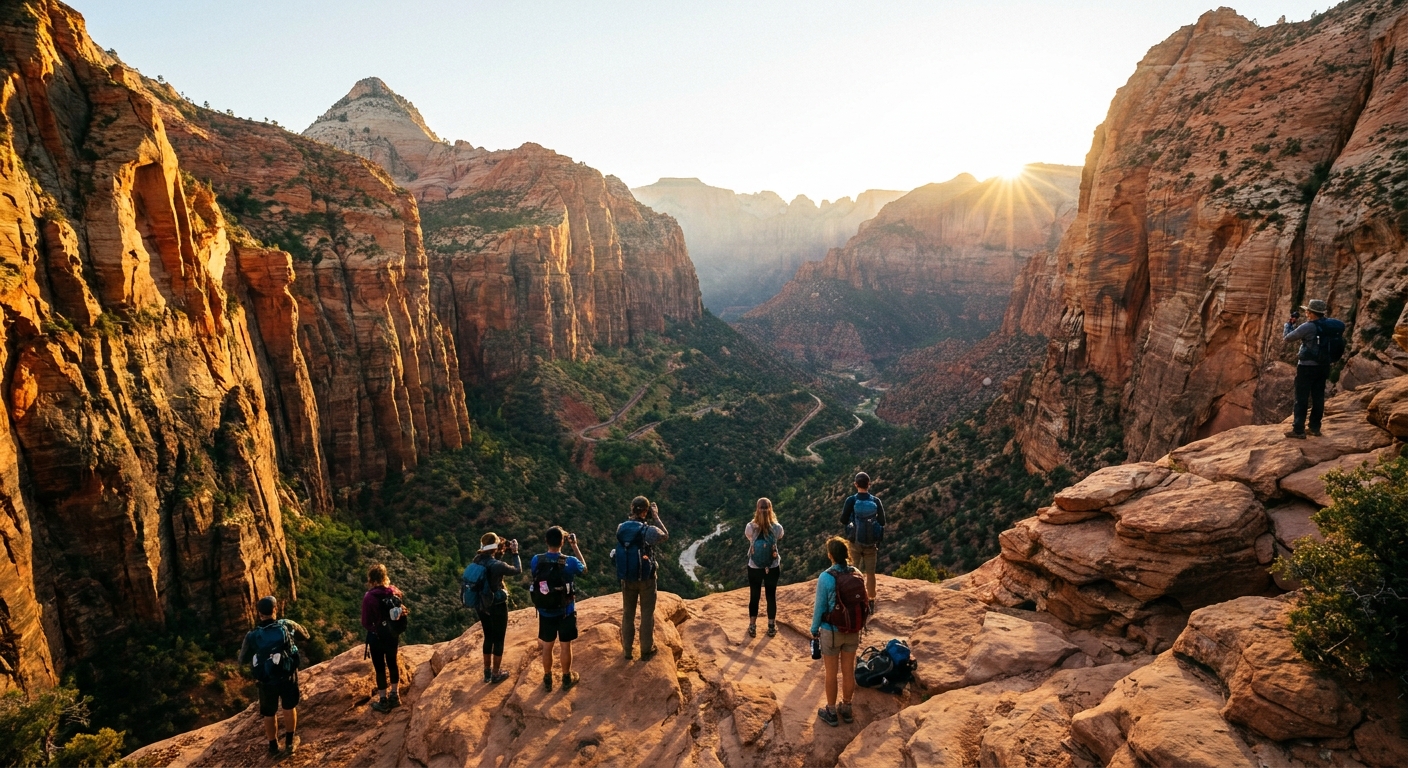
- A wide viewpoint area at the end with multiple photo angles and cliff edges
And yes, the payoff is specific: you are looking out over lower Zion Canyon with the road and the Great Arch area below, plus big Navajo sandstone walls stacking into the distance. It feels like a front-row seat into the canyon.
My personal rule here is simple: treat it like a short mountain trail, not a sidewalk. Closed-toe shoes, hands free, and attention on the ground when you are moving.
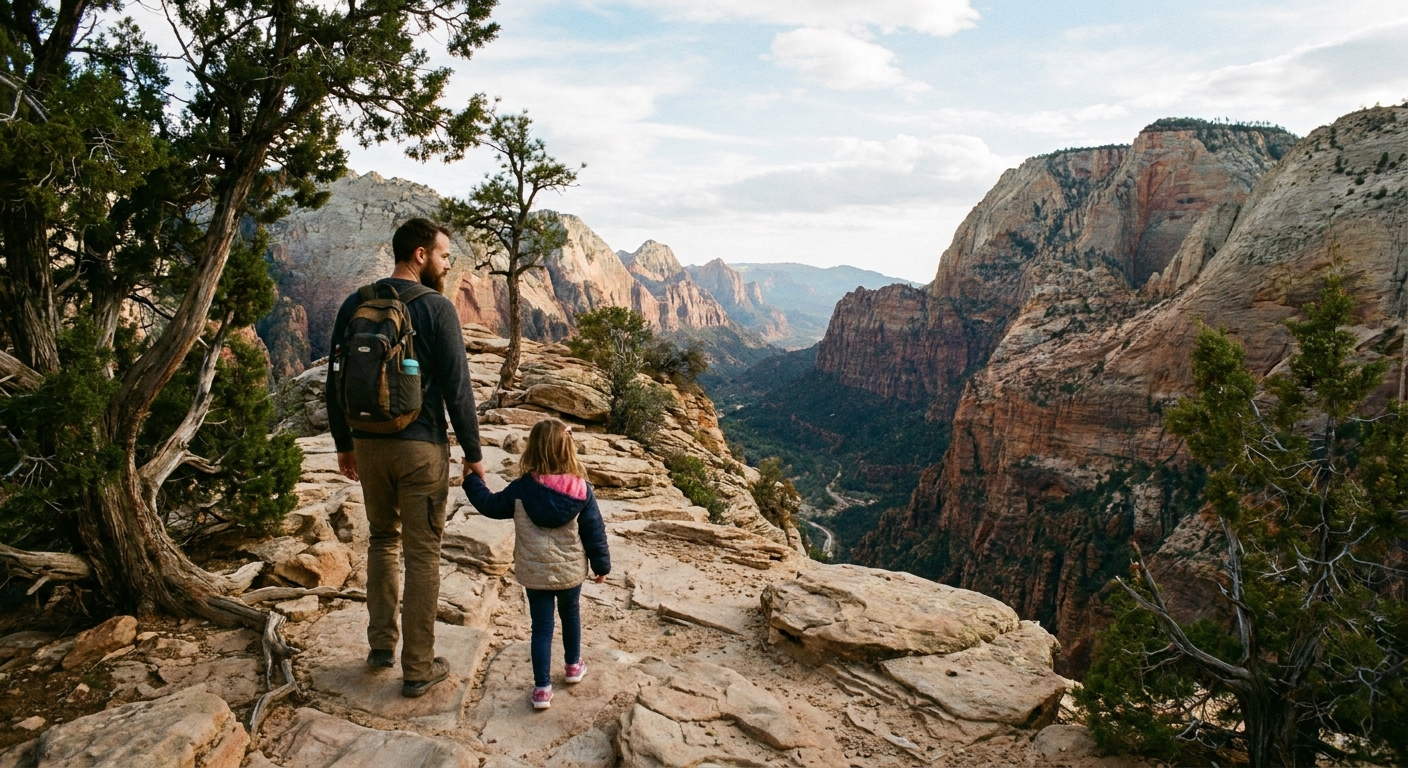
Families and kids
Yes for many families, but it depends on your child’s trail behavior and your willingness to turn around early. This is not a stroller trail, and it is not the place for kids who love sudden sprints or edge peeking.
Best age range
- Confident walkers (often 5+): usually great with close supervision
- Toddlers: doable if carried in a structured carrier and you are comfortable with narrow spots
- Babies: fine in a carrier, but be extra mindful of your balance on steps and slickrock
Family tips
- Use a hand rule: in narrow or exposed sections, kids hold an adult’s hand or a backpack strap. No exceptions.
- Snack before the viewpoint: hungry kids at the rim is the fastest way to rushed decisions.
- Skip the edge: the best family photos often happen a few steps back where everyone can relax.
- Plan your “yes” and “no” zones: pick specific places where kids can explore rocks safely, and places where they must stay centered on trail.
If you are on the fence: consider doing Canyon Overlook early, then choose a lower-exposure family hike in the main canyon after, like Riverside Walk.
Accessibility
This trail is not wheelchair accessible. Expect stairs, uneven slickrock, narrow tread, and short sections with exposure. If anyone in your group needs a smooth surface and consistent width, choose a paved option like the Pa’rus Trail or Riverside Walk instead.
Turnaround points
You do not have to reach the final overlook to get a great experience. If crowds, wind, or kid energy are not matching the terrain, these are smart places to stop.
- After the initial climb: you get a first taste of views and can decide if the exposure feels manageable.
- At the overhang area: a natural rest spot with shade at certain times of day.
- Before the narrowest sections: if you can see a tight stretch ahead and feel your group tense up, that is your signal.
Turning around is not “missing it.” It is good mountain judgment, especially with kids or anyone uneasy around heights.
Cliff-edge etiquette
Canyon Overlook’s viewpoint is a shared space. The best experiences happen when everyone acts like the rim is a place to breathe, not a place to prove something.
On the trail
- Yield on narrow sections: step to a stable spot and let others pass, especially if they are moving faster.
- Keep your group tight: do not spread across the whole trail when others need to pass.
- Stay on the established path: shortcuts damage fragile desert soils and widen the trail edges.
At the overlook
- Give the edge space: if someone is visibly nervous, do not crowd them from behind for a photo.
- Watch wind gusts: Zion can kick up sudden wind at the rim. Hats and loose items can go flying, and so can balance.
- Photo turns: take your shot, then step back. Let the viewpoint flow.
- No rock throwing: it is dangerous, loud, and it is not the vibe.
- Do not climb out on ledges for photos: the view is still elite from safer rock.
My favorite overlook habit is the “two steps back rule.” If you take two steps back from the rim, you can still see everything and you can actually enjoy it.
How it compares
If you are choosing between Zion’s headline hikes, here is the practical risk profile difference.
Canyon Overlook
- Exposure: short, intermittent. Some railings, but not continuous.
- Consequences: cliff edges exist, especially at the viewpoint.
- Effort: low mileage, quick climb.
- Best for: visitors with limited time, families with solid supervision, photographers, and anyone who wants big views without a big day.
Angels Landing
- Exposure: sustained and intense on the chain section, with steep drop-offs on both sides.
- Permit: required for the final chain-assisted ridge.
- Crowd dynamic: two-way traffic on chains can feel stressful even for confident hikers.
- Best for: experienced hikers comfortable with heights who have a permit and want a true adrenaline-and-icon view.
Observation Point (when routes are open)
- Exposure: generally lower on East Mesa style approaches, more of a steady hike than a cliff-edge scramble.
- Effort: longer and more time-committing than Canyon Overlook, often hot and exposed to sun depending on route.
- Payoff: huge views down on Angels Landing from above, with more space to spread out.
- Best for: hikers who want a longer, quieter viewpoint day and can handle distance and sun management.
The simple takeaway: Canyon Overlook has brief exposure in a short package. Angels Landing concentrates exposure into a famous, high-commitment section. Observation Point is typically more about endurance and heat than hands-on exposure, depending on route conditions and access.
What to pack
This is a carry-on-only kind of hike. Light, intentional, and ready for the desert.
- Water: at least 0.5 to 1 liter per person, more in summer
- Footwear: closed-toe with grip. Skip slick sandals.
- Sun protection: hat, sunglasses, sunscreen
- Traction (winter or shoulder season storms): microspikes if ice is present
- Kid add-ons: snacks, a small layer, and a plan for carrying if they melt down
Weather note: In monsoon season, storms can build fast. If you hear thunder, get away from the rim and exposed slickrock and head back.
Sustainability note: pack out every crumb and peel. Zion’s wildlife learns fast, and so do the ravens.
Sample plans
Plan A: the easy win
- Arrive at the tunnel area near sunrise.
- Park in the signed Canyon Overlook pullout if available.
- Hike to the viewpoint, enjoy the light, then be back at your car before the mid-morning rush.
Plan B: midday reality check
- Drive to the trailhead and do one loop past the pullout only.
- If no legal spot appears, continue east to the next legal pullout.
- If shoulders are full, skip it and come back later. Do not invent parking.
FAQ
Is Canyon Overlook Trail scary?
It can be for anyone uncomfortable with heights. The exposure is not constant, but it is real in a few spots and at the viewpoint. If you stay centered on trail and keep a respectful distance from edges, many people find it manageable.
Can I bring a dog?
No. Like most Zion trails, Canyon Overlook does not allow pets. Service animals are the exception. If you need a pet-friendly walk, the Pa’rus Trail is the classic in-park option for leashed pets.
Do I need the Zion shuttle?
No. This trail is on UT-9 by the tunnel, outside the shuttle-only scenic drive. You access it by driving.
Is it worth it if I only have one hour?
Yes, if you can park legally without wasting most of that hour circling. If parking is a mess, your best one-hour alternative inside the main canyon is usually Riverside Walk.
Final thoughts
Canyon Overlook is Zion in miniature: massive scenery, tight logistics, and a little exposure that asks you to be present. Go early, park legally, keep kids close, and treat the rim with the same respect you would on a big mountain route. You will walk away with the kind of view that makes the rest of your trip feel sharper and more vivid.